
автордың кітабын онлайн тегін оқу Indoor and Outdoor Recreations for Girls
RECREATIONS FOR GIRLS

Indoor
and
Outdoor
RECREATIONS FOR GIRLS
BY
Lina Beard
and
Adelia B. Beard
New York
Charles Scribner's
Sons
1914
Copyright, 1904, 1906, by
CHARLES SCRIBNER'S SONS
SPECIAL NOTICE
The publishers hereby give warning that the unauthorized printing of any portion of the text of this book, and the reproduction of any of the illustrations or diagrams, are expressly forbidden.
EXPLANATORY NOTE TO NEW EDITION
Since the publication of this volume two years ago as "Handicraft and Recreation for Girls," it has occurred to us that "Recreations" alone much more accurately defines the contents, for the handicrafts represented are only those that in effect are recreations. Therefore we have thought it best to drop the word Handicraft and issue the new edition under the more appropriate title, "Recreations for Girls."
Lina Beard
Adelia B. Beard.
September, 1906.
PREFACE
This book, like a girl's life, is divided into two parts: occupation and amusement, or handicraft and recreation.
It is not equally divided, for handicraft is so much more like play than work, and is so entertaining in itself, we find difficulty in drawing a distinct line between that and recreation. The one insists upon blending with the other and the book, after all, is a book of entertainment.
With the old handicrafts coming back into favor and new ones constantly being brought forward, a girl's life may be full of delightful employment. To work with joyous enthusiasm and self-reliant energy, as well as to play with light-hearted enjoyment, cannot fail to make her sensible, wholesome, and happy, and it is with this end in view that we have written and illustrated the book. Our wish is to help our girl friends to make the most of their girlhood and to enjoy it to its fullest extent.
We have had practical experience in the actual working out of all the various handicrafts and recreations, and therefore give only that which we know can be well and easily done by the average girl.
Thanks are due to the Delineator, Harper's Bazar, Woman's Home Companion, and Good Housekeeping, for their courtesy in promptly returning for this work the original drawings and material used in their respective magazines.
The Author.
Flushing, August 2, 1904.
CONTENTS
PART I
HANDICRAFT
CHAPTER I.
PAGE Spinning 3The Spinning-Wheel, 4; The Spindle, 5; The Distaff, 7; Thoroughly Cleaned, 8; The Band, 8; To Adjust the Band, 9; The Flax, 10; Practice, 11; How to Spin, 12; When the Thread Breaks, 12.
CHAPTER II.
Weaving on a Home-made Loom 15The Pin Loom, 16; The Heddles, 17; The Shuttle, 19; To Adjust the Warp, 19; The Woof, 20; How to Weave a Miniature Navajo Blanket, 20; Blankets for Dolls' Beds, 26.
CHAPTER III.
A Ball of Twine and What May Be Made of It 27Making a Little Hammock, 27; How to Tie the Twine, 29; A School-Bag, 31; Twine Curtains, 34.
CHAPTER IV.
An Armful of Shavings, and What to Do with Them 36Selecting the Shavings, 36; A Soft Little Basket, 36; How to Prepare the Shavings, 37; How to Weave the Shavings, 39; Bind the Edges, 40; The Handle, 40; A Handkerchief Case, 41.
CHAPTER V.
Primitive Reed Curtains 43The Reeds, 43; Raw Material, 43; The Twine-Stick Weave, 44; The Finished Curtain, 46; Curtain-Bee Frolic, 48; Door-way Screens, 49.
CHAPTER VI.
Things to Make of Common Grasses 53A Grasshopper House, 53; A Doll's Hammock, 56; A Bouquet-Holder, 58; Weaving a Napkin-Ring, 59.
CHAPTER VII.
Possibilities of a Clothes Line 62Adapted to Decoration, 62; Rope Wood-Basket, 62; Rope Net Fringe, 65; The Tassels, 65.
CHAPTER VIII.
How to Weave a Splint Basket 68The Material, 68; The Spokes, 68; The Weavers, 70; Weaving the Basket, 71; Binding Off, 71; Trimming, 73.
CHAPTER IX.
Modelling in Tissue-Paper 75Modelling a Chicken, 75; A Turkey, 81; The Sturdy Little Elephant, 83.
CHAPTER X.
Nature Study with Tissue-Paper 86All Flowers from Squares and Circles, 86; The Best Models, 86; Material, 87; The Carnation, 87; How to Cut a Circle, 88; The Morning-Glory, 94; The Daffodil, 99.
CHAPTER XI.
A New Race of Dolls 103Dolls of Substance and Form, 103; The Paper, 104; Making the Head, 104; The Arms, 105; The Body, 105; The Legs, 106; The Feet and Shoes, 107; Doll's Hair, 106; The Dress, 108; The Cap, 110.
CHAPTER XII.
An Indian Encampment on a Pastry-Board 111The Ground, 111; The Wigwam, 112; Decorating the Wigwam, 114; The Fire, 114; The Doll Indian, 115; The War Head-Dress, 116; A Travois, 118; Pipe of Peace, 119; A Perfect Little Tomahawk, 120; The Chieftain's Shield, 120; Arrow-Heads and Arrows, 122; A Bow That Will Shoot, 124; The Doll Squaw, 125; Squaw's Chamois Gown, 125; Primitive Loom and Navajo Blanket, 125; Papoose, 130; Cradle for Papoose, 130; Indian Money, 131; Wampum Necklace, 131.
CHAPTER XIII.
A Toy Colonial Kitchen with Fac-simile Colonial Furnishings 133The Floor, 135; The Fireplace, 138; A Hair-pin Crane, 138; Little Dutch Oven, 139; Two Andirons, 141; The Fire, 142; Iron Pot, 143; The Peel, 144; The Toaster, 144; Pot-Hooks, 145; The Spinning-Wheel, 147; The Little Spinner, 150; The Costume, 150; Flint-Lock Rifle, 151; The Bellows, 153; Colonial Pewter Dish, 154; Grandfather's Clock, 155; Colonial Churn, 160.
CHAPTER XIV.
Little Paper Houses of Japan 162How the People Live, 162; The House, 162; The Floors, 167; The Fence, 168; The Gateway, 169; Birthday Festivals, 169; The Koi, 171; A Kago, 172.
CHAPTER XV.
Some Odd Things in Russia 175The Coronation Cathedral, 175; Door-way, 177; Cupolas, 178; A Russian Peasant Doll, 180; A Little Samovar, 182.
CHAPTER XVI.
Pottery Without a Potter's Wheel 185Primitive Pottery, 185; The Clay, 187; Moulded on Baskets, 187; The Table, 188; The Roll, 189; To Coil the Clay, 189.
CHAPTER XVII.
Baby Alligators and Other Things of Clay 193The Head, 195; The Body, 196; The Tail, 196; Coat of Armor, 197; The Legs and Feet, 198; A Banana, 201; A Little Bust of Washington, 202.
CHAPTER XVIII.
Funny Little Apple Toys 206The Porcupine, 206; Sally Walker's Head, 208; Sally's Curls, 208; The Indian, 209; A Comical Little Jap, 211; An Apple Tower, 214.
CHAPTER XIX.
Marvel Pictures 215Mary, 215; Her Dress, 217; Sun-Bonnet, 218; How to Draw the Lamb, 219; How to Make the Wool Grow, 219; How to Draw the Goose, 221; How to Feather the Goose, 223.
PART II RECREATIONCHAPTER XX.
Egg Games for the Easter Holidays Lifting for Pasch Eggs 227How to Prepare the Egg-Shells, 227; Hanging the Eggs, 228; The Players, 228; The Lifting, 229; The Egg Dance, 230; Placing the Eggs, 230; Dividing the Players, 230; The Dance, 230; The Reward, 231; Easter Angling, 231; Materials for the Game, 231; Fish-poles, 231; Eggs, 232; Rules of the Game, 234; Table Egg-Rolling, 235.
CHAPTER XXI.
May Day Amusements 237How the May King and Queen Are Chosen, 237; Archery, 237; The Bows, 238; Arrows, 238; Floral Target, 240; Keeping Score, 243; May Baskets and Spring Flowers, 246; How to Erect the Pole, 249; Dressing the May-Pole, 250; The Balls, 252; The Game, 252.
CHAPTER XXII.
Hallowe'en Revels 254Gold Nuggets, 254; The Mine, 255; The Miners, 255; The Apple Witch, 256; Witch's Hair, 257; Hat, 257; Broom, 258; Ghost Writing, 259; Four-Leaved Clover, 260; Apple-seed Fortune Telling; 261; Fortune Bags, 262.
CHAPTER XXIII.
The Magic Cloth and What It Will Do 264Magic in India, 264; A Jumping Frog, 264; The Hungry Birds, 267; To make the Children Talk, 268; Moving Faces, 269; The High Note, 270.
CHAPTER XXIV.
Finger Plays for Little Folk 273The Teeter, 273; Church, 275; Steeple, 275; Open Door, 276; The People, 276; The Preacher, 277; Man Chopping Wood, 277; My Mother's Knives and Forks, 279; My Father's Table, 280; My Sister's Looking-Glass, 280; The Little Black Birds, 280; The Baby's Cradle, 281; Chin Chopper Chin, 282; Build the Tower, 282; The Five Little Pigs, 285; Little Heads for Little Fingers, 285.
CHAPTER XXV.
How to Arrange Fresh Flowers 289Selecting the Flowers, 289; A Number of Nasturtiums, 290; Do not Crowd the Flowers, 290; Green Leaves with Flowers, 291; Color Schemes, 291; The Vases, 292; Colorless Transparent Vases, 292; Arrangement, 293; Flower Lifter, 294; Symmetry, 295; Wild Flowers, 295.
CHAPTER XXVI.
Open Air Playhouses 298A Florida Playhouse, 298; Palm Decorations, 298; Other Decorations, 298; An Umbrella Playhouse, 299; A Real Teepee, 302; An African Hut, 306; The Floral Tent, 307.
CHAPTER XXVII.
Keeping Store 308The Counter, 308; The Scales, 309; Groceries, 312; Vegetables, 312; Candy, 313; Wrapping Paper, 313; Money, 314; Paper Pocket-Books, 314; Keeping Accounts, 316; Bars of Soap, 319; Butter Clay, 319.
CHAPTER XXVIII.
A Frolic with the Roses 320Beauty of the Rose, 320; Rose Petal Fleet, 321; Green Leaf-Boats, 322; The Lake, 323; A Little Rose Girl, 325; A Garden, 325; A Peachblow Vase, 327; Candied Rose Petals, 327; Rose Petal Cap, 328; Conventional Designs, 330; A Wreath of Roses, 332; A Rose Book, 332.
CHAPTER XXIX.
A Straw Ride Picnic 333The Season, 333; Games for the Wagon, 333; Simon Says, 335; Bird Wish, 337; Lines to Be Recited Rapidly, 337; At the Grounds, 338; Chasing the Deer, 338; The Swing, 338; Teeter-Tarter, 338; The Dinner, 339; Dishes, 339; Camp-Fire, 342; After Luncheon, 342; Telling Stories, 343; Game of Menagerie, 343.
CHAPTER XXX.
A Paper Chase 345The Hares and Hounds, 345; The Start, 347; False Scents, 347; The Finish, 348; How to Dress, 348.
PART I
HANDICRAFT
All the old handicrafts are coming back again, and ere long we shall be as proud as the maids in Revolutionary times of our hand-spun and hand-woven fabrics. To be able to spin and weave is to be accomplished in the newest as well as the oldest of household arts.
In the two uprights of the spindle-frame there must be leather rings like Fig. 4, one ring in each upright. The narrow strip extending outward from the ring is pushed through the hole in the upright, and the edge of the ring fitted into the little grooves just above and below one of the holes (Fig. 5). These two leather rings hold the ends of the spindle, which can be easily taken out and put in by bending one of the rings backward or slightly turning one of the uprights. Fig. 6 shows the spindle with the spool, or bobbin, and the small, double-grooved wheel. The spindle proper is simply the metal rod and horseshoe-shaped piece of wood with its two rows of little hooks or teeth. Besides the wheel and spindle there must be
These are all the parts of the spinning-wheel, but before you can "see the wheels go round" every piece of metal must be
is hand spun, but at present it is possible to obtain them only of old-fashioned spinners who make their own bands. You can, however, make a band of cotton cord, such as is used for cording dresses. Fig. 9 gives the exact size. The length of cord for a wheel measuring eighteen and a half inches in diameter is about ten feet five inches. This allows for a lap of one inch at the joint. Sew together with silk, wrapping and sewing until the joint is almost invisible.
It seems a simple thing to work the treadle, but you will find that without previous practice you will forget to make your foot go in the absorbing interest of getting the flax ready to run on the spindle. Curb your impatience a little while therefore, and resolutely turn the distaff, with its pretty load, away from you. Place one foot on the treadle, give the large wheel a turn to the right, or away from the spindle, and try to keep a steady, even motion with your foot. The jerks caused by uneven pedalling will always break the thread, so you must learn to make the wheel turn smoothly and easily, without hurry and without stopping. Some spinners place only the toe of the foot on the treadle, others rest on it the heel also; it matters little which method you adopt so long as the wheel turns evenly. When you are quite satisfied that you can keep the wheel going without giving it a thought you may begin
With a pencil and ruler draw two straight lines across the board, the first one inch and a half from the top edge, the other two inches and a half from the bottom edge. This will make the lines just eleven inches apart. On these lines, beginning one inch from the side edge of the board, make a row of dots exactly one-quarter of an inch apart, twenty-nine dots on each line, as in Fig. 12. At each corner of the board, one inch above the upper line and one inch below the lower line, draw a short line, and on each short line, three-quarters of an inch from the side edge, make one dot.
Tie the end of the warp securely to the first pin on the long line at the upper left-hand corner of the loom (Fig. 18). Bring the string down and around the first two pins on the lower line, up again and around the second and third pins on the upper line, and then down and around the third and fourth pins on the lower line. Up again, down again, crossing two pins each time, back and forth until the last pin on the lower line has been reached. Wrap the warp around this pin several times, and then around the tack, tying it here so that it cannot slip. The warp must lie flat on the board where it passes around the pins, and in stringing up it must be drawn rather tight, though not with sufficient force to pull the pins out of place.
of string on each side of the hammock. In Fig. 30, T shows how to place a strand for the fringe under one side of the mesh on the edge of the net: and S gives the manner of bringing the ends of the strand down over the string forming the mesh and under the loop made by the centre of the fringe-strand. Pull the two ends of the strand down evenly, and bring the knot up close and tight to the hammock-mesh as shown in the finished fringe in Fig. 30.
which is easier to make than the hammock. Take a piece of heavy cord twenty inches long, lap one end to the distance of an inch over the other and sew the two lapped ends firmly together; then bind them neatly around and around with string. Bring the two edges or sides of the circle together, forming two ends (V V, Fig. 34). Tie a strong string on each end (Fig. 34) and fasten each of the strings to the back of a chair; you will then have a circle of heavy cord securely suspended in mid-air. Cut twenty-four lengths of twine, each twenty-five inches long; double each piece and fasten all the strands on the circle of heavy cord in the same way you made the fringe on the hammock (X X, Fig. 34), except that this time the strands must be quite a distance apart. Let all the spaces between the strands be equal. Having fastened the lengths of twine on the circle, net them together exactly as you netted the hammock, but you must depend upon your eye to keep the meshes even and of the same size, as there will be no board with lines to guide you (Fig. 34). Tie the knots in circular rows, going around on both sides of the circle for each row. Continue the meshes until within three and a half inches of the bottom, then tie the two sides together, closing the bottom of the bag and forming the fringe shown in Fig. 33.
Pine-shavings are the best to use, as they are less brittle than those of harder woods. Select a number and put them to soak in cold water to make them soft and pliable. Then, lifting out those of an even width, place them before you on a lap-board or table, and after passing them between your fingers several times to take the curl out, cut eight pieces eleven inches long. Directly across the centre of two of the strips draw a straight line, as in Fig. 36. Place one of these strips, A, flat on the table and lay the other, B, across it so that the upper edge of B will touch the dividing line of A and the mark on B will be on a line with right-hand edge of A, Fig. 37. Under A slide another strip, C, Fig. 38. Over B and under C slide the strip D, Fig. 39. Over D and under A pass the strip E, Fig. 40. Under E, over B and under C weave the strip F, Fig. 41. Under E, over B, and under C weave the strip G, Fig. 42. Over F, under D, over A, and under G weave the strip H, Fig. 43. This forms a square for the bottom of the basket.
Weave all the way around, turning the corners sharply, until the weaver meets the first end; lap it over this, cut it off and tuck the last end under H. Start the next weaver at C, weave it around and tuck under E. Weave five weavers around the sides of the basket, beginning each time in a new place that the joints may not all come together, then bend the upright shavings over the edge of the top weaver, tucking the ends of each under the third weaver, one inside, the next outside, as they may come inside or outside the basket (Fig. 45).
Loop the handle diagonally over the basket and fasten the other end on the second weaver on the side. Secure the ends of the long strip on the third weaver, allowing it to cross the other side of the handle at the top, then bind the two pieces together at the middle by wrapping with a shaving of the same width over and over. Split this wrapper at the last end and tuck the two ends in at the sides. Fig. 48 shows the under part of the handle with one end of the wrapper tucked in.
out in the open. So away to the spot where the finest cat-tails grow, gather a lot of them, cutting the stalks off clean and smooth at the base, that the cat-tails may not be bent or split, for as reeds in your curtain they must be as near perfect as possible. Cut the velvety brown head off from each one, making all of the stalks the same in length; then, with several long leaves twisted together for string, tie the stalks into a bundle and march home with the treasure.
and adding cat-tails until the curtain is of the desired length. Tie the ends of the string on each line securely together and tuck them under the weave, hiding the ends on the wrong side of the curtain (Fig. 55). At equal short distances from the tips of the head-pole fasten in a screw-eye large enough to pass readily over the two hooks immediately above the window where the curtain is to hang (Fig. 55, A, A). On the centre of the space along the upper side of the top pole, between the first and second cord and the third and fourth cord, drive in a staple-nail (Fig. 49, B, B), shown more plainly in Fig. 56. These staple-nails are for holding in place the long cord used in rolling up the curtain (Fig. 57, B, B, and Fig. 58, B, B). Thread one end of a long piece of cord from the back of the curtain through one staple-nail and the other end through the other staple-nail. Bring both ends of the cord down over the front of the curtain around the bottom and up over the back; then tie the ends on the pole (Fig. 57, C, C). Dotted lines show how the cord runs along the back of the curtain. Have the cord sufficiently long to allow of the stretch between the two staple-nails B and B (Figs. 57 and 58), to hang down over the back and extend in a loop below the bottom edge of the curtain (Fig. 57, D). When you wish to raise the curtain, pull the bottom loop and up will go the curtain (Fig. 58). These primitive hangings are just the thing for outing cottages on the sea-shore or log-houses in the mountains. You can have fun weaving them while at your summer home and in place of the old-fashioned quilting-bee you might give a
and adding cat-tails until the curtain is of the desired length. Tie the ends of the string on each line securely together and tuck them under the weave, hiding the ends on the wrong side of the curtain (Fig. 55). At equal short distances from the tips of the head-pole fasten in a screw-eye large enough to pass readily over the two hooks immediately above the window where the curtain is to hang (Fig. 55, A, A). On the centre of the space along the upper side of the top pole, between the first and second cord and the third and fourth cord, drive in a staple-nail (Fig. 49, B, B), shown more plainly in Fig. 56. These staple-nails are for holding in place the long cord used in rolling up the curtain (Fig. 57, B, B, and Fig. 58, B, B). Thread one end of a long piece of cord from the back of the curtain through one staple-nail and the other end through the other staple-nail. Bring both ends of the cord down over the front of the curtain around the bottom and up over the back; then tie the ends on the pole (Fig. 57, C, C). Dotted lines show how the cord runs along the back of the curtain. Have the cord sufficiently long to allow of the stretch between the two staple-nails B and B (Figs. 57 and 58), to hang down over the back and extend in a loop below the bottom edge of the curtain (Fig. 57, D). When you wish to raise the curtain, pull the bottom loop and up will go the curtain (Fig. 58). These primitive hangings are just the thing for outing cottages on the sea-shore or log-houses in the mountains. You can have fun weaving them while at your summer home and in place of the old-fashioned quilting-bee you might give a
The girls and boys could readily make a number of hangings in one afternoon, and while weaving the reeds together they would weave into the work all sorts of bright speeches and gay laughter, so that ever after the curtains would be filled with delightful associations of the charming summer afternoon. Reed curtains can be fashioned in any width. If very narrow hangings are in demand, cut your reeds to measure the length needed for the curtain-width and weave them together with the same twine cross-weave used in Fig. 55.
Bunch together seven fine, strong seed-grass stalks and tie just below the blossoms, with the root-end of your long-blade grass (Fig. 71). The stems of the seed-grasses are the spokes, the long grass the weaver. Turn the blossom-ends down, the stem-ends up, and close to where it is tied, begin to weave the long grass in and out, under one spoke, over the next, under the third, over the fourth, going around and around spirally until the end of the weaver is reached, then tie it to one of the spokes. Keep forcing the spokes farther and farther apart as you weave until the holder is shaped like a cone. As you see in the illustration, the weaver never passes over one of the spokes twice in succession. In one row it goes over a spoke, in the next row under it, in the third over again, and so on. In order that it may always come this way you must have an uneven number of spokes. Four will not do, nor six, nor eight, but five, seven, or nine spokes will bring the weave out all right.
For instance, the ninth spoke should come between No. 1 and No. 5, the tenth spoke between No. 5 and No. 3, the eleventh spoke between No. 3 and No. 6, and so on around the circle (Fig. 87). Be sure the lower end of a spoke fits between the same numbers as the upper end. When all the spokes are placed hammer a strong pin directly through the centre where they are crossed, to hold them together while you begin.
Cut a square of the same kind of tissue paper, measuring nine and one-half inches on all four sides; fold diagonally twice across the square as when making a paper pin-wheel. The centre of the square is exactly where the diagonal lines meet and cross; pinch the centre portion up into a beak and tie it with a string (Fig. 101); then fit the beak over the centre of the chicken's head, bringing the paper entirely over the head on all sides; tie the square around the chicken's neck close up to the head (Fig. 102). The two points A and B of the square must form the wings, while C is carried backward over the under portion of the body and D back over the upper part, the two ends C and D being brought together and tied tight up to the body to form the tail. In Fig. 103 you will see exactly how to pinch up the wing if you notice particularly the upper part of the wing B, next to the body. The wing A on Fig. 103 shows how the two wings must be tied close to, but not on, the body. When each wing is tied, make the tail of C and D by tying the extensions together as explained above; that done, bend down the legs, spread out the wings and tail, open out and flatten the feet, then stand the little chicken on a level surface (Fig. 104). Remember always to crease the tissue-paper with the grain of the paper; if you attempt to cross the grain the paper will be very apt to tear.
(Fig. 105) is also modelled from half a sheet of tissue-paper as near the general color of a turkey as can be found. Make Fig. 92 and Fig. 93 of the paper; then fold Fig. 93 five and three-quarter inches from one end (Fig. 106, F). Three inches from this end tie the two layers together (Fig. 106, G). Fold the strips back and tie a string through the lower loop up over the loose top layer (Fig. 106, H). Wind the extreme end of the paper (Fig. 106, O), with string to form the beak (Fig. 107), bend the beak down and tie it to the neck to form the top of the head (Fig. 108, P). Make the legs and feet as you did those for the chicken (Fig. 98) and slide them through the body so that one fold of the body will be above and two beneath the legs (Fig. 107). Cut the wings from a separate piece of tissue-paper (Fig. 109). Let the paper measure seven inches on the widest side, five on the opposite side, and four and one-half on each of the other sides. Pinch the paper together through the centre and tie (Fig. 110). Gather up one wing, so that it will not tear, and slip it through the body, immediately over the legs, with the widest side toward the front (Fig. 105), leaving the other wing out free on the other side of the turkey. Bend down the legs, spread the tail out fan shape and bend it up; open out the wings and drop them downward and forward (Fig. 105). Flatten out the feet and stand up the turkey (Fig. 105).
Ordinary garden flowers and those most easily procured make the best models. The carnation-pink, the morning-glory, and the rarer blossoms of the hibiscus, are well adapted to the work, also the daffodil and some of the wonderful orchids.
is made of a circle of dark-green paper the diameter of which is three and one-quarter inches (Fig. 130). Gather this circle between your fingers as you did the others and crimp the edge with the scissors. It will then form a little bag or cup like Fig. 131. Slip the bag over the head of a lighter and tie at the bottom as in Fig. 132. If the bud does not take the proper shape at first, model it with your fingers until it is correct. Start the wrapping of the stem just above where the bud is tied and finish as you did the stem of the pink. Use small leaves on the bud stem, having the strip of paper just as wide, but considerably shorter than for the leaves on the stem of the open flower.
Fold the square twice diagonally across from corner to corner to find its centre; then begin at one corner and gather along one of the creases until you reach the centre (Fig. 139). Start again at the opposite corner, gather along the crease to the centre, then wrap and tie (Fig. 140). Pinch each leaf from underneath along the crease in the middle, to give the depression at the midrib. Straighten the leaf out a little at its widest part and you will find you have made a pair of leaves which are surprisingly natural. Wrap and tie these to the stem and make as many more as you think are needed.
you will need eight sheets of white tissue-paper, two sheets of flesh pink, not too deep in color, a quarter of a sheet of light-brown or yellow, and a small piece of black. Her underclothes will require one sheet of white and her dress and bonnet one sheet of any color you consider most becoming.
Take one sheet of the white paper at a time and draw it lengthwise through your hands, creasing or crimping it as in Fig. 149. Do this to all the eight sheets. Then, pulling six of them partly open, place them evenly one on top of another and fold through the middle (Fig. 150). Take another sheet of the crimped paper and roll it into a ball like Fig. 151. Open the folded paper, place the ball in the middle, bring the paper down over the ball and wrap and tie just below with coarse linen thread or white darning-cotton (Fig. 152). This is the head, which you must model into shape with your fingers, squeezing it out to make it fuller and rounder at the back and pinching it to give a chin to the face. Fold another crimped sheet like Fig. 153 for the arms. You will notice the ends do not quite reach the folds. The space left should measure a little over one inch. Crimp half a sheet of the pink paper and with it cover the arms; allow the pink to extend equally at each end beyond the white and fold over the ends, tying them as in Fig. 154. Then tie the loose ends down as in Fig. 155. Open the paper just below the head, slip the arms in place and tie below (Fig. 156).
a common pastry-board or any kind of board of the desired size—about nineteen by twenty-six inches—and for grass cover one side and the four edges of the board with a piece of light-green cotton flannel stretched tight, fleece side up, and tacked to the under side of the board. Sprinkle sand and small stones on the grass at one side of the wigwam, to show where the grass has been worn off by the tramping of the Indians, the bronco pony, and the dog, for all Indians possess dogs of some description. If you have a toy dog of suitable size, stand him by the fire where he will be comfortable. Before the red men owned horses, a dog was always used to drag the travois, and to this day the braves care as much for a dog as does any pale-faced boy—which is saying much, for a white boy and any kind of a dog make devoted friends and comrades.
Make the cover of unbleached or brown-tinted cotton cloth cut like Fig. 170. Mark the curved lower edge with the home-made compass used for the grass circle. Fasten the pin and pencil in the paper strip nine and one-half inches apart; draw almost a half circle, then an inch and a half from the spot A (Fig. 170), where the pin is stationed, begin to cut the opening for the top of the wigwam poles, B (Fig. 170). Slash the point C in as far as D, sew pieces of cloth over the points E and E, leaving the opening at dotted lines to form pockets for the smoke-poles. Cut two rows of little holes on each side of the upper part of the wigwam to run the pinsticks through when fastening the wigwam together (Fig. 171).
If you can find a Zulu doll of the required size, with long, straight black hair, and give him a wash of dull red paint, you can turn him into a fine Indian. Failing these dolls, make an Indian doll of dull red raffia or cloth. This you can do if you try, and remember to have your red man a little more slender than store dolls; most of these are rather too stout to make good Indians.
or "pipe of peace," to smoke and pass around the council circle, when all the leaders of the different tribes meet to talk over important matters concerning the welfare of their people. Real calumets are generally large and of goodly length, some of them being four feet long. They are made of dull-red stone, which, when first cut from the large mass, is soft enough to be carved out with a knife; later the pipe becomes hard and capable of receiving a polish. But as the red stone is not within our reach, we must use dull red-colored straw for the calumet. Soak the straw in hot water to render it less brittle. Then cut a three-inch length piece; make a hole in it a short distance from one end (Fig. 176, G) and insert a three-quarter inch length of straw for the pipe bowl (Fig. 176, H). For the mouthpiece take a half-inch length of white straw (Fig. 176, I), and slide it in the other end of the pipe. Glue both bowl and mouthpiece in place and decorate the calumet with red, green, and white silk floss tied on the pipe stem (Fig. 177).
Bison hide is something you cannot obtain, so take writing paper for the shield. Cut it into a circle an inch and a half in diameter, with an extension for the handle (Fig. 180). Glue the free end of the handle on the opposite side of the back of the shield. Make ten paper eagle feathers (Fig. 181), hang seven on the bottom of the shield with red thread, after first decorating the centre of the shield with given designs and the edge with colored bands, using any or all of the following colors, but no others: positive red, blue for the sky, green for the grass, yellow for the sun, white for the clouds and snow, and black. To the Indian color is a part of religion. Purple, pinks, and some other colors, the red man, loyal to his beliefs, can never bring himself to use. Attach two of the remaining feathers at the top and another on the centre of the shield, as shown in Fig. 182.
Cut three paper feather strips (Fig. 186), each an inch in length, paint black bands on them, bend at dotted line and glue the feathers on the shaft one-quarter of an inch from the notch, allowing them to stand out at angles equally distant from each other (Fig. 187). Bind the extensions L and M (Fig. 186) to the shaft, and tie tufts of white and red worsted on immediately above the feathers to help in finding the arrow (Fig. 188). Paint the shaft in brilliant colors.
Make the bow case (Fig. 192) of ordinary wrapping paper cut like Fig. 191, three and a half inches long and two and a half inches wide. Fold the paper lengthwise through the centre and glue the sides together along the dotted lines; then fringe the edge up to the dotted line and decorate with gay paint.
(Fig. 199). Sharpen the bottom and drive it into a hole in the ground. For the foliage cut a fringe of soft green and olive-brown tissue-paper folded lengthwise in strips. Crimp the strips with a blade of the scissors, then open out the fringe; gather each one through the centre, give the paper a twist, and the two ends will form bunches of foliage. Work the twisted centre of one piece down into a crack at the top of the tree. Over across this at right angles in another opening, fit in the second twist of paper foliage and crown all with a bunch standing upright as shown at Fig. 199.
bound in its stiff cradle is one of the drollest things imaginable. Paint a small doll copper color, make its hair black, and bind the baby in a cradle cut from brown pasteboard (Fig. 200). Cut along heavy line and bend forward the tongue R along the dotted line, bring the strap S across and glue the end on the under side of the cradle; then line the cradle with white tissue-paper and place the Indian child on it; spread a piece of vivid red tissue-paper over the infant, bringing the sides of the cover on the under side of the cradle, where you must glue them. Fold over the lower end of the paper and glue that also on the back of the cradle. Paint the cradle and portions of the cover white, green, black, and yellow (Fig. 200); then hang the cradle and baby on the limb of the tree (Fig. 199), where the little papoose will be safe while his squaw-mother works at her weaving.
[134]
[135]
upon which to hang the pots and kettles over the fire. One end of the crane was bent down and attached to the side chimney wall by iron rings. These rings allowed the crane to turn so that the extending iron rod could be swung forward to receive the hanging cooking utensils and then pushed back, carrying the pot and kettles over the fire for the contents to cook. The crane was black and of iron. A hair-pin (Fig. 211) makes a fine crane. Bend yours, as shown in Fig. 212, then with two socket-rings made with stitches of black darning-cotton fasten the crane to the side of the chimney at the dots C and C (Fig. 207), and tie a piece of the darning-cotton on the little crane immediately below the lower socket-ring; bring the thread diagonally across to the top arm of the crane an inch and a quarter from the free end and again tie it securely (Fig. 213).
F and F (Fig. 207) as in Fig. 213. Bend forward the interior of the fireplace (Fig. 208) at dotted lines, and fit Fig. 208 on the back of Fig. 207 to form the inside of the fireplace and the mantel-piece. Slide the slashed top strips of the sides of the fireplace D,D,D,D (Fig. 207), back of the slashed strips D,D,D,D (Fig. 208), which will bring the two centres E and E of the sides in Fig. 208 behind F and F in Fig. 207, and will thus form two layers on the sides of the chimney. Push the edge G and G of Fig. 208 through the slit G and G in Fig. 207 to form the mantel-piece, then bend down the edge of mantel-piece along dotted line.
Chicken and other eatables were placed between the front and back rings on the toaster and broiled before the fire, which was so hot that it was necessary to have long handles on all cooking utensils.
Just look at your little colonial friend, Thankful Parker! (Fig. 228). The tiny maid seems almost to be stepping lightly forward and backward as she spins out long threads of the soft, warm yarn, singing softly all the while a little old-fashioned song. How busily she works, and listen! you can all but hear the wheel's cheery hum, hum, hum! That's the way the real colonial dames used to spin. Such a
Make the cap (Fig. 243) of thin white material cut like Fig. 242, and the band (Fig. 244) of the same color as the dress. Cut the thin white kerchief like Fig. 245, and fold it as in Fig. 246. Fig. 247 gives the design for the dress waist, and Fig. 248 the sleeve. The skirt is a straight piece gathered into a waistband. The apron (Fig. 249) is white. When the doll is dressed it should resemble little Thankful Parker (Fig. 228). An
Lay the gun-barrel above the wooden part (Fig. 254) and fasten the two together with the four bands of tinfoil (Fig. 255), allowing the top part of Fig. 250 to stand up free to represent the flintlock. We must be content without a trigger unless you can manage to make one by bending down and cutting a part of Fig. 250. Paint the butt and wooden portion of the gun brown before binding on the barrel, and you will find that you have made a very real-looking little rifle to hang upon the rustic brackets over the mantel-piece.
to place over the bare board floor, and it will be fun for you to weave it. Take a piece of smooth brown wrapping-paper the size you want your mat, fold it crosswise through the centre and cut across the fold (Fig. 259), making a fringe of double pieces which we will call the warp. Unfold the paper and weave various colored tissue-strips in and out through the brown foundations (Fig. 260), until the paper warp is all filled in with pretty, bright colors. You can weave the rug "hit or miss" or in stripes wide or narrow as you choose, only make the rugs as pretty as possible.
The sides of the house are supposed to be formed of paper-covered screens which slide in grooves and may be removed entirely when desired. The interior of a real Japanese house is divided into rooms merely by the use of sliding paper screens, and the entire floor may readily be thrown into one large apartment, there being no solid partitions as in our houses. Cut out flat round paper lanterns, paint them with the gayest of colors and make the small top and bottom bands black; then with needle and thread fasten the lanterns along the top front of the large opening of the small room (Fig. 282).
the floor is set instead of a table, and each person receives his own little lacquer tray placed on the floor, or on a low wooden stool, with the individual portion of rice in a delicate china bowl, pale tea in dainty teacups and shredded or diced raw fish in china a queen might envy. On the tray are also a pair of ivory chopsticks, which even a little child can manage skilfully, in place of the spoon, knife, or fork that our girls or boys would use. The Japanese do not have bread, butter, milk, or coffee, and never any meat, but they cultivate a mammoth radish which is cut up, pickled and eaten with relish. For dinner they take pale tea, rice, and fish, and for supper fish, pale tea, and rice. Often the fish is cooked, sweetmeats are served and pickled radish also, but frequently the breakfast consists of merely a bowl of cold rice. These unique people do not seem to think or care much about their food; many times they deny themselves a meal that they may spend the money on a feast of flowers in some garden where they can enjoy gazing upon masses of exquisite cherry blossoms, chrysanthemums, or other flowers. No nation in the world loves flowers more than the Japanese, and none can rival them in the beautiful arrangement of their blossoms.
Make your fence of paper cut according to Fig. 287, and mark the pattern (Fig. 288) on it with two tones of yellow paint. Paint the convex top of the gate-way a bright red with narrow black border, and mark the white gate-posts with black Japanese lettering like Fig. 289. Paint the remaining portions of the gate-way yellow, the edges black. Fig. 282 will help you to grasp the idea of the fence and gate-way. The names of the streets are not on the corners as in our cities, so a panel of white wood is nailed to the gate-posts with both the name of the street and householder on it, and often a charm sign is added.
for the pole to be placed in front of the little paper house; they look very comical, bobbing and swinging high in air with their wide-open mouths. Cut Fig. 290 of white tissue-paper, also Fig. 291, which is a trifle larger than the first and is slashed along three edges. Lay Fig. 290 on top of Fig. 291; bend the flaps over and paste them on Fig. 290. Form a little hoop of a strip of stiff paper with the ends pasted together; blow the fish open, then paste the hoop on the inside of the open edge of the head to form its immense mouth. When dry mark the fish with red paint like Fig. 292. Tie a thread on the two opposite sides of the mouth and with another thread attach the loop to a slender stick on the end of which you have fastened a gold disk made of two pieces of gilt paper. This is intended to represent the rice ball with which the real fish are fed. The fish banners are hollow so that the wind may fill them, causing the fish to rise and fall as the breeze comes and goes. Push the end of your fish-pole through the centre of a small box-lid or button mould (Fig. 293) and stand the decoration outside the gate-way of the little house. The fish used on this eventful day are the famous carp, which the natives call koi, the unconquerable. The Japanese carp stands for good cheer, indomitable will, perseverance and fortitude, and it is used to impress these virtues upon the boys, but all the good qualities named are fully as necessary for girls even though the Japanese do not mention the fact, but girls are not forgotten. The nation gives them the third day of the third month for their festival. It is called the
for the pole to be placed in front of the little paper house; they look very comical, bobbing and swinging high in air with their wide-open mouths. Cut Fig. 290 of white tissue-paper, also Fig. 291, which is a trifle larger than the first and is slashed along three edges. Lay Fig. 290 on top of Fig. 291; bend the flaps over and paste them on Fig. 290. Form a little hoop of a strip of stiff paper with the ends pasted together; blow the fish open, then paste the hoop on the inside of the open edge of the head to form its immense mouth. When dry mark the fish with red paint like Fig. 292. Tie a thread on the two opposite sides of the mouth and with another thread attach the loop to a slender stick on the end of which you have fastened a gold disk made of two pieces of gilt paper. This is intended to represent the rice ball with which the real fish are fed. The fish banners are hollow so that the wind may fill them, causing the fish to rise and fall as the breeze comes and goes. Push the end of your fish-pole through the centre of a small box-lid or button mould (Fig. 293) and stand the decoration outside the gate-way of the little house. The fish used on this eventful day are the famous carp, which the natives call koi, the unconquerable. The Japanese carp stands for good cheer, indomitable will, perseverance and fortitude, and it is used to impress these virtues upon the boys, but all the good qualities named are fully as necessary for girls even though the Japanese do not mention the fact, but girls are not forgotten. The nation gives them the third day of the third month for their festival. It is called the
To give a true conception of the wonderful interior of the sacred cathedral to one who has never seen it, is impossible, but we can gain an idea of the general appearance of the exterior by making a miniature Cathedral of the Assumption (Fig. 299). Find, or make, a firm white pasteboard box seven inches long, five and one-quarter inches wide, and four and one-half inches high; this is for the body of the building. Fold a strip of paper seven inches in length, crosswise, through the centre, and bring the ends together, making another fold crosswise through the centre of the doubled strip, which will give four layers of paper of equal length. Cut this into a scallop three-quarters of an inch deep, open out the strip and you will have four scallops, each one and three-quarters inch wide, at its base. Lay the strip in turn along each of the top edges of the sides of the box, and mark the box around the edges of the scallops, drawing four scallops on the two long sides of the box, and three on each of the short sides. Cut out the scallops on top of the box; then take the cover of the box, which must form the roof of the structure, and remove the bent-down sides; trim off with scissors the extreme edge of one long side and one short side, until the cover forms a tight fit in the top of the box, but may, with gentle pressure, be made to slide down one inch. Fasten the roof in place at each corner by running a strong pin from the outside wall through into the roof, until the pin is embedded its full length in the roof.
(Fig. 300) of light reddish-brown paper; make it three inches high and one and one-half inch wide. Let the door proper (Fig. 301) be of inked paper an inch and a half high by an inch and a quarter wide, the door-window (Fig. 302) one inch and a quarter high by three-quarters of an inch wide. Cut the upper row of windows like Fig. 303 and the lower front windows according to Fig. 304. Make the lower side windows double (Fig. 305). The door-arch (Fig. 306) must be a trifle over two and one-quarter inches long. Curve the arch by drawing it across a blade of the scissors, paint it green on both sides, bend down the slashed portion, and paste the arch over the door-way, as in Fig. 299.
ready for use you will find at any pottery. If it is dry break into small pieces, put it in a large stone jar, and cover with cold water; let it stand until thoroughly soaked through and then stir with a stick until well mixed, and work with your hands—squeezing and kneading until free from lumps and perfectly smooth. When it is dry enough not to be muddy, and is of the consistency of dough, it is in good working condition.
All you need for the work is a lump of soft clay, a hat-pin, your fingers, and determination to succeed. Take a piece of clay (Fig. 330) and roll it between your hands until it resembles Fig. 331. Push the two ends together, causing the roll to hump up slightly near the centre, lay it down on a board or any hard, flat surface, and with the fingers carefully pat, squeeze, and push it into the form of Fig. 332. Gently smooth out all roughness; then nip off little pieces of clay from the big lump for the nose and two eyes; stick them on as in Fig. 333. Again smooth the rough edges until the clay looks like Fig. 334. With a little careful modelling you can make the head exactly like Fig. 335. Mark the eyes, mouth, and nose with the flat point of the pin. If portions of the head become too thick, take off some of the clay, and if at any time the head is worked down too thin fill in the hollow spots with clay. In modelling one can always pinch off pieces here and there when necessary; or add little bits, smooth it all down, and the places altered will never show the marks of the change.
All you need for the work is a lump of soft clay, a hat-pin, your fingers, and determination to succeed. Take a piece of clay (Fig. 330) and roll it between your hands until it resembles Fig. 331. Push the two ends together, causing the roll to hump up slightly near the centre, lay it down on a board or any hard, flat surface, and with the fingers carefully pat, squeeze, and push it into the form of Fig. 332. Gently smooth out all roughness; then nip off little pieces of clay from the big lump for the nose and two eyes; stick them on as in Fig. 333. Again smooth the rough edges until the clay looks like Fig. 334. With a little careful modelling you can make the head exactly like Fig. 335. Mark the eyes, mouth, and nose with the flat point of the pin. If portions of the head become too thick, take off some of the clay, and if at any time the head is worked down too thin fill in the hollow spots with clay. In modelling one can always pinch off pieces here and there when necessary; or add little bits, smooth it all down, and the places altered will never show the marks of the change.
Mould another piece of clay like Fig. 336. Run the ball of your thumb along the sides, making the body the form of Fig. 337, broader and thicker through the centre than at the two ends. For the tail pull from the large lump a smaller amount of clay, roll it and model it like Fig. 338, larger at one end than at the other. The last portion (Fig. 339), like the others, is flat on the bottom, and with the exception of a small triangle at the heavy end of the tail the two sides meet at the top, forming a sharp ridge which decreases in height as it tapers down to a point at the extreme end. As each part is finished keep it moist with a wet cloth, and when the four sections are made place them in a row (Fig. 340), then join them together, rounding all the edges slightly. Fig. 341 shows how to mark the back of the alligator.
formed of small plates or shields, and in the clay one must imitate the real. Use the hat-pin for marking the lines on the head, and trace stripes sidewise across the entire length of the body in the manner shown by Fig. 341 from C to D, continuing the stripes down each side of the first section of the tail (Fig. 329). Next run a line lengthwise through the entire centre. D to E (Fig. 341) shows how to begin, only you must commence the central lengthwise line at C. Mark the plates on one side starting at C, as indicated from E to F (Fig. 341); then make them on the other side, which will cause a pointed scallop to stand out and up on both sides of the space from G to H (Fig. 341). On the last section the top ridge will be scalloped H to K (Fig. 341). The nostrils are distinctly marked by two round holes; make these with the point of the pin. Cover the alligator over with a wet cloth while you model his
Model two front and two hind legs and feet; see that the hind feet and legs are larger and differently formed from the front ones. The hind feet have only four toes (Fig. 351). The line A (Fig. 340) designates the place where the front legs should be joined to the body, and the line B (Fig. 340) shows where to fasten on the hind legs. That you may have a thorough understanding of the manner and direction in which the joints of the legs bend, we will suppose that you rest on the floor on your knees and elbows. You will then find that your knees bend forward and your elbows backward, with your arms corresponding to the front legs and your legs to the hind legs. Now, when you draw or model hereafter, you will not make any mistake in regard to it. Look again at Fig. 349. The foot, V, corresponds to or rudely resembles your hand; T, your wrist; P, your elbow; O, your shoulder. Examine Fig. 329. On the hind leg are the foot, ankle, knee and hip joint. While the alligator is in a plastic state make him open his mouth, by cutting a slit in the head from the front along the waved line up back beyond the eye; carefully pull apart the jaws (Fig. 352). Have your alligator measure at least fourteen inches from tip to tip, for it will be more difficult to model a smaller one. Once having made the little creature, you will find it easy to model similar animals; select something else in the same line and try to make it.
is very simple to copy. Roll a piece of clay, making the ends bluntly pointed; bend it slightly as in Fig. 353 and, paying strict attention to proportion, carefully form the work like the original, adding, taking from, smoothing and flattening as may be required (Fig. 354).
If you can find an apple with a bump on one side, you may make a porcupine in less than five minutes, for all that is necessary is to stick the apple full of wooden toothpicks, and that work will be as easy as putting pins into a cushion. Let the bump on the apple form the head of the animal. Bend four toothpicks like Fig. 361 and push them up into the apple to serve as legs and feet. Make the bent toothpicks balance the apple perfectly, so that the porcupine will stand firmly on its feet without other support. Use black pins for eyes and broom straws for the whiskers. Stick them into the head of the animal as shown in Fig. 362. Begin at the extreme back of the porcupine to insert the wooden toothpicks that are to serve as quills; although they are not hollow it makes very little difference, as this wee creature cannot shake them, causing the quills to knock against each other, as does the real animal when he wants to produce a rustling sound to warn off an enemy. Continue pushing in the toothpicks until the apple resembles Fig. 362. Keep the quills inclined backward and be careful not to have them stand out too far; slant the quills as much as possible, as the length of the porcupine must appear greater than the breadth. Now, if you could endow the animal with life, you would find that he was a vegetarian; that is, he could not eat meat, and you would be obliged to feed him on fruit, roots, and certain kinds of bark. You may be glad, though, that this porcupine is only a "make-believe one," for, if he lived, he would sleep all day and want to run about and take his exercise during the night; and, more than that, you would feel very sorry for the poor little fellow, because he would be extremely lonesome so far away from his native land of India, Africa, or some part of Southern Europe. So of the two, all things considered, the apple porcupine makes a better pet for the small members of the household.
(Fig. 363). With the small blade of a pocket-knife cut the eyes near the centre of the apple, placing them far apart to give an innocent expression to the face (Fig. 363). Cut the lower line of the eyes straight and the upper curved, as in Fig. 364; then push the small, pointed end of an apple-seed in the centre of each eye; run the seed in so far that only a small portion of the blunt end stands out (Fig. 365). Cut away a small, half-moon-shaped piece of the skin (Fig. 366) to indicate the nose. The mouth must be open and made the shape of Fig. 367. Cut it into the apple a trifle more than an eighth of an inch in depth. Make the curls of two narrow strips of paper rolled up tight like Fig. 368; then pulled out as in Fig. 369. Pin one curl on each side of the head (Fig. 363). Cut a round piece of white paper for Sally's collar. Make a small hole in its centre and slip the collar on the end of a stick; then push the stick well up into the lower part of the head (Fig. 363). Keep the collar in place by two pins stuck through it into the apple.
is very different in coloring and expression from Sally (Fig. 370). Notice how near together his eyes are; and see how long and narrow his nose is. If you examine the face of the next red man you see, or the picture of one, you will probably find that he has two deep, decided lines from his nose to his mouth, and that the mouth itself is firm and straight. Remember these hints when making the Indian's head. Select a dark-red apple, one that is rather long and narrow, if possible, for the red man seldom has a round face. Cut two eyes of white paper and pin them on the apple with black-headed pins pierced through the centre of each eye. Make the long nose of paper (Fig. 371). Cut two slits close together on the face and slide the sides of the nose (AA, Fig. 371) into the slits (Fig. 370). Cut two more slits, one on each side of the nose, down to the corners of the mouth, and insert in each a piece of narrow white paper to form the lines; then cut one more slit for the mouth and push in a strip of white paper, which may be bent down to show a wider portion (Fig. 370). Last, but not least, come the ornamental feathers. If you can obtain natural ones so much the better; if not, make paper feathers of bright, differently colored paper. Fig. 372 shows how to cut them. Roll the bottom portion to make a stiff stem and after punching holes in the top of the apple, forming them in a row around the crown of the head, push each feather in place, having the tallest in the centre, as in Fig. 370. Run a slender stick up into the bottom of the head and you will have something better than taffy-on-a-stick.
[213]
[214]
[216]
[217]
Fig. 382 is the pattern, which you must make by tracing it on tissue-paper and then cutting it out. Choose any material you like—wool, cotton, or silk, for her dress and any color, only let it be quite smooth. Lay the tissue-paper pattern down on the goods, pin it in place and cut around close to the edges. Try the dress on Mary to see that it fits perfectly; then cover the wrong side thinly with paste, adjust it to the little figure and press down firmly, smoothing out any wrinkles that may appear. Cut a white lawn apron like the pattern (Fig. 383), and paste it over the dress bringing the upper edge up to the waist line.
and transferred it to a sheet of cardboard, you must collect a number of small feathers as much as possible like the shapes given in the page of diagrams. Perhaps you can get those plucked from the chicken for to-day's dinner, or you may be allowed to take a few from mother's feather pillows or cushions. If you do not find feathers of just the right shapes take a pair of sharp scissors and trim them down to suit.
Cut from gilt or colored paper three scalloped disks four inches in diameter (Fig. 400). Through the centre of each disk pass a needle threaded with doubled black linen thread, cover the under side of the disk with paste, separate the two ends of the thread and hold them down on each side of the large end of a shell, as shown in Fig. 401; then draw the disk down and paste it upon the shell over the threads. If the ends of the thread extend below the disk, clip them off with sharp scissors. Wait until the paste is quite dry and the paper firmly attached to the shells, then hang the eggs by their threads in a door-way so that they will be just one foot higher than you can reach.
It is not necessary to expend any strength in the "lifting," for the players should jump, and not depend upon the helpers to be lifted up within reach of the eggs. When the eggs have been pulled down, the fun consists in eating the candy, with always the certainty of finding some bitter drops among the sweet, and the uncertainty of how soon and how often the bitter will be found.
The eggs being arranged the company is divided into couples, each in turn to try the dance. The first couple takes position within the outer circle—that is, between the red eggs and the gilded ones—and, to waltz music, they dance around the circle three times, keeping within the space between the two circles. Entering the inner circle they waltz three times around the central egg, and all this must be done without breaking or greatly disturbing any of the eggs. When an egg is broken or knocked more than twelve inches from its position, the dancers retire and give place to the next couple. The broken eggs are not replaced, but those out of position are set in order before the succeeding couple commence the dance. When each couple has had a turn and none have accomplished the feat, all change partners and the trial begins again.
A piece of narrow white satin ribbon, three inches long, is folded and pushed through the hole in the centre of the star, forming a loop; the ends are then pasted to the point on either side of the star.
and arrows will be needed for the sport, and these we will make at home. They will be quite small and easy to manufacture, but the bows, though tiny, will work to a charm and send the home-made arrows flying with swiftness and precision to their goal. Look up a piece of flat rattan, from which to form the bow, such as is often used to stiffen stays and dress waists; cut it eleven and one-half inches in length and burn a hole in each end by boring through the rattan with a hair-pin heated red hot at one end (Fig. 407). Holes made in this way will not split or break the rattan. Pass a strong linen thread through the hole in one end of the bow and tie it firmly (Fig. 408); then bring the thread across to the other end, pass it through the hole, leaving a stretch of eight and one-quarter inches from end to end of the bow, and tie the end securely (Fig. 410).
[243]
[244]
While the King and his men are at work digging up the plants the Queen and her ladies can gather the buds and blossoms, picking them with as long stems as possible and remembering to have a few green leaves of each plant with its blossoms. To keep the flowers from wilting, as they would if held in the hand, let each girl be provided with a clean, perfectly dry baking-powder can which has a lid that fits tightly; the blossoms must be without moisture and very carefully placed within the can as soon as they are plucked. When the tin box is filled the cover can be fitted on securely to exclude all the air. The green leaves may be carried in the hand, and when they droop they can be revived by being placed in fresh water. The bit of wildwood brought home in the form of dainty cut flowers could be put in water until dark, when the little
Just at dusk the flowers may be arranged in the baskets with as little handling as possible. Then, when twilight comes, the May day party can steal cautiously to the door of the house fortunate enough to be favored by a May-token, hang one of the little baskets of flowers on the door-knob, ring the bell and scamper away before they are seen, for no one of the party must be present when the door opens.
Before placing the pole in the tub nail securely to its base a piece of board eighteen inches square, as shown in Fig. 428. Erect the pole in the middle of the tub, put in cross-pieces (Fig. 428), nailing them at the ends and fill in all around with stones or bricks, as in Fig. 429.
[251]
[252]
nearer home; possibly you may have to work a little for the precious metal, but the exertion will be only fun. Ten little fairies—your ten fingers—will cheerfully supply the gold as well as the mine from which the nuggets must come on the eventful night. The fairies should make a number of small gold parcels which when finished form the nuggets (Fig. 432). Inside of each package is a piece of candy and a strip of paper with a fortune written upon it, so whatever may be the fate sent by the gnomes in the mine, it is sure to be sweet. Have enough lumps of gold to furnish each player with equal portions of one or more nuggets. Let the little fairies secure a tub, half-fill it with sand or saw-dust and hide the gold nuggets well in this home-made gold mine, scattering the little parcels through the sand like plums through a pudding. The fairies must stand a small shovel by the side of the mine, then all will be ready and the miners can dig for their fortunes (Fig. 433).
Each player in turn must take the shovel and dig in the mine until one gold nugget is found. He must then open the package carefully and read aloud the fortune Fate has given him, while the other players look on and listen. The fairies can readily whittle or saw out a wooden mining shovel from a shingle or thin box-lid. Tell them to make it about four inches long and three wide, with a handle eleven inches in length. Try to think of original ideas to write on the slips of fortune paper, or, failing these, look up apt quotations for the prophecies. If you can have the lines bright and witty, writing something that will cause a laugh when read aloud, without hurting anyone's feelings, your Hallowe'en mining will be a great success.
understands well the art of fortune-telling. She is a funny little creature made of a stick (Fig. 434), some yellow tissue-paper and an apple. A strip of the tissue-paper is gathered (Fig. 435), drawn tight together at the top and placed over the stick with a thread wound around a short distance from the top to form the head (Fig. 436). The arms are pieces of tissue-paper (Fig. 437) folded lengthwise (Fig. 438) and run through a hole punched in the body (Fig. 439). The face is marked with ink on the head (Fig. 439). Small strips of tissue-paper gathered like Fig. 440 are sewed on each arm to form the sleeves. Hair of black thread or darning cotton tied in the centre (Fig. 441) is sewed on the yellow paper head.
is a triangular piece of paper (Fig. 442) with edges pasted together and a circular piece of paper slightly slashed around the small hole in the centre (Fig. 443). The circular piece is slid down over the peak to form the brim (Fig. 444), glued on, and the entire hat is inked all over, dried and fitted on the little woman's head. A broom made of a strip of folded tissue-paper (Fig. 445) with a fringed piece of the same paper bound on for the broom part (Fig. 446) is sewed in the folded-over end of the witch's arm. When finished the point of the stick is pushed into an apple, and the apple placed upon a piece of paper divided into squares in which different fortunes are written (Fig. 447). When you want the witch to tell your fortune, spin the apple on the blank centre of the paper and wait until the witch is again quiet, and she will point with her broom to some spot where the fortune is written especially for you. Each girl and boy must be allowed three trials with this apple witch (Fig. 448).
is very mysterious and exciting. Dip a new clean pen in pure lemon juice and with this queer ink write mottoes or charms on a number of pieces of writing-paper. Allow the ink to become perfectly dry, when it will fade out completely; then place the charms in a box and let each girl and boy in turn draw what appears to be a blank slip of paper. After examining it, the paper should be handed to some grown person present who is in the secret and who has provided a lighted candle by means of which he may read the ghost writing. All the young people will cluster around and with bated breath watch the magical developing of the words on the blank paper as the reader moves the message back and forth over the lighted candle. The heat brings out the writing in distinct letters that all may see. A second charm must not be taken from the pile until the first has been read aloud.
which have previously been dampened and each dipped into a separate flavoring. The moisture will cause the spices, etc., to cling to the seed, giving various flavors. Those dipped in liquids must, of course, be afterward dried. If to your lot falls a seed which has been powdered with pulverized cloves, your life companion will never be dull and uninteresting; pepper denotes quick temper; sugar, affection and kindness; cinnamon is lively, buoyant and bright; vinegar, sour and cross; gall, bitter and morose; molasses, loving but stupid; lemon, refreshing and interesting. Add as many more flavors as you wish. When the seeds have been prepared and dried wrap each one in a small piece of white tissue-paper and pass them around to the young people, allowing each girl and boy to take two of the prophecies; then all the children must be quiet while each in turn tastes first one, then the other seed, telling aloud as he does so the particular flavor he has received. Should a player find the first seed sweet and the other sour, it would mean that the disposition of the future wife or husband will vary, partaking more of the stronger flavoring. If the taste of the first apple seed is pleasant, the married life of the player will be reasonably happy. If the flavor is very agreeable, the married life will be very happy; if the flavor proves unpleasant, it is best to remain single.
Look at the frog to be sure he is correctly drawn; then remove the pins and, allowing the cloth to remain on the table over the piece of smooth white paper, spread both of your hands out on the cloth, one at each side of the frog, and, keeping your eyes on the drawing, move your hands gradually outward, at the same time moving the mull with them. The stretching of the bias material will cause the frog to flatten out until he crouches for a spring (Fig. 450). Cautiously raise your hands up and off the cloth and place them down again in a different way; put one above and the other below his Frogship, and, still keeping your eyes on the figure, suddenly move your hands, stretching the square up and down, when the frog will give a quick leap and spring straight upward in the most unexpected manner (Fig. 451).
Have you ever seen little young birds in their nest? How they huddle together with their large yellow mouths open wide watching for their mother to return with their dinner! Trace the drawing (Fig. 452) on bias cloth and you can make these little birds move and really stretch up their heads for their dinner as you slowly pull the cloth upward and downward (Fig. 453). Watch them. Then stretch the cloth out sidewise and see the birdlings quietly settle down in their nests with a "Thank you" and "Good-by." (Fig. 454).
Trace the girl and boy (Fig. 455) on bias cloth as you did the frog. Fig. 455 shows how the children appear when they meet. Pull the cloth sidewise and their faces change expression (Fig. 456); they do not seem to enjoy their chat. Now pull the cloth in the opposite direction, and in an instant their faces show surprise and dismay (Fig. 457).
Take the dollies off the teeter and let them rest for a while and watch you build a church. Place your two hands back to back, with the ends of the fingers of the right loosely crossing those of the left hand; then, bring the palms of the hands together, fingers inside and thumbs outside and lo!
(Fig. 465). But it is without a steeple. Build one by raising the two first fingers, without disturbing the remainder of the hands; bring the raised finger-tips together and, "Here is the steeple" (Fig. 466). A church, like any other building, to be of use, must have people in it, and if we could only look inside this building we might find them; move your thumbs apart, or "Open the doors and see all the people" (Fig. 467). There they are sitting in rows; don't you see them? Now let the people go up-stairs. Cross your two smallest fingers on the inside, which will bring the backs of the hands toward each other; keeping the little fingers together, cross the third fingers, next the second, then the first fingers. The fingers on the left hand form the stairs for the people or fingers of the right hand to climb. Try it again, allowing the people to ascend slowly one by one: "Here are the people climbing up-stairs" (Fig. 468). Keep your hands loosely in the last position and raise your right elbow; while holding that up, twist your left hand around forward until the left thumb rests on the inside of the right hand. Both hands will now be turned downward with the wrists uppermost.
Leaving the hands in this position, turn your two elbows outward and down, which will bring your hands up; slide your right thumb outside and around your left thumb, the left thumb will then be the minister and, though you cannot see them, the fingers clasped inside the hands are the people, but you can see the thumb, preacher, standing up ready to talk to the people, and you may say, "Here is the preacher who for them cares" (Fig. 469).
(Fig. 472). Of course, the fingers are the knives and forks. Turn your hands over while the fingers remain in place, bring the wrists down and say, "Here is my father's table" (Fig. 473). Raise the two first fingers, bringing their tips together, and say, "Here is my sister's looking-glass" (Fig. 474). Then raise your two little fingers and, rocking the hands from side to side, say, "And here is the baby's cradle" (Fig. 475).
Dampen two bits of paper and press one down tight on the nail of the first finger of your right hand and the other on the nail of the first finger of your left hand. The two pieces of paper are the two blackbirds. Now hold your first fingers, on which the birds are resting, out stiff and double up the remaining fingers; then let your father see how well you have taught these little pet birds to mind, for they will do exactly as you say, going and coming at your command. Place the tips of your two first fingers on a chair, which you must pretend is a hill, and raising first one finger to make the bird fly, then the other, keep the pets flying up and down while you repeat these lines:
As you say the last line raise the right finger up and back over your right shoulder; while there, quickly bend down the right finger with Jack on it and stiffen out the second finger in its place. Bring your right hand down with Jack hidden and put the empty second finger on the chair instead of the first. The bird will be gone and lonesome little Jill will perch on the hill with no playmate, so you must let her go too. Repeat these words, "Fly away, Jill," and make her disappear as you did Jack, bringing down the empty second finger of your left hand and your father will find that both birds have gone; but you may make them return by saying, "Come back, Jack," as you raise your right hand and close down the second finger while you straighten out the first and bring it again to the chair with Jack upon it. Call Jill also that Jack may have some one to sing to, and as you say, "Come back, Jill," bend down the second finger and straighten out the first one with Jill on it, and let her fly down to Jack. You may repeat the lines again and again, making the pets come and go.
In a house where good taste always prevailed there stood, one day, on the uncovered top of a grand piano a tall, colorless, transparent vase which held just one long-stemmed American Beauty rose. The queenly flower with its stem showing through the glass and the few green leaves attached were all reflected in the highly polished piano, and the effect of the colors reproduced in deepened, darkened tones by the rich rosewood was indescribably lovely. There were no other flowers and, though the room was a large one, none were needed. One's eyes fell immediately upon the rose when entering, and lingered there with no wish to be drawn away by lesser attractions.
Few flowers look well packed tightly together and all are better for loosening up a trifle. Purple violets are almost the only flowers that will bear crowding, though many think wild daisies adapted to this arrangement, and spoil their beauty by making them into hard, tight bunches. A good rule is to follow Nature as far as possible in this direction. Flowers that grow singly and far apart, should not be crowded, but those which grow thickly clustered may be more closely massed.
that are different in kind or color, it can seldom be done successfully. To be sure, a mass of sweet-peas in all their variety of color is very lovely, but even they are more effective when separated into bunches each of one color. White flowers sometimes are the better for a touch of color, and white and yellow roses make a pretty combination, or white and delicate pink, but the strong contrast of white and dark red is not pleasing. Lilies should always have a vase to themselves, and the Ascension lily must under all circumstances stand alone. Neither the quality of the flower nor the associations connected with it permit of its being grouped with any other.
need not be expensive, for they are now in the market at extremely low prices. Knowing what to choose you can find for a very moderate sum tall, slender vases with almost no markings, that will show the long stem and so display the entire loveliness of the rose. Fig. 493 is one of the least expensive of these vases. Even the colorless glass olive-bottle, shaped like Fig. 494, makes a pretty and suitable vase, and an ordinary fish-globe displays the rose-stems to far greater advantage than a cut-glass rose-bowl. A clear glass water-pitcher without tracing of any kind is another appropriate receptacle for these lovely blossoms. When the stems of any flowers have beauty of their own, they should never be hidden in opaque vases. So it is not for roses alone these transparent vases are suitable.
With an old pair of shears, or a wire-cutter, snip off a dozen or more pieces of copper wire of varying lengths between ten inches for the longest and five for the shortest piece. At each end of every wire make a loop like Fig. 498; bend the loops over (Fig. 499), then fasten all the pieces to a brass curtain-ring by twisting each piece once around the ring at the centre of the wire (Fig. 500). Bunch the wires together and stand the lifter in a bowl of water; put your flower-stems through the wire loops, as in Fig. 501, and the wires under water will look like the flower-stems, the loops being hidden by the blossoms.
Similar playhouses may be built by children in any spot where trees grow within a short distance of each other. In place of tropical decorations the young builders can use the most ornamental bouquets within reach, selecting foliage and flowers which will keep fresh at least for a few hours.
Tie a strong piece of twine securely to the end of each of the ribs and tie the loose end of each piece of twine around the notch cut in a pointed wooden peg a short distance from its top. This will give an umbrella with a fringe of dangling pegs. Open the umbrella and fasten the handle securely to a long, sharp-pointed stick, binding the two together with strong twine. First run one end of the twine down the length you intend binding, allowing enough to tie at the bottom; then commence binding at the top over all three—the umbrella handle, the twine, and the stick. Wind the string around very tight, and when you reach the bottom, tie the twine you hold to the loose end of the length under the wrappings. Examine carefully and be sure the handle does not slide or twist on the stick; then push the point of the stick down into the ground at the place decided upon for the playhouse. If you are not strong enough to erect the house by yourself, ask some companions to lend a hand and help sink the stick firmly in the earth. When this is accomplished stretch out each length of twine in turn and drive the peg in the ground (Fig. 503). You will need a wide ruffle on the edge of the umbrella of some kind of material full enough to reach around the outer circle of pegs on the ground beneath its lower edge. The stretched twine will hold the ruffle out, forming an odd little playhouse with a smooth, round roof and drapery walls. Plait the ruffle and pin it on the umbrella with safety-pins; also fasten it at the bottom to each peg (Fig. 504). Newspapers pasted together and made of double thickness may be used for the ruffle, if more convenient, but be careful in handling the paper, as it tears readily. The longer the pole the higher and larger will be your house, for the strings also must be longer.
Take the straw or hay and divide some of it into bunches twelve inches in length. Tie these all together in a long row, forming a straw fringe. Sew the fringe around the edge of the umbrella with a coarse needle and thread, allowing it to hang over and down. Overlap the first row with another straw fringe and continue to sew on row after row until the top is reached and the umbrella entirely covered; then fasten the handle securely to a sharp-pointed stick and plant it firmly in the ground. Measure the distance around the outer edge of the umbrella, not including the straw thatch, and cut the cloth long enough to reach around, leaving an open space for the door-way. Use more straw to cover the cloth completely and sew the straw on in overlapping layers lengthwise of the material. With safety-pins fasten the wall around the inner edge of the umbrella, pinning the cloth to little loops of tape you have tied at intervals over the ribs of the umbrella (Fig. 508).
On each end of the counter nail an empty wooden box. Stand the box on one end and let the open part face backward; put your hand inside and drive a few nails through box and counter to fasten the box securely in place. Do the same with the second box and your counter will be ready for
[311]
[312]
Acorns make fine nuts. Gather a quantity of them, and for cabbage tie a number of corn-husks together, or grape-vine or hollyhock leaves; any kind of large leaves will answer the purpose. Take a small, short stick and with a string wind the ends of the leaves, one leaf at a time, on the stick, folding the first leaf opposite to and inside the second, the second in the third, and so on, always allowing each succeeding leaf to overlap the last until the cabbage-head is large enough; the resemblance to the real cabbage will be remarkable. Spinach may be made of small leaves. For asparagus pick a number of long, slender seed stems of the plantain. Short, slender sticks placed in a glass jar may serve as sticks of candy, licorice, or licorice root. You can utilize various grasses, leaves, roots, and seeds in many ways.
It requires only a few moments to make them. Cut a piece of smooth paper eleven and one-half inches long and seven wide (Fig. 524). Fold down diagonally the two top corners until they meet (Fig. 525); fold the other two corners in the same way (Fig. 526). Fold the top point down to meet centre of folded edge (Fig. 527); do likewise with the bottom point (Fig. 528). Turn the top over and fold to centre (Fig. 529); bring the bottom up to meet the edge of the folded top (Fig. 530). Now fold back and under one of the sides (Fig. 531), fold under the other side (Fig. 532), and bend back lengthwise through the centre until top and bottom meet (Fig. 533). Lay the pocket-book down on one side and the lower part will resemble Fig. 534. The lower portion of the sides O and P, Fig. 534, must be fastened together that the bottom may be tight and secure. Cut a strip of paper a trifle shorter than the length of (Fig. 534), and insert it at the bottom by first folding the strip through the centre lengthwise, then sliding one edge in at O and the other in at P. Push the two sides of the strip well up in the pocket-book, and the bottom will be tightly bound (Fig. 535). Turn the pocket-book right side up, and you will find two nice, firm little pockets. Slip your finger in one pocket and pull out the point to serve as a cover (Fig. 536). Cut a short slit through one layer of the front of the pocket-book for securing the point of the cover when the pocket-book is closed (Fig. 537).
manufacture it of strips of bright-colored paper rolled into the form of paper lighters about the length and thickness of ordinary stick candy. These mingled together in a separate glass jar or piled upon the counter add to the attractiveness of the store. Hard lump candy of various-sized pebbles will probably sell well, but if upon trial the demand is not as great as desired, you might wrap each pebble in a bit of bright paper to enhance its appearance; then the customers will doubtless invest more liberally in the gay-colored sweetmeats. Small candy balls, red and white, may be made of the red and white clover-heads picked close to the blossom, leaving no sign of the green stem visible. Keep the different colors separate, placing all of the red clover candy flat down in one layer on the inside of a box-lid, where it will look bright and pretty. The upturned edges of the lid prevent the clover from rolling out. White-clover candy will appear to better advantage if you place a piece of colored tissue-paper in a box-lid, allowing the edges of the paper to stand up a trifle beyond the sides before arranging the white clover in the lid. Gather a variety of grasses, roots, and leaves, tie them up in little bunches with strings formed of several pieces of long grass twisted or braided together, and sell them as soup-seasoning herbs. Large bouquets of white clover-blossoms with long stems and no leaves when bunched together, forming a white mass on the top, and then surrounded by large green leaves tied in place with braided grass, make excellent imitations of cauliflowers. Use the round, flat hollyhock-seed for crackers; peel off the outside green cover and the crackers will be white. You can pretend large-sized poppy-seed vessels are green tomatoes, which your customers will be glad to buy for making pickles. Have everything connected with your store neat and orderly, and conduct it in a business-like manner.
Carefully detach the rose petals one by one, beginning with the outermost and largest. Be cautious not to bruise or injure the fragile little things. Cut the sail and mast all in one piece from tissue-paper (Fig. 538). Fold the mast over twice, according to the dotted lines, that it may be stiff and able to stand erect. Bend the lower portion of the mast as in Fig. 539. Paste the inner sides of the fold together, and it will form a flat piece extending out on each side of the mast (Fig. 540). Over the bottom of this spread the least bit of strong paste or glue and place the mast well forward on one of the largest rose petals. The portion of the petal which grew inside the calyx forms the front part or bow of the boat. Have the mast stand perfectly erect; if it is inclined to bend toward either side, straighten it and keep it upright. Before launching the vessel allow a few moments for the glue to dry, then lift the boat very carefully by the top of the mast with your thumb and first finger and set it down on the water, which must be without even a ripple. When once the boat is well launched the waves may come with slight risk of damage to the craft.
of white rose petals with white sails and join the boats with a strip of white tissue-paper. Paste one end of the paper strip on the inner part of the right-hand side of one boat and fasten the other end of the paper strip on the inner part of the left-hand side of the other boat, allowing sufficient space between the two boats to keep them from touching. The twins will then sail together like two beautiful white sea-gulls floating on the crest of a wave.
Fashion the head from an old seed-vessel, which you will probably find still clinging to one of the rose-bushes. First make a small hole quite deep in the top of the seed-vessel; then push the end of the stem of the rose up into the head (Fig. 543). Run each toothpick arm through a green leaf and use a white or pale-pink rose petal for the girl's face (Fig. 544). Pin the petal to the head with four rose thorns, using two for the eyes, one for the nose, and one for the mouth. Pin a rose petal on the top of the head for a hat. Turn backward two petals, without breaking them from the rose, to form the dress waist; pin or gum one petal to the arms and neck in front and the other to the arms and neck at the back. Then stick three wooden toothpicks in the top of the rose (Fig. 544); place the toothpicks so they will form a tripod, two on a line across the front and the third a trifle back of and midway between the front ones. These three toothpicks will enable the rose girl to stand alone; the two foremost serve as legs and the other as a support. You can make feet of two green leaves stuck on the ends of the two front toothpicks (Fig. 544).
you might call it "The Feast of Roses," and decorate the four corners of a wee table with vases which would rival in color and beauty the famous "Peachblow Vase" for which such a fabulous price was paid. Make the little vases of large pink rosebuds; those beginning to unfold are the best. Peel off the outside petals and, grasping each bud, in turn, near its base with the thumb and first two fingers, gently work it back and forth until it is loosened and can be removed entire without damage. Stand each vase on a level surface and gather spears of grass to place in them. Push some of the grass ends down into the vases, but do not crowd them; have only two or three in each vase (Fig. 547). The pink color of the vase will contrast pleasingly with the green of the grass, and the feast will be laden with the delicate perfume of roses. You might candy different colored rose petals by dipping them in hot sugar syrup boiled until it spins like a thread, and then drying the petals separately on oiled paper; they will be appropriate for the party.
some pretty designs. You will need neither paints nor brushes, for the roses are the colors and deft little fingers the brushes. You must take the paints as you find them and work this way: Place two cream-colored petals on a smooth blank paper laid over a flat surface (Fig. 551); arrange two pink petals partially over the light ones (Fig. 552); lay down a stem from which you have taken the thorns (Fig. 553); add to the flower a fifth petal, which should be pink, and you will have painted a pansy (Fig. 554). Cut two of the green leaves of the rose according to Fig. 555, and place them as if growing at different distances on opposite sides of the stem (Fig. 556). Glue or strong paste dropped sparingly on the paper where you intend to put the centre of the flower will hold the petals in position, and, if necessary, you may use a trifle more glue as the work proceeds.
pin them together in a long row with slender sticks or broom straws (Fig. 560). You can weave larger and more substantial wreaths, strong enough to place on your mother's head when crowning her "Queen of Beauty and Kindness." Use the entire blossom mingled with buds and green leaves, all short stemmed, not longer than three or four inches. Bind the stems with string on a circle made of a piece of willow or some other pliable material, and be sure to remove the thorns from all the stems before weaving the wreath (Fig. 561).
[334]
[335]
These little trials of skill in speech not only give you much fun, but at the same time they cure hesitancy of speech and brighten the mind; but do not let that frighten you and deter you from profiting by the sport. Never be afraid of advantageous learning; let it come in what guise it may, it will surely add to your pleasure as well as your worth.
while the board may be used for a "Teeter-tarter"; balance the plank across a log or the lower bars of a fence; then when two players take their seats at the ends of the board, if it is properly adjusted, they will rise and sink alternately as the ends move up and down, keeping time as the players sing:
As far as possible have the table equipment of paper, that it may not be necessary to carry it back home. A tablecloth composed of large sheets of smooth white wrapping-paper will answer the purpose very well. Paper plates such as are used by bakers, make excellent substitutes for china ones and are the very thing for outing parties. Spoons may be home-made, whittled of wood; should the bowls of the spoons prove too difficult to manage, make them like small shovels (Fig. 567). If time will not allow of this, flat, smooth sticks larger at one end than the other (Fig. 568) may take their place. Knives are not absolutely necessary. Only one need be taken, but that must be of good size and sharp, to be used for cutting bread. It is a mistake to carry fine table linen or silver, they always prove a great care and are apt to be injured or lost, but not being skilled in the art of eating with chopsticks, like the Chinese, you will have to be supplied with forks. Take barely enough for the purpose and have them of the most inexpensive quality; then it will not matter if one or two happen to be lost. Only a few cups will be required and no saucers; the company can take turns using the cups. One item more—a pail for the water.
which accompanies it. When each one has secured his contribution of box or paper, all must stand around the fire and in turn cast the fuel on the flames. The first to do so begins telling any kind of an original tale which imagination may suggest, such as,
[346]
[347]
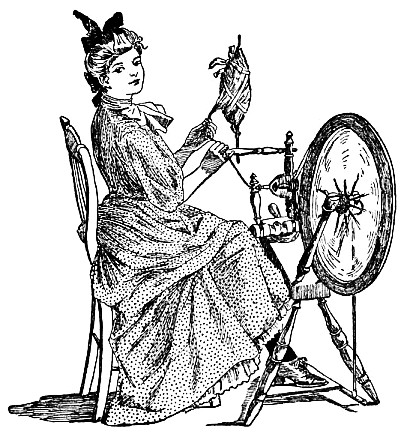
The spinning-wheel shall buzz and whirr.
CHAPTER I
SPINNING

THERE is so much poetry, romance, and history associated with the distaff and spindle, and later with the old spinning-wheel, that we have looked upon them with a feeling almost of awe, certainly with a reverence for the gentle hands that spun so industriously generations ago. But it has now occurred to us that we too may set the wheel a-humming, taking up with enthusiastic eagerness the work laid down by our great-grandmothers so many years ago. The song of even the athletic girl will soon be like Martha's when she sings in the market-place:
"I can spin, sir,"
and the wheel will no longer be set aside as a relic of an industry past and gone.
All the old handicrafts are coming back again, and ere long we shall be as proud as the maids in Revolutionary times of our hand-spun and hand-woven fabrics. To be able to spin and weave is to be accomplished in the newest as well as the oldest of household arts.
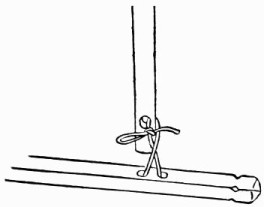
Fig. 1.—The slender rod tied at the lower end.
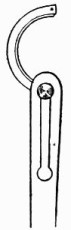
Fig. 2.—The looped upper end of the rod.
Is the old spinning-wheel in the attic, neglected and covered with dust, or in the parlor, decked in all its bravery of blue ribbons and snowy flax? Bring it out, wherever it may be, and for the first time in many years it shall buzz and whirr, while a girl's slender fingers part the flax and a girl's light foot rests upon the treadle. Look well to
The Wheel
and see that none of its parts are missing. There must be the bench, of course, with its treadle and wheel, then the slender rod which is tied loosely at the lower end to the cross-piece of the treadle (Fig. 1), and caught at the looped upper end to the little, curved-metal crank that extends at right angles from one end of the wheel's axle (Fig. 2).
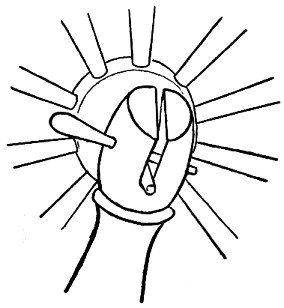
Fig. 3.—A little peg slipped through two holes.
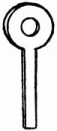
Fig. 4.—The leather rings.
The two slanting uprights which hold the wheel in place are slotted at the upper ends, and in these slots rests the axle. A little peg, slipped through two holes in one of the uprights, keeps the axle from slipping out of place (Fig. 3).
The frame that holds
The Spindle
belongs in the position shown in the illustration of the spinning-wheel. By turning the handle that extends out from the upper end of the bench this frame may be moved slightly forward or backward when it is necessary to loosen or tighten the band on the wheel.
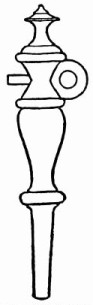
Fig. 5.—One ring in each upright.
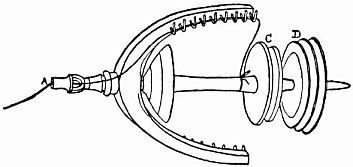
Fig. 6.—The spindle.
In the two uprights of the spindle-frame there must be leather rings like Fig. 4, one ring in each upright. The narrow strip extending outward from the ring is pushed through the hole in the upright, and the edge of the ring fitted into the little grooves just above and below one of the holes (Fig. 5). These two leather rings hold the ends of the spindle, which can be easily taken out and put in by bending one of the rings backward or slightly turning one of the uprights. Fig. 6 shows the spindle with the spool, or bobbin, and the small, double-grooved wheel. The spindle proper is simply the metal rod and horseshoe-shaped piece of wood with its two rows of little hooks or teeth. Besides the wheel and spindle there must be
The Distaff
and the arm that holds it. The arm is an upright with a rod extending out at right angles from the upper end. The lower end of the upright is slipped into a hole at one corner of the highest part of the bench.
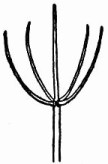
Fig. 7.—The tip of your Christmas tree for a distaff.
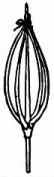
Fig. 8.—Bring the four branches up and tie at the top.
The distaff, which the mountaineers of Kentucky call the "rock," is a thing you can make for yourself if your wheel happens to have lost its own. Many are cut from the top points of pine-trees which grow like Fig. 7, and dogwood also is sometimes used. The tip of your Christmas tree will be just the thing. Strip off the bark, bring the four branches up, and tie at the top to the middle stem (Fig. 8). Let the lower end of the stem extend about four inches below the branches and whittle it down to fit in the hole in the distaff-arm.
These are all the parts of the spinning-wheel, but before you can "see the wheels go round" every piece of metal must be
Thoroughly Cleaned
and freed from rust. Rub first with kerosene oil and then with the finest emery paper. Be very careful in polishing the teeth that you do not bend or break them, as it will not be easy to have them replaced. In fact, it is difficult to replace any part of the wheel, and though it has lasted several generations, careless handling may put it past repair.
Fig. 9.—Proper size of cord for wheel band.
When the cleaning is finished, grease with lard the parts where there is any friction. The slots that hold the axle, the spindle-stem, and the metal arm, where the treadle-rod rests upon it, all need lubricating.
The best
Band for the Wheel
is hand spun, but at present it is possible to obtain them only of old-fashioned spinners who make their own bands. You can, however, make a band of cotton cord, such as is used for cording dresses. Fig. 9 gives the exact size. The length of cord for a wheel measuring eighteen and a half inches in diameter is about ten feet five inches. This allows for a lap of one inch at the joint. Sew together with silk, wrapping and sewing until the joint is almost invisible.
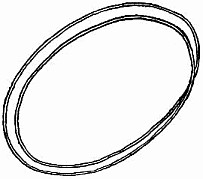
Fig. 10.—Make a double loop.
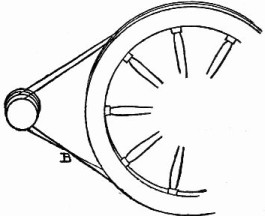
Fig. 11.—The band will cross at the bottom.
To Adjust the Band
loop it together, making it double (Fig. 10), lift the wheel from the sockets, and slip the band over it. Fit one part of the band into one of the grooves of the wheel, the other part into the other groove, allowing it to cross at the bottom (Letter B, Fig. 11). Take the spindle from its frame and fit the bands into the groove in the end of the bobbin (Letter C, Fig. 6) and into the first groove in the small wheel (Letter D, Fig. 6).
The Flax
may be obtained from any linen-thread factory and can be bought by the pound or half-pound. It is graded by color, the darkest being the cheapest and the whitest the most expensive. For practice-work the cheapest is as good as the more expensive. When you have learned to spin a fine, even thread you may choose the color in reference to the article you intend to make.
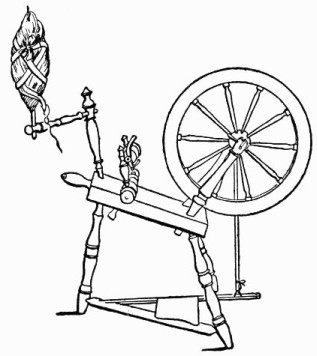
The spinning-wheel.
Open your hank of flax, take part of it, and spread thinly over the distaff, wrapping it around and around. Put on several layers, each almost as thin as a spider-web, extending it out widely and smoothly each time.
You may think the ribbon tied on the distaff of your parlor wheel is merely for ornament, but it is not. The bands hold the flax in place while it is being spun, and a crisp, dainty, pretty-colored ribbon is just as useful for the purpose as one that is old and faded, and it is far prettier to look upon. Wrap the ribbon around the flax on the distaff, beginning at the bottom, cross it, and tie as shown in illustration of the spinning-wheel.
Though everything is ready, before attempting to spin,
Practice,
simply working the treadle until you can manage that part of the work mechanically and give your whole attention to your hands.
It seems a simple thing to work the treadle, but you will find that without previous practice you will forget to make your foot go in the absorbing interest of getting the flax ready to run on the spindle. Curb your impatience a little while therefore, and resolutely turn the distaff, with its pretty load, away from you. Place one foot on the treadle, give the large wheel a turn to the right, or away from the spindle, and try to keep a steady, even motion with your foot. The jerks caused by uneven pedalling will always break the thread, so you must learn to make the wheel turn smoothly and easily, without hurry and without stopping. Some spinners place only the toe of the foot on the treadle, others rest on it the heel also; it matters little which method you adopt so long as the wheel turns evenly. When you are quite satisfied that you can keep the wheel going without giving it a thought you may begin
To Spin.
From the lowest ends of the flax draw down several strands and twist them with your fingers into a thread long enough to reach easily the bobbin on the spindle. Pass the end of the thread through the hole in the end of the spindle nearest to you (Letter A, Fig. 6), carry it across and over the upper row of teeth and tie to the bobbin (Fig. 6). Start your wheel going, and, forgetting the action of your foot, give your undivided attention to drawing out the flax. Hold the strands lightly with your left hand and with your right keep constantly pulling them down and at the same time twisting them slightly. See illustration on first page. All this time you must keep the flax from matting and tangling and the twist from running up into the mass of flax on the distaff. Only practice will make perfect in this work, though the knack may come suddenly and you will wonder at your first clumsy attempts. The little fluster and excitement one feels in beginning and the hurry to get the flax into shape for the spindle is a drawback that practice will also overcome.
When the Thread Breaks,
as it will again and again at first, thread your spindle as before, tie the new thread to the broken end and begin once more. A better way to mend the thread when you are really doing good work is to unwind a little from the bobbin, thread it backward through the spindle, bring the end up to meet the end from the distaff, and let the two lap three or four inches; then moisten your fingers and twist the threads together, making one thread again.
Moistening the Fingers
occasionally is a good thing while twisting, as it makes a smoother thread. In the old days the spinner kept a cocoa-nut-shell, filled with water, tied to the lower part of the spindle-frame, into which she daintily dipped the tips of her fingers when necessary. A finger-bowl or cup of water near by will answer the same purpose.
The little girl and the little loom.
CHAPTER II
WEAVING ON A HOME-MADE LOOM
IT is easier than sewing or knitting or crocheting, and comes so natural to many of us that one would almost think we should know how to weave without being taught. Why, even some of the birds do a kind of weaving in their pretty, irregular fashion, and it was probably from the birds and other small, wild creatures that the earliest human mothers took their lessons in weaving, and learned to make the mats for their babies to sleep on and baskets for carrying their food. No one knows how long ago these first baskets and mats were woven, but in the beginning weaving was done without looms. Afterward rude frames were tied together and hung from the limbs of trees, then softer and more flexible material was used and finer fabrics were woven. To this day almost the same kind of looms are used by the Indians in our far Western country, many miles away from the roar and clatter of machinery, and on them are woven the wonderfully beautiful Navajo blankets for which Eastern people are willing to pay such large sums.
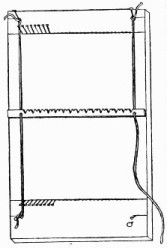
Fig. 12.—The frame for the loom.
If it is natural to weave, it should also be natural to make one's own loom, and
The Pin Loom
is simple in both the making and the working, with material usually close at hand. The necessary wood you will find at the nearest carpenter-shop, if not in your own home, and for the rest, a paper of strong, large-size pins, a yard of colored cord, and one ordinary carpet-tack are all that is needed.
Make the frame for the loom of a smooth piece of soft pine-board, fifteen inches long by nine inches wide (Fig. 12). Make the heddles of two flat sticks, nine inches long, half an inch wide, and one-eighth of an inch thick (Figs. 13 and 14). From another flat stick of the same thickness, nine inches long by one inch wide, make the shuttle (Fig. 15).
Fig. 13.—Heddle.
Fig. 14.—Heddle.
With a pencil and ruler draw two straight lines across the board, the first one inch and a half from the top edge, the other two inches and a half from the bottom edge. This will make the lines just eleven inches apart. On these lines, beginning one inch from the side edge of the board, make a row of dots exactly one-quarter of an inch apart, twenty-nine dots on each line, as in Fig. 12. At each corner of the board, one inch above the upper line and one inch below the lower line, draw a short line, and on each short line, three-quarters of an inch from the side edge, make one dot.
Fig. 15.—The shuttle.
With a small tack-hammer drive a pin in each of the twenty-nine dots on each long line, and in each single dot on the four short lines (Fig. 12). When driving in the pins let them all slant evenly outward, the ones on the top lines slanting toward the upper edge of the board, those on the lower lines slanting toward the bottom edge, as in Fig. 16. Now lay your board aside where nothing will be placed on top of it, and make your heddles.
Fig. 16.—Let the pins slant outward.
The Heddles
are for lifting the threads of the warp so that the shuttle may be passed through. One heddle is left perfectly plain, like Fig. 13. The other is cut in notches on one edge like Fig. 14.
Fig. 17.—The marked-off notches in heddle.
Along the entire length of one of the sticks rule a line dividing it exactly in the middle (Fig. 17). On this line, beginning three-quarters of an inch from the end of the stick, mark off spaces one-quarter of an inch apart, making thirty-one dots. At the upper edge of the stick mark off the same number of spaces exactly opposite those on the line. Then draw straight lines connecting the upper and lower dots, extending the first and last lines entirely across the stick (Fig. 17.) At a point on the upper edge, exactly in the middle between the first two lines, start a slanting line and bring it down to meet the second line where it touches the long line. Between the second and third lines draw another slanting line to meet the first at the bottom, forming a V. Leave the third line, and make another V at the fourth, and so go the length of the heddle, drawing a V at every other short line. At the top between the V's make smaller V's, as in Fig. 17. With a sharp knife cut out these notches, bringing the large ones quite down to the middle line (Fig. 17). On the end lines just below the middle line bore a hole with a small gimlet or a hat-pin heated red-hot at Letter A in Fig. 17. Indeed the notches, too, may be made with a hat-pin by laying the red-hot end across the edge of the stick at the top of the line, and pressing it down while rubbing it back and forth. If you are unused to handling a knife, burning the notches will be the easier way. You can shape and trim them off afterward with the knife.
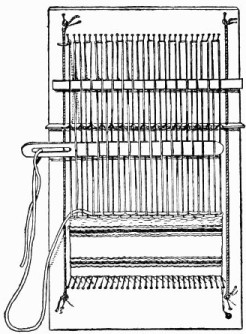
The complete pin loom.
Of the third flat stick make
The Shuttle.
Curve the corners at each end as in Fig. 15. Sharpen one end down to a thin edge and in the other end cut an eye two inches long and one-quarter of an inch wide (Fig. 15). Cut your yard of colored cord in half, pass the end of one piece through one of the holes in the notched heddle, the end of the other piece through the hole in the opposite end of the heddle, and tie each end of the cords to one of the pins at the four corners of the board, drawing the cords taut. This will fasten the heddle in its place across the loom (Fig. 12).
Near the bottom of the board, directly below the last pin at the right on the long line, drive the carpet-tack to serve as a cleat for fastening the end of the warp. All that now remains to be done is
To Adjust the Warp,
and your loom will be ready for weaving. The threads which extend up and down, or from the top to the bottom of the loom, are called the warp. Soft, rather coarse knitting-cotton makes a good warp for almost anything woven on a small loom.

Fig. 18.—Adjusting the warp.
Tie the end of the warp securely to the first pin on the long line at the upper left-hand corner of the loom (Fig. 18). Bring the string down and around the first two pins on the lower line, up again and around the second and third pins on the upper line, and then down and around the third and fourth pins on the lower line. Up again, down again, crossing two pins each time, back and forth until the last pin on the lower line has been reached. Wrap the warp around this pin several times, and then around the tack, tying it here so that it cannot slip. The warp must lie flat on the board where it passes around the pins, and in stringing up it must be drawn rather tight, though not with sufficient force to pull the pins out of place.
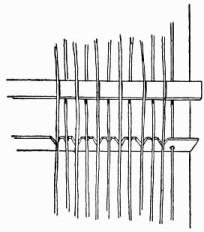
Fig. 19.—Putting in the second heddle.
Turn the heddle on edge, the notches up, and slip the threads of the warp into the notches, one thread in each notch. This, you will see, divides the warp into upper and lower threads, and forms what is called the shed. While the threads are separated take the other heddle and darn it in and out above the first heddle, taking up the lower threads and bringing the heddle over the upper ones as in Fig. 19.
The Woof
is the thread which crosses the warp and usually covers it entirely. The material to use for woof will depend upon what you are going to make. Germantown wool is used for the woof of the miniature Navajo blanket shown in the illustration. The warp is knitting-cotton.
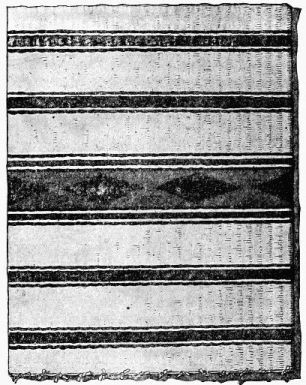
A Miniature Navajo Blanket.
This is
The Way to Weave a Navajo
blanket; simpler things you can easily make after this first lesson: Of Germantown wool you will need three colors, which are the colors most frequently used by the Indians—red (scarlet), white, and black, about half a hank of each. Take five yards of white wool, fold one end over a two-yard length, fold again, and push the double end through the eye of the shuttle (Fig. 20).
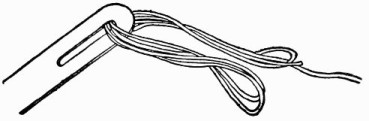
Fig. 20.—The threaded shuttle.
Tie the long end of the wool to the first pin at the lower left-hand corner of the loom, on the long line, making a tight knot and pushing it down close to the board (Fig. 21).
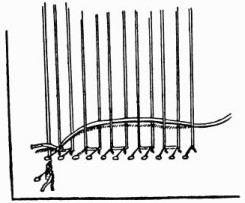
Fig. 21.—Starting the woof.
With the notched heddle on edge push the shuttle through the shed—that is, between the upper and lower threads of the warp. Draw it out on the other side, then turn the heddle down, notched edge toward you, and stand the plain heddle on edge. This will lift the lower threads of the warp above the others and make them the upper ones. Push the shuttle back through the shed, lay the plain heddle flat, and stand up the notched heddle. Weaving from the left, the notched heddle always stands, while the plain one lies flat. Weaving from the right, the plain heddle stands, and the notched one is turned down.
Do not draw the woof tight across the warp. When you have passed the shuttle through, leave the thread like Fig. 21, and then push it down firmly with your finger-tips until it lies close to the pins.
A Coarse Comb
with no fine teeth is very good to use for packing the woof, and takes the place of what is called the lay. While the woof is looped out like Fig. 21, comb it down toward you with the comb, and it will fit in evenly between the threads of the warp. As the woof of the Navajo blanket must be very tightly packed, use first the comb and then your fingers to push it down and make it compact.
Weave back and forth until all the wool in the shuttle is used. If the end of the woof extends beyond the last thread of the warp on either side, turn it back and weave it under and over several threads, and start a new piece with the end just lapping the old. The ends of the woof must never be allowed to extend beyond the warp at the sides. It is not necessary to tie the new piece of woof; the tight packing will hold it in place.
In this case the new woof must be of the red wool. Weave it across twice, or once over and back, making a very narrow red stripe, then cut it off and thread the shuttle with white. Weave the white twice across, then change to black and weave a stripe one-quarter of an inch wide. Above the black weave another narrow white stripe and another narrow red one. Put a long thread of white wool in the shuttle, and weave a white stripe one inch wide. You will have to thread the shuttle twice for this, as too long a thread will make so large a bunch that it will be difficult to pass it through the shed. After the white stripe weave another black, white, and red stripe like the first, then another inch-wide white stripe. Once more weave a black, a white, and a red stripe. Begin with the narrow black, follow with the narrow white, and then weave a wider red stripe, taking the thread four times across. After the red the narrow white, and then the narrow black stripe.
This last stripe is the lower border of
The Central Pattern
of the blanket, where your weaving will become more difficult, and at the same time more interesting.
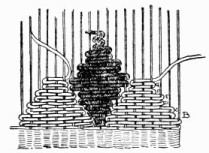
Figs. 22 and 23.—Weaving the centre stripe.
Thread the shuttle with a long piece of red wool and weave it once across from the left, turn back and weave through five threads of the warp, draw the shuttle out and weave back again to the edge; again weave through the five threads, then back as shown at B in Fig. 22. Turn here and do not take up the last thread of the warp; pass the shuttle under three threads, turn on the next thread, and bring it back under four threads (C, Fig. 22), once more under the three threads, turning on the next as before, but passing back under two threads only. Turn on the next thread (D), and pass under three. Back under two threads (E), turn as before on the next thread under two, turn, back under two (F), turn, under one, turn on the next, under two (G), turn, under one, turn on the next, back under two, and unthread the shuttle, leaving the woof hanging.
Begin with a new piece of red wool, follow the same direction, and weave another red point on the next five threads, then a third one which will take in the last warp-thread on the left. You will notice in the diagram that the woof always turns twice on the same thread of warp.
When the three red points are finished fill in the spaces between with black (Fig. 23), then continue to weave the black up into points as you did the red, making two whole and two half black diamonds. Leave the woof quite loose when you make a turn in weaving, and the space left between the red and black will fill up in packing.
Take up the end of the red wool left at the top of the first red point, and weave in the space between the half and first black diamond, then break off. Take the next red end and fill in between the two whole diamonds, then the next, and fill in between the whole and the last half diamond. This will give you a pattern of black diamonds on a red ground. Weave the last of the red woof once across, then break off and weave a black, white, and red stripe like the one forming the lower border of the pattern. Finish the blanket with the wide white stripes and narrow colored ones like those first woven.
To take the work from the loom, cut the threads between the pins at the top of the loom, and with quick but gentle jerks pull it off the lower row of pins. Tie together the first and third loose ends of the warp close to the edge of the blanket, then the second and fourth threads, and so on across, then cut the ends off rather close to the knots.
The little Navajo blanket woven in this way will closely resemble the real Indian blanket in texture, pattern, and colors.
Blankets for Dolls' Beds
may also be woven of fine white wool and finished with a pretty pink or blue border at each end. A wash-cloth, soft and pleasant to the touch, you can weave in half an hour with candle-wick for woof. This should not be packed tightly, but woven with rather a loose mesh. Then there are cunning little rag rugs to be made for the dolls' house, with colored rags for the woof. But so many materials may be woven on your home-made loom, that it will be a pleasure for you to discover them for yourself.
CHAPTER III
A BALL OF TWINE AND WHAT MAY BE MADE OF IT
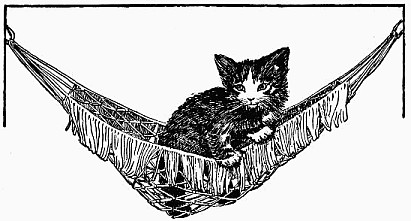
Fig. 24.—The hammock you can make.
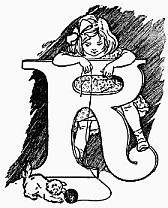
RUN to the kitchen and ask the cook to lend you her pastry-board for a day or two, to use as a support for holding string from which to make a toy hammock (Fig. 24).
Drive twelve large tacks in a straight line across the top edge of the board; place the tacks one inch and a half apart (Fig. 25), and with a pencil draw lightly a line across the board from side to side, one inch and a half below the tacks. This will guide you in keeping the knots even. Be sure that the line is perfectly straight; then draw another line one inch and a half below the first and continue making lines until the board is covered with them, at equal distances apart and running across from side to side. Over each tack on the top of the board hang a piece of string about two yards long (Fig. 26). Being doubled, each string makes two lengths of one yard each.
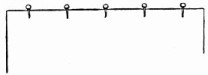
Fig. 25.—Tacks in top of board.
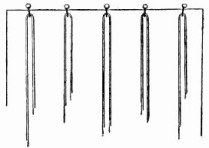
Fig. 26.—Over each tack hang a piece of string.
Bring the two ends of each strand down evenly together that all the strings may hang exactly the same in length. Fig. 26 is intended only to show how to hang the strings and gives but a section of the work.
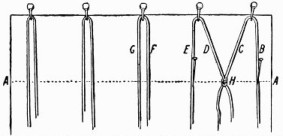
Fig. 27.—With strong pins fasten the first and fourth strings to the board.
With strong pins fasten the first and fourth strings down tight to the board (see B and E, Fig. 27); then tie the second and third strings together (C, D, Fig. 27), making the knot H (Fig. 27).
To Tie the Knot,
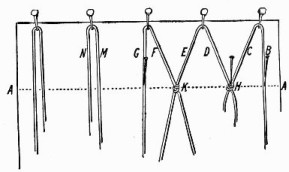
Fig. 28.—When knot H is secure stick pin in string G.
bring the two strings C and D (Fig. 27) together; hold the upper portions with the thumb and first finger of the left hand and the lower parts in the right hand, bring the lower parts up above the left hand—across and over the portion of string held in the left hand—and turn them down a trifle, running them under the strings in the left hand just above the thumb and first finger; pull the lower portion of the strings through the loop out over the first finger of the left hand as shown in Fig. 29, O. Tighten the knot with the right hand while holding it in place on the line with the left. The secret of tying the knot properly is to hold the two strings together and tie them exactly as one would tie a knot in a single string.
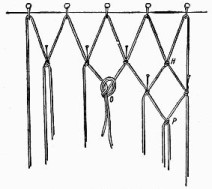
Fig. 29.—Tying the knot.
When the first knot (H, Fig. 27) is tied, take the pin out of the string E and stick it in the string G, according to Fig. 28. Fasten down the knot H with another pin, and you will have the knot H and the string G firm and tight to the board while you tie the two loose strings F and E together, forming the knot K. Pin this down to the board and remove the pin from the string G and place it in the string N, leaving M and G free to be knotted together.
Continue tying the strings in this way until you have made the first row of knots across the board, always using pins to hold the boundary-strings securely to the board on each side of the two you are tying. As each knot is formed, pin it to the board and allow the pins to remain in the first row until the second row of knots has been made.
Fig. 29 shows the beginning of the third row of knots in the knot P, the pin being taken from the first knot, H, ready to be placed in the knot P. Form row after row of meshes by knotting the strings until the netting comes too near the bottom of the board to work comfortably, then slip the top loops off from the tacks and hang a portion of the net over the top of the board, allowing a lower row of meshes to hang on the tacks.
Fasten the last row of the knots carefully, binding with strong strings the short loose ends of the strands securely to the string forming the mesh each side of the knot. Remove the net from the board and make
A Fringe
of string on each side of the hammock. In Fig. 30, T shows how to place a strand for the fringe under one side of the mesh on the edge of the net: and S gives the manner of bringing the ends of the strand down over the string forming the mesh and under the loop made by the centre of the fringe-strand. Pull the two ends of the strand down evenly, and bring the knot up close and tight to the hammock-mesh as shown in the finished fringe in Fig. 30.
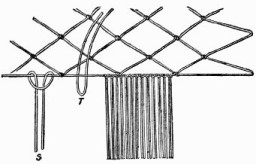
Fig. 30.—Making the fringe.
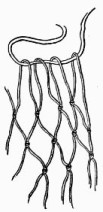
Fig. 31.—Heavy cord through loops on end of hammock.
When you have made the fringe, thread a separate heavy cord through the loops on each side of the hammock (Fig. 31). Tie the loops together (Fig. 32) and fasten together the two ends of each cord, making these two extra last loops long enough to allow of a free swing for the little hammock, or you can thread a cord of the same as that used in the hammock through every loop, tying the ends of each piece together through a brass ring, and instead of one long loop a number will support the hammock.
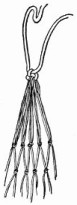
Fig. 32.—Tie loops together.
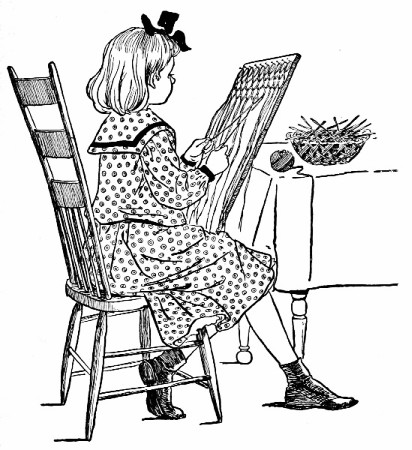
Making a sash-curtain for her room.
Fig. 33 shows a strong, serviceable little
School-Bag
which is easier to make than the hammock. Take a piece of heavy cord twenty inches long, lap one end to the distance of an inch over the other and sew the two lapped ends firmly together; then bind them neatly around and around with string. Bring the two edges or sides of the circle together, forming two ends (V V, Fig. 34). Tie a strong string on each end (Fig. 34) and fasten each of the strings to the back of a chair; you will then have a circle of heavy cord securely suspended in mid-air. Cut twenty-four lengths of twine, each twenty-five inches long; double each piece and fasten all the strands on the circle of heavy cord in the same way you made the fringe on the hammock (X X, Fig. 34), except that this time the strands must be quite a distance apart. Let all the spaces between the strands be equal. Having fastened the lengths of twine on the circle, net them together exactly as you netted the hammock, but you must depend upon your eye to keep the meshes even and of the same size, as there will be no board with lines to guide you (Fig. 34). Tie the knots in circular rows, going around on both sides of the circle for each row. Continue the meshes until within three and a half inches of the bottom, then tie the two sides together, closing the bottom of the bag and forming the fringe shown in Fig. 33.
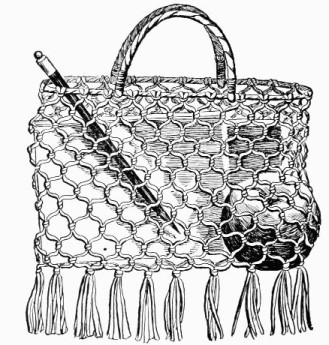
Fig. 33—Your school-bag made of string.
Having finished the bag, untie the strings attached to the two ends and make two handles of heavy cord or slender rope. Fasten the handles on their respective sides of the bag. Loop the ends of the handles under the cord forming the top of the bag, and bring each end up against its own side of the handle. Sew each of the two ends of the two handles securely to the handle proper; then bind the sewed portions neatly together with fine cord as in Fig. 33.
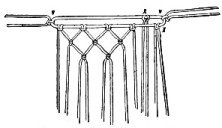
Fig. 34—Making the school-bag.
With some firm straws and more string we will make
A Sash-Curtain
for the window of your own room, as the little girl is doing in the illustration. Loop about thirty strands on the same number of tacks, in the manner in which you hung those for the hammock (Fig. 26). Make one row of knots, and before forming the next row slide a piece of straw one inch long over the two strings which are to be knotted together; the ends of the string must be moistened and brought together in a point in order that they may more easily be threaded through the straw. The letter R in Fig. 35 shows the straw with the ends of the string run through it, and U gives a straw higher up on the strings. After each straw is put into place, knot the strings immediately underneath to prevent the straw from sliding out of position.
Fig. 35 shows how to manage the work. It is almost exactly like that of the hammock, the only difference being the threading on of the straws which hold the strings in place without a knot at the top (see W in Fig. 35). Let the bottom of the net end in a fringe. Take the loops off from the tacks when the curtain is finished, and slide them on a straight, slender stick, which you can fasten to the window by resting the ends of the stick through loops of tape tacked on the sides of the window-frame at the right distance up from the ledge of the window.
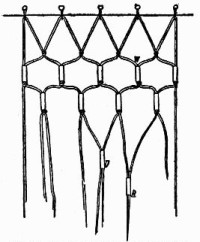
Fig. 35.—Sliding straws on strings for curtain.
If possible, let all the net-work be made of pliable, soft material; it is easier to handle, and the results are much prettier.
Make the curtains of any color you may fancy.
CHAPTER IV
AN ARMFUL OF SHAVINGS AND WHAT TO DO WITH THEM
DO you love to go into a carpenter-shop, with its sweet-smelling woods and fascinating tangle of white and rose-tinted shavings, and to watch the carpenter guide his plane along the edge of a board, shaving off so evenly and smoothly the long curls which look almost as natural as the ringlets of a little girl? I am sure that many times you have tucked the ends of the shavings under your hat and scampered off with the curls streaming out behind or bobbing up and down delightfully at the sides.
It is great fun, yet there is still more entertainment to be found in these pretty shavings.
Gather an armful, then, choosing the most perfect ones, not too thin, with firm, smooth edges, and you shall weave them into
A Pretty, Soft Little Basket
like the illustration.
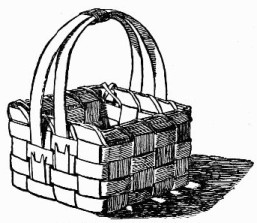
The soft little basket made of shavings.
Fig. 36—Directly across the centre draw a straight line.
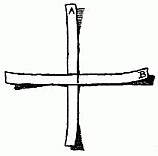
Fig. 37—So that the upper edge of B will touch the dividing line of A.
Pine-shavings are the best to use, as they are less brittle than those of harder woods. Select a number and put them to soak in cold water to make them soft and pliable. Then, lifting out those of an even width, place them before you on a lap-board or table, and after passing them between your fingers several times to take the curl out, cut eight pieces eleven inches long. Directly across the centre of two of the strips draw a straight line, as in Fig. 36. Place one of these strips, A, flat on the table and lay the other, B, across it so that the upper edge of B will touch the dividing line of A and the mark on B will be on a line with right-hand edge of A, Fig. 37. Under A slide another strip, C, Fig. 38. Over B and under C slide the strip D, Fig. 39. Over D and under A pass the strip E, Fig. 40. Under E, over B and under C weave the strip F, Fig. 41. Under E, over B, and under C weave the strip G, Fig. 42. Over F, under D, over A, and under G weave the strip H, Fig. 43. This forms a square for the bottom of the basket.

Fig. 38.—Under A slide the strip C.

Fig. 39.—Over B and under C slip the strip D.
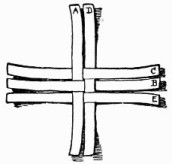
Fig. 40.—Over D and under A pass E.
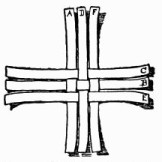
Fig. 41.—Under E, over B and under C weave F.
Bend up the ends and
Weave the Sides
with longer, narrower shavings which you can make by cutting lengthwise through the middle of several wide shavings.
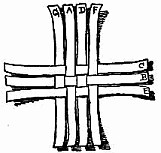
Fig. 42.—Under E, over B and under C weave G.
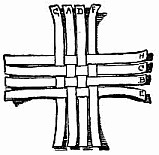
Fig. 43.—This forms the bottom of the basket.
If you find any difficulty in keeping in place the part you have woven, pin it to the board or table with several pins, as in Fig. 44. Bring the sides up close to the edges of the bottom, then start your weaver at D, on the inside of the basket (Fig. 44).
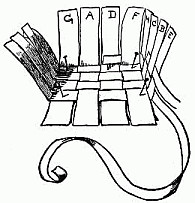
Fig. 44.—Bend up the ends now and weave the sides.
Weave all the way around, turning the corners sharply, until the weaver meets the first end; lap it over this, cut it off and tuck the last end under H. Start the next weaver at C, weave it around and tuck under E. Weave five weavers around the sides of the basket, beginning each time in a new place that the joints may not all come together, then bend the upright shavings over the edge of the top weaver, tucking the ends of each under the third weaver, one inside, the next outside, as they may come inside or outside the basket (Fig. 45).
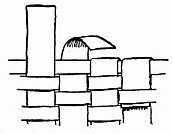
Fig. 45—Bend the upright shavings over the top edge.
Bind the Edge
with two binders the width of the side weavers. Hold one inside, one outside, and whip them on over and over, taking the stitches with a narrow strip of shaving as shown in Fig. 46.
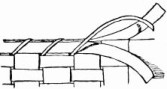
Fig. 46.—Bind the edge with two binders.
Cut two strips the width of your side weavers for
The Handle,
making one twelve inches and the other eleven inches long. One inch from each end cut notches, as in Fig. 47. Slide the end of the short strip under the second weaver on one side of the basket and pull it up until the points catch on the weaver, then tuck the end under the lower weaver (see illustrations).
Fig. 47.—Notch the ends like this.
Loop the handle diagonally over the basket and fasten the other end on the second weaver on the side. Secure the ends of the long strip on the third weaver, allowing it to cross the other side of the handle at the top, then bind the two pieces together at the middle by wrapping with a shaving of the same width over and over. Split this wrapper at the last end and tuck the two ends in at the sides. Fig. 48 shows the under part of the handle with one end of the wrapper tucked in.
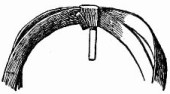
Fig. 48.—Tuck the two ends in at the sides.
You can make table-mats, charming little handkerchief-cases, and a number of other things of the dainty shavings, all on the same principle as that of the basket.
To make
The Handkerchief-Case,
weave a square, measuring eight inches, of the narrow shavings, just as you did for the bottom of the basket. These shavings must be twelve inches long and you will probably need about thirty-two pieces. When the square is finished tuck in the ends, as around the edge of the basket, then bend in three of the corners to meet at the middle and catch with needle and thread. Sew a quarter of a yard of bright ribbon where the corners join and another quarter of a yard on the loose corner. (See illustration.) Put your handkerchiefs in the little pocket, bring up the loose point, and tie the ribbon in a pretty bow.
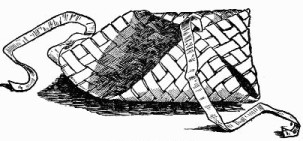
The handkerchief case.
CHAPTER V
PRIMITIVE REED CURTAINS
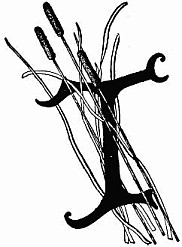
THESE pretty rustic hangings can be made very easily and quickly. They are light in weight and the general tone of coloring, when the reeds have been carefully dried at home, is a pleasing soft gray green, with suggestions here and there of gray browns, reds, and yellows. The curtains may be either of these reeds or fresh green cat-tails, and even of the silvered gray stalks left standing from last season. The cost in actual outlay of money for several curtains need be only a few cents for cord, staple-tacks or nails, and screw-eyes, but, like the early savage whose method of work you are imitating, you must collect the
Raw Material
out in the open. So away to the spot where the finest cat-tails grow, gather a lot of them, cutting the stalks off clean and smooth at the base, that the cat-tails may not be bent or split, for as reeds in your curtain they must be as near perfect as possible. Cut the velvety brown head off from each one, making all of the stalks the same in length; then, with several long leaves twisted together for string, tie the stalks into a bundle and march home with the treasure.

Fig. 49.—Beginning a primitive curtain.
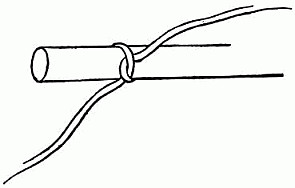
Fig. 50.—Centre of twine tied on long stick.
An old bamboo fishing-rod, a length of handle from a long-handled dusting or window brush, or any kind of a long, slender, smooth, round stick will do for the top curtain-pole from which to hang the reeds. Lay the pole across a table in front of and parallel to you; then tie the centres of four pieces of cord of even lengths on it at equal distances from each other (Fig. 49). Detail of the work is given in Fig. 50. Place a cat-tail reed up against the four ties, allowing one string from each tie to come over and the other under the cat-tail (Fig. 51). Cross the two lengths of each cord over the last cat-tail, bringing the lower string up and the upper string down (Fig. 52); then lay another reed up against the crossed strings, carrying the strings in turn over this reed (Fig. 53). Again bring the lower strings up and the upper down before placing in another cat-tail, and always alternate the large and small ends of the reeds as in Fig. 54, in order to have them equally balanced and to avoid bringing all the small ends on one side and the large ones on the other side of the curtain.
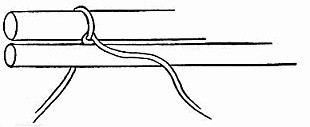
Fig. 51.—Allow one string to come over and the other under the cat-tail.
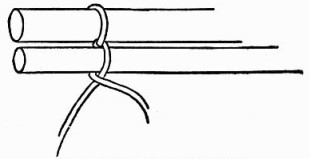
Fig. 52.—Cross the two lengths of twine.
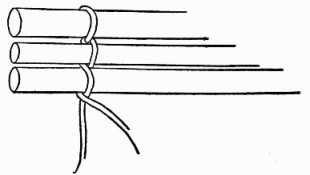
Fig. 53.—Lay another cat-tail up against the crossed strings.
Fig. 54.—Alternate large and small ends of reeds.
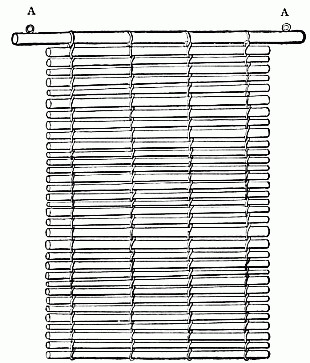
Fig. 55—Primitive curtain of reeds and twine stitch.

Fig. 56.—Staple nail in top pole of curtain.
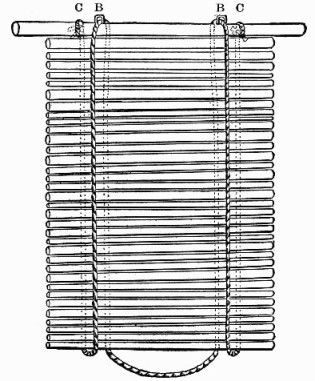
Fig. 57.—Cord fastened on top pole for rolling up curtain.
Continue Crossing the Cord
and adding cat-tails until the curtain is of the desired length. Tie the ends of the string on each line securely together and tuck them under the weave, hiding the ends on the wrong side of the curtain (Fig. 55). At equal short distances from the tips of the head-pole fasten in a screw-eye large enough to pass readily over the two hooks immediately above the window where the curtain is to hang (Fig. 55, A, A). On the centre of the space along the upper side of the top pole, between the first and second cord and the third and fourth cord, drive in a staple-nail (Fig. 49, B, B), shown more plainly in Fig. 56. These staple-nails are for holding in place the long cord used in rolling up the curtain (Fig. 57, B, B, and Fig. 58, B, B). Thread one end of a long piece of cord from the back of the curtain through one staple-nail and the other end through the other staple-nail. Bring both ends of the cord down over the front of the curtain around the bottom and up over the back; then tie the ends on the pole (Fig. 57, C, C). Dotted lines show how the cord runs along the back of the curtain. Have the cord sufficiently long to allow of the stretch between the two staple-nails B and B (Figs. 57 and 58), to hang down over the back and extend in a loop below the bottom edge of the curtain (Fig. 57, D). When you wish to raise the curtain, pull the bottom loop and up will go the curtain (Fig. 58). These primitive hangings are just the thing for outing cottages on the sea-shore or log-houses in the mountains. You can have fun weaving them while at your summer home and in place of the old-fashioned quilting-bee you might give a
Curtain-Bee Frolic.
The girls and boys could readily make a number of hangings in one afternoon, and while weaving the reeds together they would weave into the work all sorts of bright speeches and gay laughter, so that ever after the curtains would be filled with delightful associations of the charming summer afternoon. Reed curtains can be fashioned in any width. If very narrow hangings are in demand, cut your reeds to measure the length needed for the curtain-width and weave them together with the same twine cross-weave used in Fig. 55.
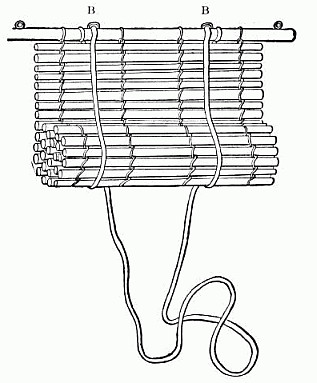
Fig. 58.—Cat-tail curtain raised by loop from bottom.
Fig. 59.—Small end of one cat-tail.
Fig. 60.—Large end of another.
Fig. 61.—Wide curtain, each reed of two cat-tails joined.
Doorway-Screens
hung on a swinging, armlike rod extending, when open, at right angles with the doorway, and easily moved forward or backward, are attractive when of woven reeds, especially if dull, green-colored cord is used in the manufacture in place of ordinary twine. For very wide out-of-door veranda-shades, select the strongest cat-tails and dig out about two inches of pith from the large end of one cat-tail very cautiously to avoid breaking the sides; then push the small end of another cat-tail into the opening (Figs. 59, 60, 61); weave these long pieces together as you wove the single reeds in the first curtain, using extra lines of weave. If you cannot obtain cat-tails, take other reeds; or cut some straight, slender poles from shrubs or trees, and weave them into curtains with colored cord of reds or browns. Such pole-hangings would be excellent for the open front of your mountain shack or lean-to, and they could do service in screening the sunlight, when too strong, from the central open way of your saddle-bag log-house.
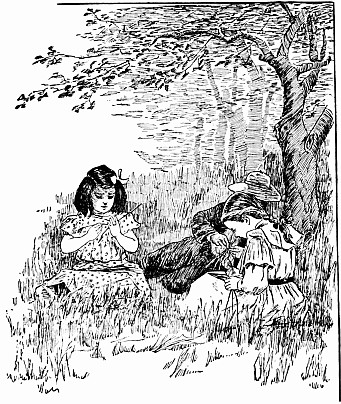
Sitting in the orchard
CHAPTER VI
THINGS TO MAKE OF COMMON GRASSES
A Grasshopper-House
MAMMY, make me a grasshopper-house."
"Go 'long, chile, I done got 'nough to do 'thout makin' no hoppergrass-houses."
"Please, mammy, only one, and then I can make them for myself. I'll watch you just as close. Won't you, mammy?"
"Pick me some grasses, then; I 'low I has to, but don't yo' come pesterin' me no more after this time.
"Seed-top grasses, honey, seed-top grasses; don't git me none of them blade kind. Ketch hol' near the top and pull 'em up slow like, then they'll come out nice and smooth, an' leave they ole rough skins behind, just like a eel does when you skins him. That's it, you got 'nough now; bring 'em 'long here an' we'll make the hoppergrass-house.
"Hol' your own hand, honey, you'll learn best that-a-way. Can't forgit the feelin' of it once you build it on yo' fingers.
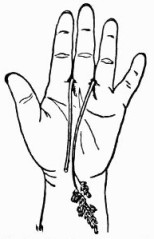
Fig. 62.—Put the grass around your middle finger with the end inside.
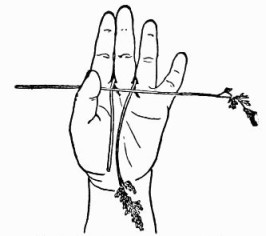
Fig. 63.—Lay the next grass across the first.
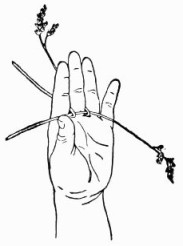
Fig. 64.—Bend back the ends of the first grass.
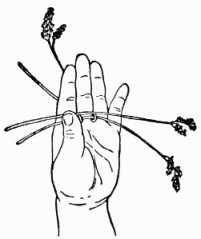
Fig. 65.—Put the next grass across your hand.
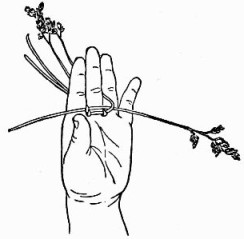
Fig. 66.—Bend back the second grass ends like the first.
"Take one piece o' grass an' put it round yo' middle finger with the ends inside like this (Fig. 62). Now lay the next piece right across the first (Fig. 63), an' bend back the ends of the first grass over the tother an' tuck 'em 'tween yo' fingers just like that (Fig. 64). Put the next grass across yo' hand (Fig. 65), an' take up the second grass-ends, bendin' 'em back to keep company with first grass-ends. That makes another bar (Fig. 66). Now yo' do it an' let mammy see how yo' git along. That's right, lay the grass across an' put the under ends back ev'ry time. How many bars has yo' got now? Six? That's 'nough fo' any hoppergrass, an' is as many as yo' little hand can hol' anyway.
"Now slip it offen yo' fingers, bring the ends together an' tie with a blade o' grass just above these here blossom ends (see illustration). There now, yo' done made a hoppergrass-house, an' don' yo' come askin' yo' ole mammy to stop her work no more."
That is the way the little girls and boys in the South are taught to make the grasshopper-houses, by the old colored "mammies." They are funny little cages, and, of course, will not hold a grasshopper or any other insect, but we like to imagine they will.
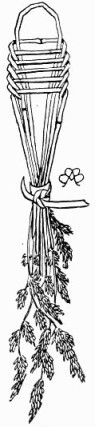
The grasshopper-house
There are other things to make of grasses, any one of them requiring only a few moments' work, and it is a pretty, quiet occupation for restless little fingers. Sitting in the orchard, nestling like little partridges amid the tall grasses, all your materials are close at hand. Reach out and gather some of the long-bladed grass, and we will make
A Doll's Hammock.
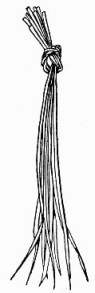
Fig. 67.—Tie them together at the root ends.
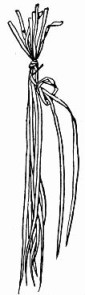
Fig. 68.—Lift two of the grasses and tie them together.
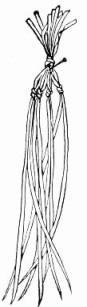
Fig. 69.—Tie them all in pairs.
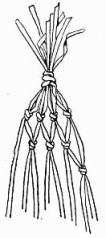
Fig. 70.—Make the knots of the second row one inch below the first row.
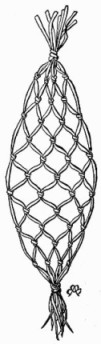
The grass hammock.
Some of this grass measures twenty-five inches in length. It does not grow on stalks, but the blade appears to spring directly from the root, and it is smooth and pliable. You may find orchard-grass almost any where, generally in neglected corners and close to fences where the scythe does not reach.
Take eight or ten of the blades of this grass and tie them together at the root-ends as in Fig. 67, drawing the knot tight as in Fig. 68. Stick a pin through just below the knot and fasten to your knee; then lift two of the grasses at the right-hand side, and tie them together about one inch below the pin (Fig. 68). Tie the next two grasses together in the same manner, the next, and the next, until you have tied them all in pairs (Fig. 69). Make the second row by separating the pairs of the first and tying one grass of one pair to the neighboring grass of the next pair, making the knots one inch below the first row. This leaves the first and last grasses hanging loose (Fig. 70). On the third row the first and last grasses are tied in once more (Fig. 70). On the fourth they are left again, and so they alternate until the hammock is finished. Keep the rows of knots at even distances apart, and make the hammock as long as the length of the grass will allow. Leave about three inches of the grass below the last row of knots, and then tie the ends together as in the illustration. Swing the little hammock between the low-hanging branches of a tree; put your dolly in it and let the summer breezes rock her to sleep while you sing:
Rock-a-by baby in the tree-top.
A very pretty
Bouquet-Holder
can be made of seed-grasses and one long blade of grass. In this you may carry the most delicate wild flowers and ferns without wilting them by the warmth of your hand.
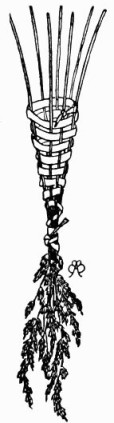
Bouquet-holder made of seed-grass.
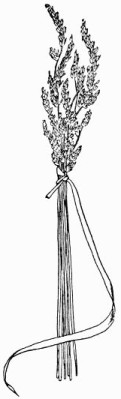
Fig. 71.—Bunch together the seed-grass stalks.
Bunch together seven fine, strong seed-grass stalks and tie just below the blossoms, with the root-end of your long-blade grass (Fig. 71). The stems of the seed-grasses are the spokes, the long grass the weaver. Turn the blossom-ends down, the stem-ends up, and close to where it is tied, begin to weave the long grass in and out, under one spoke, over the next, under the third, over the fourth, going around and around spirally until the end of the weaver is reached, then tie it to one of the spokes. Keep forcing the spokes farther and farther apart as you weave until the holder is shaped like a cone. As you see in the illustration, the weaver never passes over one of the spokes twice in succession. In one row it goes over a spoke, in the next row under it, in the third over again, and so on. In order that it may always come this way you must have an uneven number of spokes. Four will not do, nor six, nor eight, but five, seven, or nine spokes will bring the weave out all right.
A Grass Napkin-Ring
is another thing that can be made by weaving or braiding the grasses.
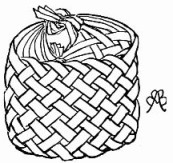
Grass napkin-ring.
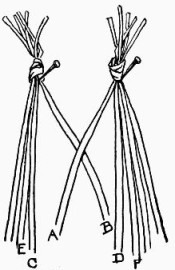
Fig. 72.—Take one blade from each bunch and cross them.
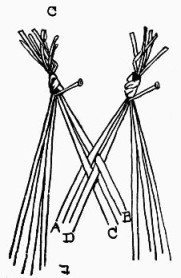
Fig. 73.—Bring C over A and D under B and over C.
Select ten fine long blades of grass, divide them into two bunches of five each, put the root-ends together, and tie them as when making the hammock. Pin these two bunches to your knee about two inches apart, and taking one blade from each bunch, cross them as in Fig. 72, the right-hand grass A on top of the left-hand grass B. Now bring the left-hand grass C over A, and the right-hand grass D under B and over C (Fig. 73). Next weave the left-hand grass E under A and over D, then the right-hand grass F over B, under C, and over E. Weave the remaining four grasses in the same way, taking first from one side, then from the other. When your work has reached the stage shown in Fig. 74, take the grass A, turn it under and weave it in and out as in Fig. 76, then the grass B, turn it over and weave until it crosses A (Fig. 76). D comes next, to be woven until it crosses B, then C, which will cross D. On the left hand always turn the grasses under before beginning to weave, on the right hand turn them over before beginning to weave.
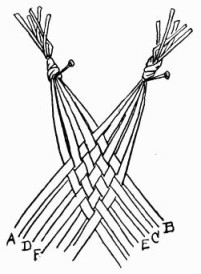
Fig. 74—Weave the remaining grasses in the same way.
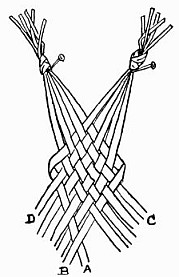
Fig. 76.—Turn the grass A under, and weave it in and out.
When You Have Woven
or braided a strip about five inches long, untie the two knots at the top, form the braid into a ring and tie the opposite ends together in two knots. The groups G and G in Fig. 77 form one knot, the groups H and H the other knot. Trim the ends off neatly and the napkin-ring will look like the one in the illustration.
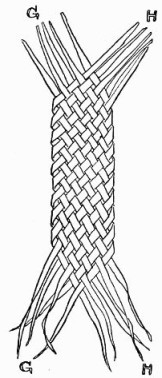
Fig. 77.—Tie the opposite ends together.
Do not use rough or saw-edged grasses for any of this work, for they sometimes cut the hands, and the seed-top grasses must not be old enough to shed their seeds into your eyes. When dry most grass is quite brittle and will break if you attempt to bend it. The fresh, green, soft and pliable grasses are the kind you need and these you may always find in season.
CHAPTER VII
THE POSSIBILITIES OF A CLOTHES-LINE
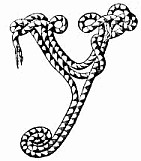
YOU can form it into graceful patterns of curves and coils, loops and rings; you can weave it basket-fashion or net it together with brass curtain-rings, and you can fray it out into soft, pretty tassels. You can make it into a decorative wood-basket, a grille for an open doorway, fringe for curtains and portières, or decoration for the top of a wooden chest. One use will suggest another and you will probably find some way of adapting the rope that has never yet been thought of.
Hemp rope and cotton, large rope and small, down to the ordinary heavy twine, all lend themselves to this work.
It requires a rather heavy clothes-line, one considerably lighter, called by some rope-cord, and a piece of strong twine for the
Wood-Basket
shown in the illustration.
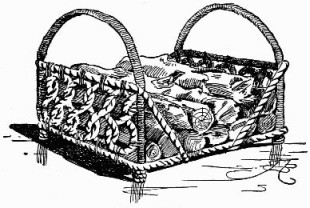
The wood-basket.
Make the bottom of a board two feet long and sixteen inches wide, and on each end of the board nail securely one-half of a barrel-hoop (Fig. 78). From an old broom-stick cut four rounds one inch thick for the feet (Fig. 79), and fasten one round to each corner underneath the board with strong screws or wire nails (Fig. 78, Z Z). This is all the wood you will need for the basket, the rest is to be made entirely of rope.
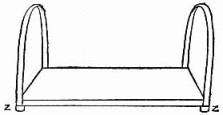
Fig. 78—On each end nail one-half of a barrel-hoop.

Fig. 79—For the feet.
Take your small rope and nail one end of it to the edge of the bottom, close to one end of one of the barrel-hoops (Fig. 80), then wrap the hoop with the rope, one row close to another until it is completely covered. Cut off the rope when it reaches the end of the hoop and nail it down as you did the first end of the rope in beginning. Fasten a piece of the heavy rope entirely around the edge of the board, nailing it at intervals along each side, but leaving loose that at the end edges until later. Make the
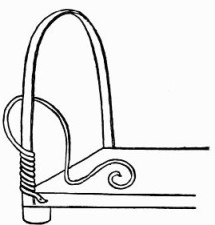
Fig. 80.—Nail one end of the small rope to the edge of the bottom.
End Pieces
of the basket by looping and twisting the heavy rope into the pattern shown in Fig. 81, forming as many loops as are required to reach across the end of the bottom. Wrap and tie one row of the loops to the rope on the end edge of the board and the side loops to the hoops, using the twine for this purpose.
Eight inches from the end of the bottom, underneath but near the side edge, nail one end of your heavy rope; bring it up slantingly and wrap and tie it to the hoop just above and touching the top edge of the loops, stretch the rope tightly across the hoop and tie at the other side, then carry the end down and fasten underneath the bottom eight inches from the end of the board (see illustration). Wrap and tie the top loops of the end piece to the top rope as shown in illustration. Finish the other end of the basket in the same manner, not forgetting to nail in place the rope left loose at the end edges. Give the completed wood-basket several coats of dark varnish. The varnish not only produces a nice finish, smoothing down both wood and rope, but also stiffens and helps to hold the rope in place.
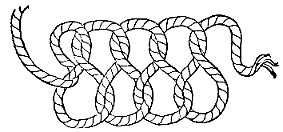
Fig. 81.—Make the end pieces like this.
A Rope Netting
at once simple and effective is made like Fig. 82.
This netting may be made of heavy rope for a grille in an open doorway, or of lighter rope for fringe. In either case the method is the same.
In a board, at regular distances apart, along a straight line, drive a row of wire nails. It depends upon the size of the rope how far apart the nails should be placed. For a heavy rope there must be at least four inches between, and this distance should lessen as the rope decreases in size.
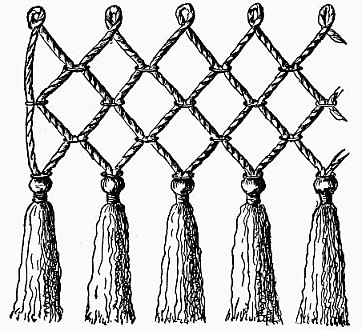
Fig. 82.—A Rope netting.
Cut your rope into pieces four feet in length if it is heavy, not so long if it is light rope. Loop one piece of rope over each nail and let it hang down evenly, then bring the first and fourth strands together and slip on them a small brass curtain or embroidery ring (Letter A, Fig. 83). Push the ring up to within four inches of the line of nails if the nails are four inches apart. If the distance between the nails is three inches the ring must be three inches below the line. Catch the ring to each strand of rope with needle and thread to hold it in place. Bring the third and sixth strands together and slip on a ring (Letter B, Fig. 83). Then the fifth and seventh, and so across the board.
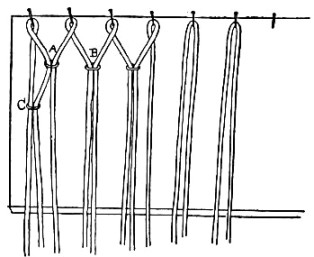
Fig. 83.—Slip on a small brass curtain ring.
Begin the next row by slipping a ring on the first and second strands, placing it the same distance below the first row of rings that the first row of rings is below the line of nails (Letter C, Fig. 83). Bring the third and fourth strands together with a ring, the fifth and sixth, continuing the original pairing of the strands until the row is complete. The third row of rings brings together again the second and fourth strands, the third and sixth, as in the first row, and the fourth row of rings goes back to pairing the first and second, third and fourth strands.
The Tassels
Below the last row of rings wrap and tie the strands together, then untwist the ends of the rope up to where it is tied and fray it out until it becomes fluffy. Make the head of the tassel by wrapping closely with twine a short distance below the ring, or you may slip on several of the brass rings as a finish.
The board on which you make your netting need not be any longer than is convenient to handle, for when one part of the netting is finished it can be taken off the nails and new strands added to carry on the work.
Fig. 84 is an ornamental design suitable for decorating a wooden chest or, if sewed on cloth, for a hanging. By studying the design you can easily reproduce it without the aid of description or other diagram.
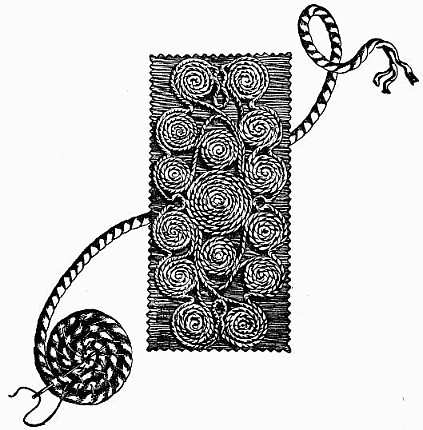
Fig. 84.—Ornamental design.
CHAPTER VIII
HOW TO WEAVE A SPLINT BASKET
YOUR enthusiasm will begin when you find how easily the splint can be cut and shaped after it has soaked for a while in water. It is delightful to work with, almost as soft and pliable as ribbon, while having more substance. Although there is apparently such diversity in the material shown in the illustration, it all comes from one roll of splint, which is uniform in width and thickness.
A basket measuring about six inches in diameter and three inches in height is a convenient size on which to learn.
Open Your Roll of Splint,
put two pieces to soak in a bowlful of cold water, and let them remain twenty minutes. Have ready a clean lap-board, a pair of large scissors, and an old towel. The lap-board not only serves for a work-table, but also keeps the water out of your lap.

Weaving the sides of basket with long weaver.
Wipe the dripping water from the splint, and cut off six pieces nineteen inches long; then cut these into sixteen strips one-half inch wide, for the spokes of the basket. Do not attempt to tear the splint, for it will not tear evenly. From the other piece of splint cut four strips for weavers, making the first one-half of an inch wide, the next one-fourth of an inch wide, another one-eighth of an inch wide, and the last one-sixteenth of an inch wide. Place all the weavers in the water and leave them until you are ready to begin weaving.

Fig. 85.—The first four spokes.
Take Up the Spokes,

Fig. 86.—Eight spokes in place.
one at a time, and pass them between your fingers until they are perfectly straight and flat; then number them all by writing the number with a pencil on each end of every spoke; see diagram (Fig. 85). Lay the spokes in front of you on the lap-board crossing the first four at the centre (Fig. 85). Place the next four spokes in the spaces between the ones you have just arranged in the order shown in Fig. 86, then the remaining eight in the spaces left between these.
For instance, the ninth spoke should come between No. 1 and No. 5, the tenth spoke between No. 5 and No. 3, the eleventh spoke between No. 3 and No. 6, and so on around the circle (Fig. 87). Be sure the lower end of a spoke fits between the same numbers as the upper end. When all the spokes are placed hammer a strong pin directly through the centre where they are crossed, to hold them together while you begin.
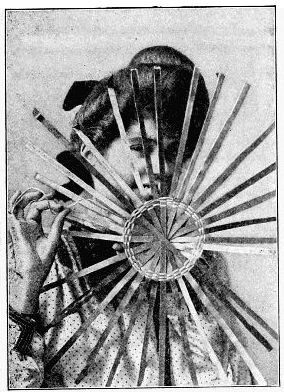
Bottom of basket completed.
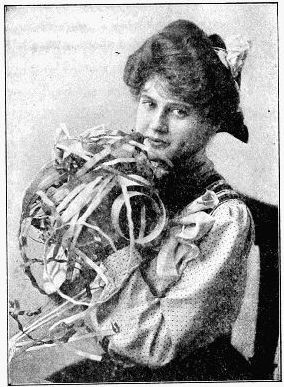
Material for weaving basket.
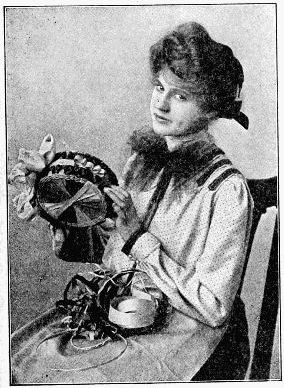
Small basket with two rows of trimming on different colored weaver between.
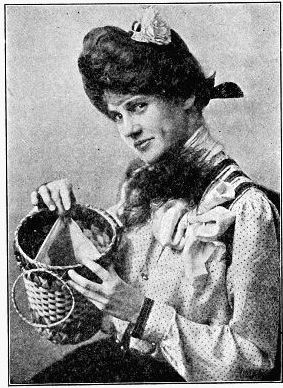
Lining the basket.
The Weaving
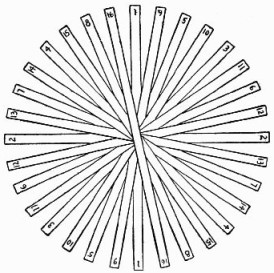
Fig. 87.—All of the spokes in place.
With the spokes lying in the position shown in diagram (Fig. 87), take the eighth-inch weaver, and begin to weave it in and out of the spokes. Start it under spoke No. 1 about two and one-half inches from the centre, bring it over No. 9, under No. 5, over No. 10, under No. 3, over, under, over, under, until it has crossed spoke No. 16; then skip No. 1, bring the weaver under No. 9, and weave another row. You will find it necessary to skip one spoke at the beginning of each row, in order to make a continuous under-and-over weave. Weave five rows with the eighth-inch weaver, then slide the end under the last row, lapping it an inch or so and running it under several spokes, to hide the joint. Slip the first end under a spoke also. During this part of the work your main endeavor must be to weave in a perfect circle. The illustration shows the bottom of the basket completed.
Before bending the spokes for the sides of the basket, let them soak in the water a few minutes, then place the work on the lap-board, the same side up as when started, and carefully bend the spokes up at right-angles with the bottom (Fig. 88). Start a half-inch weaver inside the basket, close to the bottom, and weave under and over until the row is complete; then, allowing for a lap of about three inches, cut the weaver off and slide the end under the first end of the weaver, making the invisible joint by tucking each end under a spoke. Start the next row a little beyond the joint of the first row, that the joining may not all come in one place. Weave five rows of the half-inch weaver, then two rows of the fourth-inch weaver and then bind off (Fig. 89).
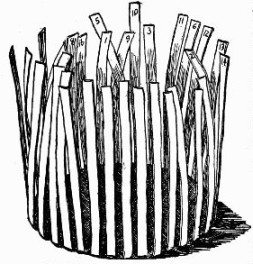
Fig. 88.—Bend the spokes up.
Binding Off
Cut the spokes off evenly, leaving about two inches extending above the top of the basket, then put the basket in the water, spokes down, and soak until pliable. Bend each spoke down snugly over the top weaver, and slip the end through the next weaver, pushing it down until its end is hidden under one of the weavers. Bend one spoke inside, the next outside the basket, according as they come inside or outside of the top weaver (Fig. 89).

Fig. 89.—Binding off.
This binding off holds the top weaver in place and makes the basket very firm; but the spokes must be protected from wear where they are bent, and it is necessary to put a double band around the edge. For this band cut two pieces of the fourth-inch weaver which will go around the basket and lap about an inch. Place one piece along the inside edge, the other along the outside edge of the basket, and with the sixteenth-inch weaver bind them to the top weaver, as shown in Diagram 90. Fasten the end by taking several cross-stitches with the narrow weaver, passing it under the inside band only, and tucking the end under the same band.
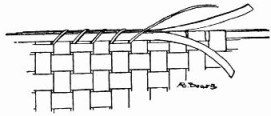
Fig. 90.—Putting on the band.
The Trimming
Many splint baskets are trimmed with twisted loops of the same material. For this trimming take one of the half-inch weavers and cut a thread's width off its edge, making it just a trifle narrower than the other weaver. Insert the end of this weaver under a spoke at the top of the basket (letter A, Diagram 91), give a twist to the left, and pass it beneath the next spoke, as shown in Diagram 91, letter B. Pull the loop down and flatten it a little with your thumb, then twist the weaver again, this time to the right, and slip the end under the next spoke, letter C. Continue this around the basket, and make the joint of the trimming as you did the other joints, by lapping the ends and slipping them under the spokes, which makes the last loop of double thickness.
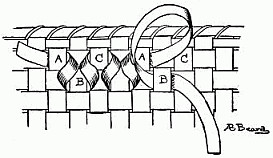
Fig. 91.—Making the trimming.
The small basket shown in the illustration has two rows of trimming, and between them is run a weaver of another color pulled out into loops at the sides.
The illustration on the first page of this chapter shows a large basket with four rows of trimming and handles. The handles are made of the fourth-inch weaver, which is brought around twice, making a ring of double thickness. The ring is then wrapped with the eighth-inch weaver, and fastened to the basket with loops of the same. The weaving of this large basket differs from the smaller one, in that the weaver is not cut at the end of each row, but is continued around row after row. For a large basket the half-inch weaver can be used in this way, but in a small basket the slant of the weaver as it runs around is too apparent. If a long weaver is used in a small basket it must not be more than one-eighth of an inch in width.
While baskets of the natural white splint are extremely dainty, color certainly gives variety and adds interest to the work, and the splints will take dye readily. You might also line your basket with silk of a color to harmonize with the splint.
The white-ash splint one and one-half inches wide comes in rolls of twenty-five yards, and a roll will make several medium-sized baskets. The material may be obtained of almost any kindergarten supply firm.
CHAPTER IX
MODELLING IN TISSUE-PAPER

A FEW cents will be sufficient to buy enough tissue-paper to model good-sized elephants, too large to stuff into the Christmas stocking, for they measure six or seven inches in length and stand four or five inches high; and you can make chickens nearly life-size, and the queer little turkeys, too.
You must select paper of the necessary color, and fold, roll, fold, squeeze, fold, tie, with here a little pull and there a little pat, a spreading out, a pinching in; that is all. There is no sewing, no pasting, no pinning, merely modelling and tying, using only tissue-paper and string.
These animals are very substantial and unique. They are not at all thin or flat, but well rounded out and lifelike, with character and independence enough to stand alone—just the kind your little brother and sister will be delighted with, for they may play with the toys free from all danger of hurts or bruises. To
Make the Chicken
select a sheet of tissue-paper of a soft yellow color, cut it through the centre, fold into two pieces. Take one of the halves and gather up the long edge where it has been cut (Fig. 92), then gather the opposite edge (Fig. 93). Crease the paper as it is folded by holding one end with the right hand (Fig. 92), and drawing the paper several times through the partially closed left hand. This will cause it to retain the creases, as seen in Fig. 93.
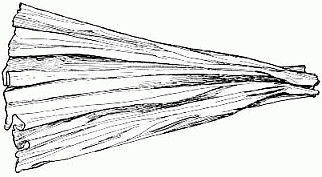
Fig. 92.—The beginning of the paper chicken.

Fig. 93—Second step in modelling chicken.
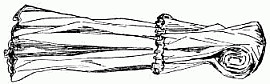
Fig. 94.—Third step in modelling chicken.
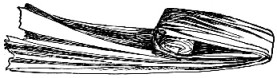
Fig. 95.—Fourth step in modelling chicken.
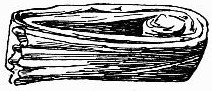
Fig. 96.—Fifth step in modelling chicken.
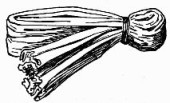
Fig. 97.—Head and body of chicken.

Fig. 98.—Modelling the chicken's legs.
Roll a separate piece of paper into a little wad and lay it on the creased strip (Fig. 93) about one-fourth of the distance from one end. Bend the short end of the strip over the wad of paper, as in Fig. 94; then fold up the strip where the end of the short fold lies, bend this over the first fold (Fig. 95) and bring the loose end on the bottom of the three layers. Fig. 96 shows a wad of paper inserted at one end of a strip of creased paper folded over and over three times, making four layers, two on top and two on the bottom of the paper wad. Wind a string around the paper tight up to the wad and tie it securely to form the head (Fig. 97). You now have the body and head of the chicken. Make the legs and feet of a strip of paper about sixteen inches long and seven and one-half wide. Gather up the two long sides with your fingers as you did the paper in Fig. 93; crease the paper, then wind each leg with string, leaving one inch free at each end to form the feet (Fig. 98). Lift up the free end of the folded paper (Fig. 97) and place the centre of the legs (Fig. 98) midway under the last fold as in Fig. 99. Tie the end of the loose layer of the body securely on the body, and you will have the foundation ready for the beak, wings, and tail (Fig. 100).
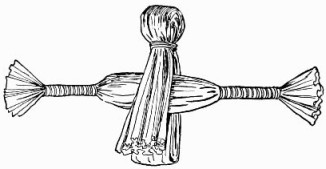
Fig. 99.—Modelling body and legs of chicken.
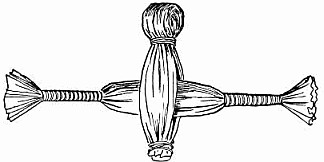
Fig. 100.—Partially modelled ready for beak, wings and tail.
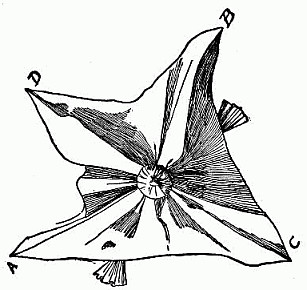
Fig. 101.—The beak of chicken.
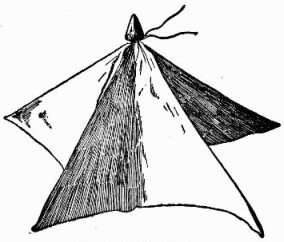
Fig. 102.—Modelling beak on chicken.
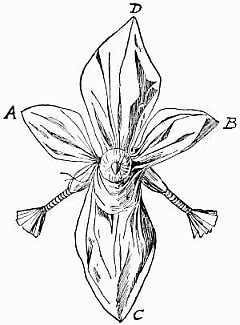
Fig. 103.—Paper chicken nearly finished.
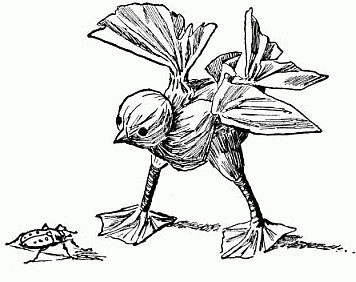
Fig. 104.—Hungry little paper chicken.
Cut a square of the same kind of tissue paper, measuring nine and one-half inches on all four sides; fold diagonally twice across the square as when making a paper pin-wheel. The centre of the square is exactly where the diagonal lines meet and cross; pinch the centre portion up into a beak and tie it with a string (Fig. 101); then fit the beak over the centre of the chicken's head, bringing the paper entirely over the head on all sides; tie the square around the chicken's neck close up to the head (Fig. 102). The two points A and B of the square must form the wings, while C is carried backward over the under portion of the body and D back over the upper part, the two ends C and D being brought together and tied tight up to the body to form the tail. In Fig. 103 you will see exactly how to pinch up the wing if you notice particularly the upper part of the wing B, next to the body. The wing A on Fig. 103 shows how the two wings must be tied close to, but not on, the body. When each wing is tied, make the tail of C and D by tying the extensions together as explained above; that done, bend down the legs, spread out the wings and tail, open out and flatten the feet, then stand the little chicken on a level surface (Fig. 104). Remember always to crease the tissue-paper with the grain of the paper; if you attempt to cross the grain the paper will be very apt to tear.
The Turkey
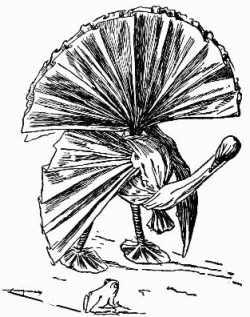
Fig. 105.—The astonished paper turkey.
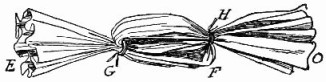
Fig. 106.—Modelling turkey's body.
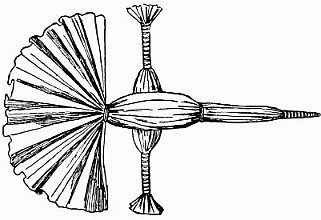
Fig. 107.—Legs and feet of turkey.
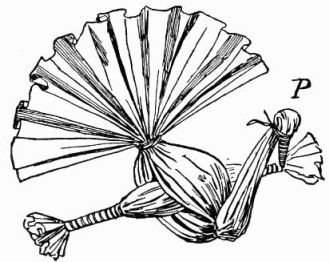
Fig. 108.—Head modelled on turkey.
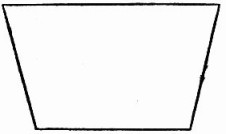
Fig. 109.—Paper for turkey wings.
(Fig. 105) is also modelled from half a sheet of tissue-paper as near the general color of a turkey as can be found. Make Fig. 92 and Fig. 93 of the paper; then fold Fig. 93 five and three-quarter inches from one end (Fig. 106, F). Three inches from this end tie the two layers together (Fig. 106, G). Fold the strips back and tie a string through the lower loop up over the loose top layer (Fig. 106, H). Wind the extreme end of the paper (Fig. 106, O), with string to form the beak (Fig. 107), bend the beak down and tie it to the neck to form the top of the head (Fig. 108, P). Make the legs and feet as you did those for the chicken (Fig. 98) and slide them through the body so that one fold of the body will be above and two beneath the legs (Fig. 107). Cut the wings from a separate piece of tissue-paper (Fig. 109). Let the paper measure seven inches on the widest side, five on the opposite side, and four and one-half on each of the other sides. Pinch the paper together through the centre and tie (Fig. 110). Gather up one wing, so that it will not tear, and slip it through the body, immediately over the legs, with the widest side toward the front (Fig. 105), leaving the other wing out free on the other side of the turkey. Bend down the legs, spread the tail out fan shape and bend it up; open out the wings and drop them downward and forward (Fig. 105). Flatten out the feet and stand up the turkey (Fig. 105).
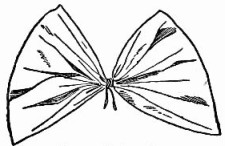
Fig. 110.—Turkey wings.
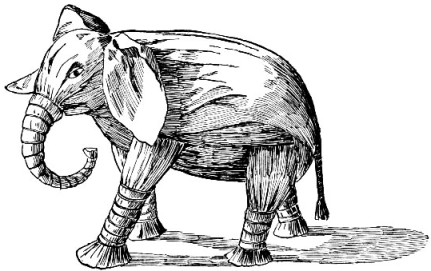
Fig. 111.—Elephant modelled of tissue-paper.
The Elephant
(Fig. 111) will require two sheets of brown tissue-paper for its body, head, and trunk, which are all made of a single strip of paper. Unfold, spread out and fit the two sheets of tissue-paper together; then gather up one side, as in Fig. 92, crease and gather up the other side (Fig. 93). Bind one end with black thread to the distance of four and one-half inches to form the trunk; then fold the remainder of the strip into four layers, beginning with the free end of the paper; fold over and over three times. This gives the body and head. Bind black thread around the folds next to the trunk to form the head. Make four legs of two pieces of paper in the same way you formed those of the chicken (Fig. 98), only the elephant's legs must be very much thicker. Slide the legs through the body between the two layers of paper, shove the front legs forward and the hind legs backward. For the tail use a small strip of the brown tissue-paper. Wrap it around and around with black thread to within an inch of the bottom and cut this end up into fringe. Fasten the tail on the elephant with black thread, pass the thread between the first and second layers of paper forming the back of the body of the animal and tie the tail on the outside threads which cross from side to side of the elephant; bend the top of the tail over the thread, as you would hang a garment on a clothes-line, and tie the bent-over end down on to the tail proper. Shape the ears like Fig. 112, pinch together the end S and tuck it under the thread which separates the head from the body. Allow the long side, M, to form the front of the ears. You can add white ivory tusks if desired. Roll up two white writing-paper lighters and push an end of each up in the head under the trunk, forming one tusk on each side.
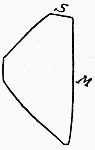
Fig. 112.—Elephant's ear.
In making these little creatures do not forget that you must do some modelling, bending and shaping them with your fingers, squeezing up the paper where it stands out too far, and gently pulling it out in places where it flattens too much. The heads can be turned to suit the fancy, the bodies inclined this or that way, or they may stand stiff and erect. You might model a number of chickens, of different-colored paper, some yellow, some white, and others black, like real chickens; or make several turkeys and two or three elephants, some of the latter with tusks and others without. The toys when finished will cause exclamations of delight and approval. They are simple and easy to put together, something which will not cost much and yet be worth many times the amount expended for the necessary material to manufacture. The little animals are attractive, substantial toys, entirely different from the common ones which any girl or boy with sufficient pocket money may purchase.
CHAPTER X
NATURE STUDY WITH TISSUE-PAPER
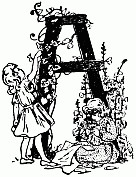
A natural flower, some tissue-paper, a pair of scissors, a spool of thread, and nimble fingers are all you need.
There are no patterns, only circles and squares and strips of paper which you gather here, spread out there, wrap and tie some place else and, with deft fingers, model into almost exact reproductions of the natural flower before you.
With its unfamiliar terms to be committed to memory and the many parts of the flower to be distinguished, botany is apt to prove dry and tiresome to the little child, but to study nature by copying the flowers in this marvellously adaptable material is only a beautiful game which every child, and indeed many grown people, will delight in. The form of the flower, its name and color, may, by this means, be indelibly stamped upon the memory, and a good foundation laid for further study.
The Best Models
Ordinary garden flowers and those most easily procured make the best models. The carnation-pink, the morning-glory, and the rarer blossoms of the hibiscus, are well adapted to the work, also the daffodil and some of the wonderful orchids.
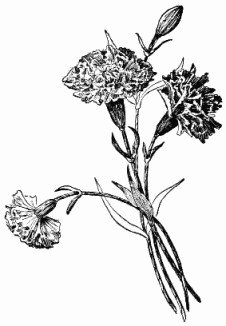
Carnations modelled from tissue-paper.
Even holly with its sharp-spiked leaves and scarlet berries and the white-berried, pale-green mistletoe may be closely copied. All these and many more are made on the same principle and in so simple a manner even quite a little child may succeed in producing very good copies from Nature.
Material
Buy a sheet of light pink tissue-paper, another of darker pink, and one of the darkest red you can find. Then a sheet of light yellow-green and one of dark green. Have a table "cleared for action" and place your paper on the right-hand side, adding a pair of scissors and a spool of coarse thread, or, better still, of soft darning-cotton.
With all this you are to copy the
Carnation-pink
which someone has given you or you have growing in your own garden. Make one of your light pink paper, one of the darker pink, and another of the rich, deep red to have a variety.
Lay your natural flower down on the left-hand side of the table, away from your material but quite within easy reach, for it must be consulted frequently. Seat yourself comfortably and don't work hurriedly.

Fig. 113.—Fold the square diagonally through the centre.
The first thing necessary in this system of squares and circles is to know
How to Cut a Circle Quickly,
easily and accurately, and always without a pattern. Here is a method which never fails:
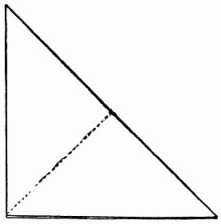
Fig. 114.—The first triangle.
Cut a square the size you wish to make your circle. That is, if you want a circle with a diameter of four inches cut a four-inch square (Fig. 113). Fold the square diagonally through the centre according to the dotted line on Fig. 113, and you have the triangle (Fig. 114). Fold this at the dotted line and it will make another triangle (Fig. 115). Again fold through the middle and you have the third triangle (Fig. 116). Fold once more and Fig. 117 is the result. Measure the distance from the edge, B, to the centre A in Fig. 117 and mark the same distance on the other side of the angle shown by the dot, C (Fig. 117). With your scissors cut across from C to B, curving the edge slightly, as shown by the dotted line from C to B (Fig. 118). Fig. 119 is the circle still in its folds. Fig. 120 is the circle opened, the dotted lines indicating where it has been folded.
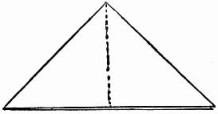
Fig. 115.—Second triangle.
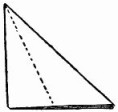
Fig. 116.—Third triangle.
Your eye will soon become sufficiently accurate to enable you to gauge the distance from A to B, and you can then cut from C to B without measuring.
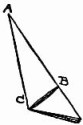
Fig. 117.—Fold once more.
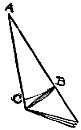
Fig. 118.—Cut from C to B, curving the edge.
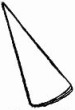
Fig. 119.—The circle still in its folds.
Before Beginning Your Flower
take up the natural one and examine it carefully. You will notice that it has a great many petals crowded closely together and that their edges are pointed like a saw. You will also see that the green calyx is wrapped snugly around the lower part of the flower and that it, too, has a pointed edge.
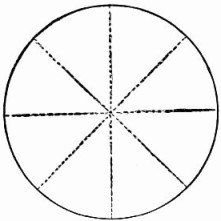
Fig. 120.—The circle opened.
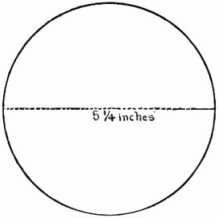
Fig. 121.—The petals.
Now hold the pink off at arm's length. The separateness of the petals disappears and you see them only as a mass; the points on the edges are not noticeable except as they give the flower a crimped appearance, and the edge of the calyx looks almost straight. It is this last appearance or the impression of the flower that you are to produce rather than its many and separate little parts. So now to work.
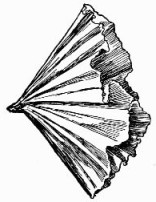
Fig. 122.—Crimp the edge with your fingers.
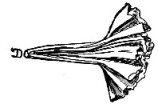
Fig. 123.—Draw these through your hand to bring them closely together.
Fig. 124.—Make a slender lighter.
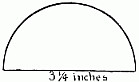
Fig. 126.—The calyx.
Cut Two Squares for Each Pink,
one measuring five and one-quarter inches, the other four and three-quarter inches, and turn them into circles (Fig. 121) by the method just explained. Take one of the circles at the centre, where the folding lines cross, with the tips of the fingers of your left hand and pinch it together; then, while still holding it, crimp the edge with the fingers of your right hand (Fig. 122). Do this always with every kind of flower, whether it is made of circles or squares. Without loosening your hold of the centre, draw the paper lightly through your right hand several times, then crimp the edge again, this time with the blade of your scissors. Treat all the circles alike, then place a small circle inside a larger one and draw them through your hand to bring them together, pinching them closely until within a little over an inch of the edge (Fig. 123). Make a slender lighter of ordinary writing-paper (Fig. 124), snip off the point of the flower (D, Fig. 123), open the other end a little and push the lighter through until its head is hidden. This forms the stem. Wrap and tie with thread at the bottom of the flower (Fig. 125), and again where the petals spread. This last is to be but temporary, as you will remove the thread when the flower is sufficiently pressed together to hold its shape.
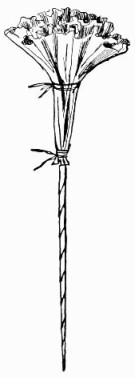
Fig. 125.—Wrap and tie at the bottom and where the petals spread.
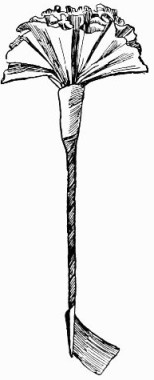
Fig. 127.—Wrap the paper spirally around the stem.

Fig. 128.—The leaves.
From your light-green paper cut a circle measuring three and one-quarter inches through its diameter and cut it in two to make the half circle for the calyx (Fig. 126). Remove the thread that holds the flower just below its petals and wrap the calyx closely around the lower part, tying it at the bottom; then cut a narrow strip of dark-green paper and wrap it spirally around the stem, beginning at the top (Fig. 127). Let the wrapper extend a little below the lighter and twist the end to hold it in place. Spread the petals of your flower as much like the natural blossom as possible.
Leaves
For the leaves cut a strip of dark-green paper six inches long and three-quarters of an inch wide (Fig. 128). Find the centre by folding the paper end to end and making the crease shown by dotted line in Fig. 128. Gather it along this line, not with needle and thread—we use no needle in this work—but with your fingers, and pinch it together; then twist each end into a point (Fig. 129). With the sharp point of your scissors punch a hole directly through the centre (E, Fig. 129), and push the point of the stem through the hole, bringing the leaves as far up on the stem as you find them on the natural flower; then wrap and tie them in place.
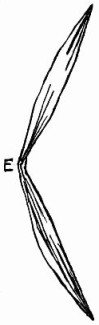
Fig. 129.—Twist each end into a point.
The Bud
is made of a circle of dark-green paper the diameter of which is three and one-quarter inches (Fig. 130). Gather this circle between your fingers as you did the others and crimp the edge with the scissors. It will then form a little bag or cup like Fig. 131. Slip the bag over the head of a lighter and tie at the bottom as in Fig. 132. If the bud does not take the proper shape at first, model it with your fingers until it is correct. Start the wrapping of the stem just above where the bud is tied and finish as you did the stem of the pink. Use small leaves on the bud stem, having the strip of paper just as wide, but considerably shorter than for the leaves on the stem of the open flower.
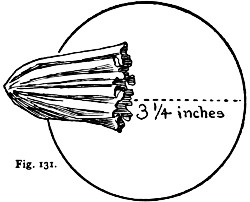
Fig. 130.—The bud.
It is wonderful how very natural these blossoms appear. At a short distance no one would think they are not the real, old and familiar pinks. Only the fragrance is missing, and that may also be supplied and a spicy odor given by enclosing a whole clove in the heart of each flower.
The Morning-Glory
From your pale-pink paper you can make the delicately beautiful morning-glory. Have the natural flower with its stem and leaves to copy from, even if the blossom is not the color you want. As with the pink, it is the general form and appearance we strive for in the morning-glory, not the detail.
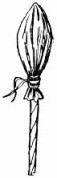
Fig. 132.—Slip the bag over the head of a lighter.
Make your pink circles with a diameter of about seven inches. It is always better to have your flowers a trifle larger than the natural ones, rather than smaller.
But one circle is required for each morning-glory. Crimp this in your fingers and draw through your hand as you did the circles for the pinks; then, pinching it together to within one and one-half inches of the edge, hold it in your left hand and flatten out the top as in Fig. 133. See that the fulness is evenly distributed, and pull and straighten out the edges until you are satisfied with its appearance.
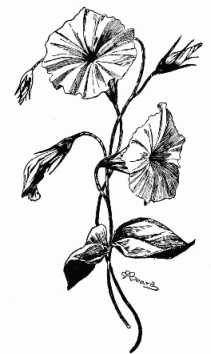
Morning-glory modelled from tissue-paper.
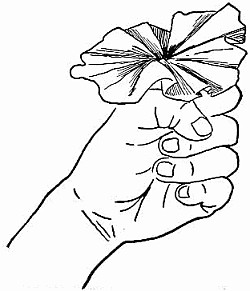
Fig. 133.—Flatten out the top of the flower.
A piece of bonnet-wire makes the best stem if you wish to give the true viney effect of the growth. If it is only the blossom you are making, a paper lighter will answer. When you use the wire bend one end over to form a small loop; this is to keep the stem from slipping through the flower. Pass the straight end of the wire through the centre of the flower and draw it down until the loop is hidden.
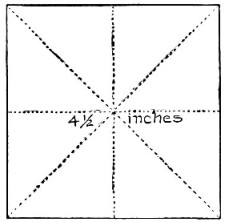
Fig. 134.—Green square for calyx.
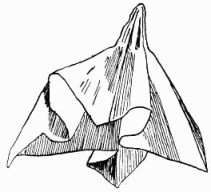
Fig. 135.—Draw the edges down.
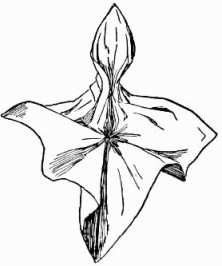
Fig. 136.—Form a leaf-shaped point.
Make
The Calyx
of a square of light-green paper measuring about four and one-half inches. Fold the square four times through the centre to form the creases shown by the dotted lines in Fig. 134. Hold the square at the centre and draw the edges down as in Fig. 135; then bring the two edges together in gathers, just below one of the corners, to form a leaf-shaped point as in Fig. 136. Gather below each corner, tie as in Fig. 137, and twist each corner into a sharp point like F, Fig. 137. Draw the calyx through your hand, bringing the points together (Fig. 138). Push the calyx up on the stem and tie just at the base of the flower, then tie again about three-quarters of an inch below and wrap the remainder of the calyx close to the stem. Wind the stem with light-green tissue-paper and bend it as the natural one is bent and curved.

Fig. 137.—Twist each corner into a point.
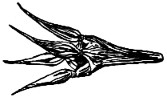
Fig. 138.—Bring the points together.
Make several buds of the pink paper, following the directions given for the green bud of the pink; then twist each bud at the point and add a calyx.
The wilted flower shown in the illustration is made by taking one of the morning-glories you have just finished and actually wilting it by drawing the flower together and creasing and pressing it to resemble the partially closed and drooping natural blossom.
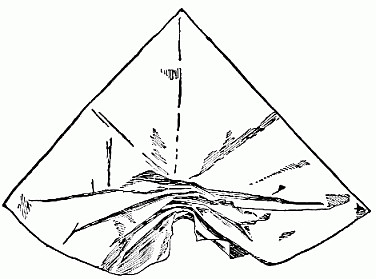
Fig. 139.—Gather along one of the creases.
Only a piece of dark-green paper six inches square is required to model two almost perfectly shaped morning-glory leaves.
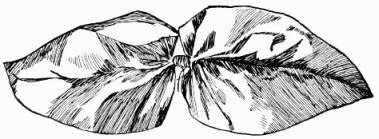
Fig. 140.—The morning-glory leaves.
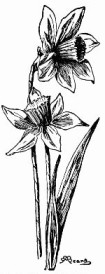
Daffodils modelled from tissue-paper.
Fold the square twice diagonally across from corner to corner to find its centre; then begin at one corner and gather along one of the creases until you reach the centre (Fig. 139). Start again at the opposite corner, gather along the crease to the centre, then wrap and tie (Fig. 140). Pinch each leaf from underneath along the crease in the middle, to give the depression at the midrib. Straighten the leaf out a little at its widest part and you will find you have made a pair of leaves which are surprisingly natural. Wrap and tie these to the stem and make as many more as you think are needed.
The Daffodil
is of such a different nature it hardly seems possible that it can be made on the same principle as the other flowers, yet the work is practically the same.

Fig. 141.—For the two extra petals.
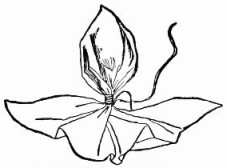
Fig. 142.—Pinch and tie in place.
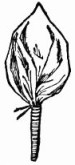
Fig. 144.—Cut off the ragged end.
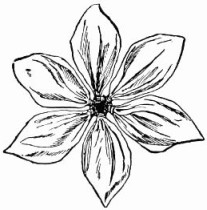
Fig. 145.—Fit each loose petal between two of the others.
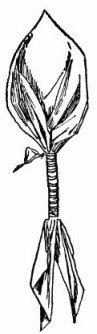
Fig. 143.—Bring together the fan of paper below the petal.
Match the tint of your natural daffodil in yellow tissue-paper as nearly as possible, and then cut two squares for each flower measuring about five and one-half inches. Fold the squares crosswise and diagonally through the centre as you did for the calyx of the morning-glory (Fig. 134), and cut one square in half along one of its diagonal folds (Fig. 141). Gather the square two and a quarter inches below each corner and tie as in Fig. 137, but do not twist the points. This gives you four petals, but as the daffodil has six, you must make two more from the triangular halves of the square you have just cut. Gather each triangle across from side to side, according to the dotted line in Fig. 141, and pinch and tie in place as in Fig. 142, making sure the petal is of exactly the same size as those on the square. Bring together the fan of paper left below the petal and wrap and tie as in Fig. 143, then cut off the ragged end (Fig. 144). Draw the petals of the square together as you did the calyx, and insert the stem made of a paper lighter. Put in place the two extra petals, pushing the wrapped ends down into the heart of the flower; fit each loose petal between two of the others and tie (Fig. 145).
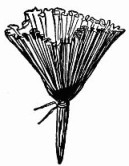
Fig. 146.—Pinch the cup together.
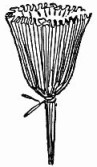
Fig. 147.—Slip the cup on your finger like a thimble.
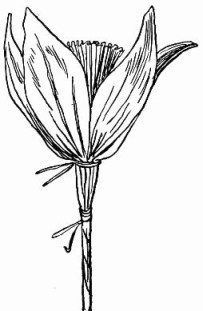
Fig. 148.—Insert the stem of the cup into the centre of the flower.
Turn back to the bud of the pink (Fig. 130), and from a circle of the yellow paper, with a diameter of four inches, make the cup (Fig. 131), using the scissors to give a fine crimp to the edges. Pinch the cup together at the bottom almost half-way up and tie (Fig. 146); slip it on your finger like a thimble and press it into shape like Fig. 147. Insert the point or stem of the cup into the centre of the flower and tie in place just below the petals (Fig. 148).
Cut a two and three-quarter-inch square from light-brown paper and divide it diagonally in half for the calyx. Examine your natural daffodil and notice how loosely the calyx seems to be wrapped around the flower. Imitate this by leaving the point loose at the top, while you wrap the bottom of the calyx closely around the stem. Allow the wrapping for the stem to cover the lower part of the brown calyx. Make several long, narrow leaves from strips of dark-green paper, two inches wide and of varying lengths. Twist one end of each leaf into a point and, gathering the other end, draw it through your hands until it stands up stiffly. Wrap each leaf partly around the stem and tie in place, following as closely as possible the natural growth of the leaf on the stem. Bend the stem just below each flower, being careful not to break the paper lighter which forms it.
If you use thread the color of the flowers for tying and green for the stems the effect will be almost perfect.
CHAPTER XI
A NEW RACE OF DOLLS
LIKE the little animals, these dolls are modelled of tissue-paper and they are equally substantial and durable. The dolls, as well as their dresses, shoes, and bonnets, are made without taking a stitch or using glue or paste. Nothing could be prettier or more suitable to hang on the Christmas-tree than these little ladies decked out in their fluffy tissue-paper skirts, and nothing will give greater delight to the children.
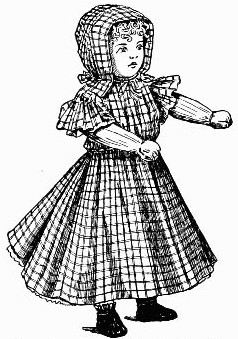
Here she comes. Little Miss Muffett.
To make
Little Miss Muffett
you will need eight sheets of white tissue-paper, two sheets of flesh pink, not too deep in color, a quarter of a sheet of light-brown or yellow, and a small piece of black. Her underclothes will require one sheet of white and her dress and bonnet one sheet of any color you consider most becoming.

Fig. 149.—Creased tissue-paper for making doll.
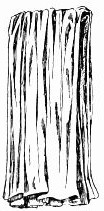
Fig. 150.—Six sheets of tissue-paper folded together for making doll.

Fig. 151.—Head of doll.
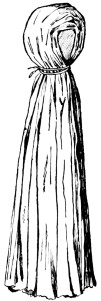
Fig. 152.—Head tied on body.
Take one sheet of the white paper at a time and draw it lengthwise through your hands, creasing or crimping it as in Fig. 149. Do this to all the eight sheets. Then, pulling six of them partly open, place them evenly one on top of another and fold through the middle (Fig. 150). Take another sheet of the crimped paper and roll it into a ball like Fig. 151. Open the folded paper, place the ball in the middle, bring the paper down over the ball and wrap and tie just below with coarse linen thread or white darning-cotton (Fig. 152). This is the head, which you must model into shape with your fingers, squeezing it out to make it fuller and rounder at the back and pinching it to give a chin to the face. Fold another crimped sheet like Fig. 153 for the arms. You will notice the ends do not quite reach the folds. The space left should measure a little over one inch. Crimp half a sheet of the pink paper and with it cover the arms; allow the pink to extend equally at each end beyond the white and fold over the ends, tying them as in Fig. 154. Then tie the loose ends down as in Fig. 155. Open the paper just below the head, slip the arms in place and tie below (Fig. 156).
Fig. 153.—Beginning the arms.
Fig. 154.—Pink paper over arms.
Fig. 155.—Outside of arms tied over inside.
Spread out your smooth sheet of pink paper, place the doll's head directly in the centre and draw the paper down over head and body; keep it as smooth as possible over the face and wrap and tie at the neck (Fig. 157). Push the pink paper up on the shoulders and cut a slit about six inches long lengthwise through the middle of the entire mass of paper, as shown in Fig. 157. Wrap and tie each of the legs (Fig. 158) and tie once more under the arms (Fig. 161). Fold the bottom edges under and model the feet in shape (Fig. 158). The wrappings at the thighs and knees take slanting lines, which give a more natural shape to the legs than if the thread were simply wrapped round and round as at the ankles.
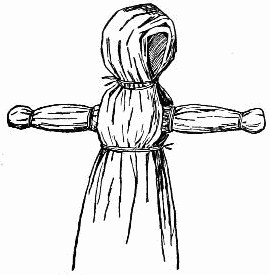
Fig. 156.—Arms in place.
Paint the Face
of Little Miss Muffett with water-colors, placing the features low on the head to give a babyish look, and make the eyes large and mouth small. Color the cheeks and chin a deeper pink, and put little touches of red just above the eyes near the inner corners and little streaks of blue just below the eyes.
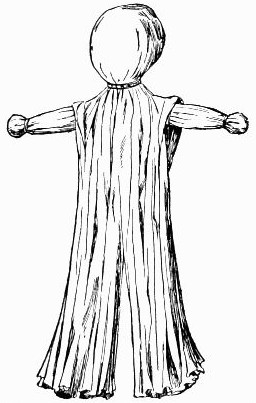
Fig. 157.—The pink skin of tissue-paper over doll.
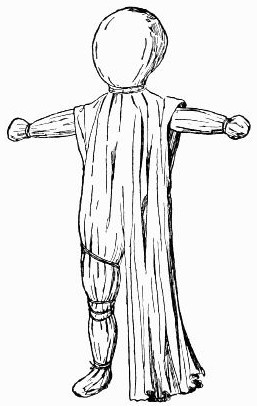
Fig. 158.—Modelling legs of doll.
Miss Muffett's curls are furnished by
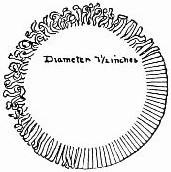
Fig. 159.—The wig.
The Wig,
which you are to make of brown or yellow paper, or black if you want a little brunette.
Cut a circle seven and one-half inches in diameter, and on the edge cut a fringe one inch in depth (Fig. 159). This is the hair, which you must curl by drawing it lightly over the blade of a penknife or scissors (Fig. 159).
Fit the wig on Miss Muffett's head, holding it in place with pins until you can tie it on just back of the curls (Fig. 161).
Now for the little lady's clothes. To make
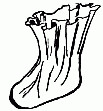
The shoe.
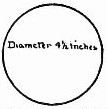
Fig. 160.—Pattern of shoe.
The Shoes,
which will be her first article of dress, cut out of the black tissue-paper two circles measuring four and one-half inches in diameter (Fig. 160); place one foot in the middle of a circle, draw the paper up around the ankle and wrap a number of times before tying. Put the other shoe on the other foot in the same manner, and your doll will look like Fig. 161.
Miss Muffett's Lingerie
consists of a union garment (Fig. 162) and a white skirt (Fig. 163). From one end of your remaining sheet of white paper cut a strip about seven inches wide, and at the middle cut a slit half-way up (Fig. 162). Draw this through your hands to crimp it, the creases to run lengthwise, that is, from top to bottom. Fit the little garment to the body, tying it just below the arms and again above the knees, where it will form ruffles.
Cut the white skirt in a circle seventeen inches in diameter with a circular opening in the centre (Fig. 163). Crimp the skirt and put it on over the feet, not the head, of the doll, wrapping and tying it in place around the waist.
Not only may tissue-paper be purchased in all colors, with their various shades and tints, but in pretty little checks, plaids, and figures as well, so Miss Muffett may have a dress equal in appearance to the cotton or silk gown of her china sisters.
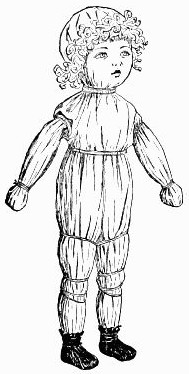
Fig. 161.—Ready to be dressed.
Cut the skirt of
The Dress
after the white skirt pattern (Fig. 163), and the waist like the smaller circle (Fig. 164), which has one slit, from outer to inner edge, added to the opening at the centre.
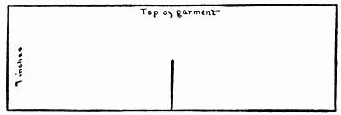
Fig. 162.—Union garment.

Fig. 163.—White skirt.
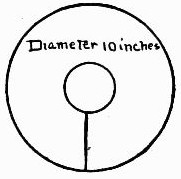
Fig. 164.—Waist pattern.
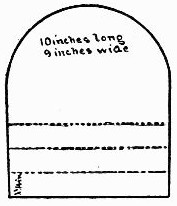
Fig. 165.—Pattern for sun-bonnet.
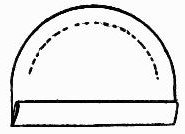
Fig. 166.—Bonnet folded.
This waist circle should measure ten inches in diameter. Do not crimp the dress skirt, but put it on in all its crisp freshness, and tie in place at the waist-line. Adjust the waist on Miss Muffett, bringing the slit opening at the back. It looks very much like a cape now, doesn't it? But draw the fulness in at the bottom and around the arms at the shoulders, and you have a little waist with full short sleeves. Tie the waist rather high, and bring it down to bag slightly over the skirt as shown in the illustration of Miss Muffett. Cut
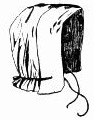
The sun-bonnet.
The Sun-Bonnet
of the same paper as the dress. Fig. 165 shows the pattern, which is ten inches long and nine inches wide. Fold the straight edge over three times, according to the dotted lines in Fig. 165, making the folds one and one-quarter inches wide. Fig. 166 shows the bonnet folded, and the dotted line around the curve indicates where it is to be gathered in at the neck.
Fit Fig. 166 on Miss Muffett's head, allowing the folded edge to extend slightly beyond her face, then draw the bonnet down at the back and gather it in with your fingers until it sits snugly to the neck. Through the middle of the fold, one inch from each end, puncture a hole, and through these two holes pass the thread that goes around the back of the bonnet and ties under Miss Muffett's chin. See illustration of sun-bonnet.
CHAPTER XII
AN INDIAN ENCAMPMENT
AN Indian encampment for your very own! A wigwam, camp-fire, Indian travois, blanket-weaving loom, gorgeous feathered head-dress, bow, arrows and shield, tomahawk, wampum, and a little copper-colored papoose in its funny stiff cradle, hanging on a tree entirely alone! Does not all that sound delightful? The complete scene can actually be made to appear in your room at home.
Take for
The Ground
a common pastry-board or any kind of board of the desired size—about nineteen by twenty-six inches—and for grass cover one side and the four edges of the board with a piece of light-green cotton flannel stretched tight, fleece side up, and tacked to the under side of the board. Sprinkle sand and small stones on the grass at one side of the wigwam, to show where the grass has been worn off by the tramping of the Indians, the bronco pony, and the dog, for all Indians possess dogs of some description. If you have a toy dog of suitable size, stand him by the fire where he will be comfortable. Before the red men owned horses, a dog was always used to drag the travois, and to this day the braves care as much for a dog as does any pale-faced boy—which is saying much, for a white boy and any kind of a dog make devoted friends and comrades.
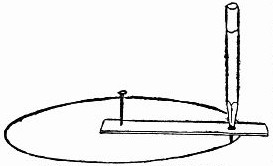
Fig. 167.—Home-made compass.
Now that we have our camping-ground, the first thing we must do is to
Put Up the Wigwam
for shelter. Draw an eight-inch diameter circle on the grass near one end of the ground. Fold a strip of paper lengthwise, stick a pin through one end of the paper and drive it down into the board where you wish the centre of the circle, push the point of a lead pencil through the other end of the paper four inches from the pin; keep the pin steady while you move the pencil around many times until a circle appears plainly on the grass (Fig. 167).
Fig. 168.—Pole sharpened to flat point.
Cut twelve slender sticks eleven inches long and sharpen the heavy end of each into a flat point (Fig. 168). The sticks must be straight, for they are wigwam-poles. Tie three poles together two inches from their tops and spread out the sharpened ends at nearly equal distances apart on the circle line; mark the spots where they rest and bore gimlet-holes in each place through the cloth into the wood. Enlarge each hole with a penknife and insert the poles, pushing the sharpened points down firmly into the holes (Fig. 169). Add seven more poles around the circle, keeping the spaces between all about even. Sink these last poles in the ground as you did the first three; then tie the tops together around the first three poles, and you will have the wigwam framework of ten poles standing strong and firm.
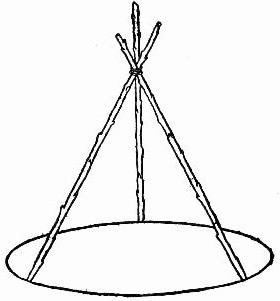
Fig. 169.—First three poles planted firmly in edge of circle for wigwam.
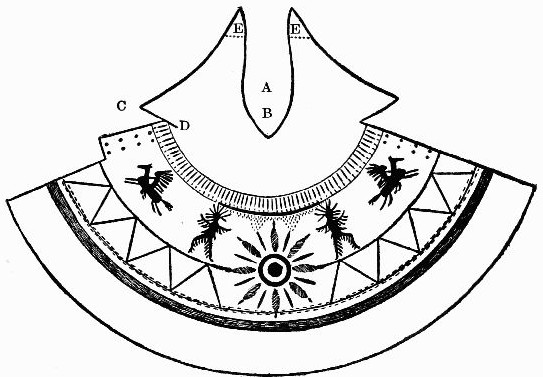
Fig. 170.—Cover for wigwam.
Make the cover of unbleached or brown-tinted cotton cloth cut like Fig. 170. Mark the curved lower edge with the home-made compass used for the grass circle. Fasten the pin and pencil in the paper strip nine and one-half inches apart; draw almost a half circle, then an inch and a half from the spot A (Fig. 170), where the pin is stationed, begin to cut the opening for the top of the wigwam poles, B (Fig. 170). Slash the point C in as far as D, sew pieces of cloth over the points E and E, leaving the opening at dotted lines to form pockets for the smoke-poles. Cut two rows of little holes on each side of the upper part of the wigwam to run the pinsticks through when fastening the wigwam together (Fig. 171).
Now comes the fun of decorating the cover. Pin the cloth out flat and smooth, and paint in brilliant red, yellow, black, green, white, and blue the designs given in Fig. 170. When finished, fit the cover over the wigwam-poles and with short, slender sticks pin the fronts together. Peg the lower edge down to the ground with short black pins and slide a pole in each pocket of the smoke-flaps E and E (Fig. 170). Bring the poles around and cross them at the back of the wigwam. As you do this you will exclaim with delight at the result, for the little wigwam will be very realistic.
In front of your wigwam or tepee
Build a Make-Believe Fire
of bits of orange and scarlet tissue-paper mixed in with short twigs, and then you must manufacture something to cook in. Bore a hole in the ground near the fire and fit in the fire-pole, making it slant over to one side and hang directly above the fire. Place a stone over the embedded end of the pole to keep it firm. Suspend an acorn kettle or any little kettle of the right size for the Indians to use on the pole and the camp will begin to look cosey for the red men to enjoy. Hunt up a jointed doll about five inches high, paint it copper color, ink its hair, and the doll will be a fairly
Good Indian.
If you can find a Zulu doll of the required size, with long, straight black hair, and give him a wash of dull red paint, you can turn him into a fine Indian. Failing these dolls, make an Indian doll of dull red raffia or cloth. This you can do if you try, and remember to have your red man a little more slender than store dolls; most of these are rather too stout to make good Indians.
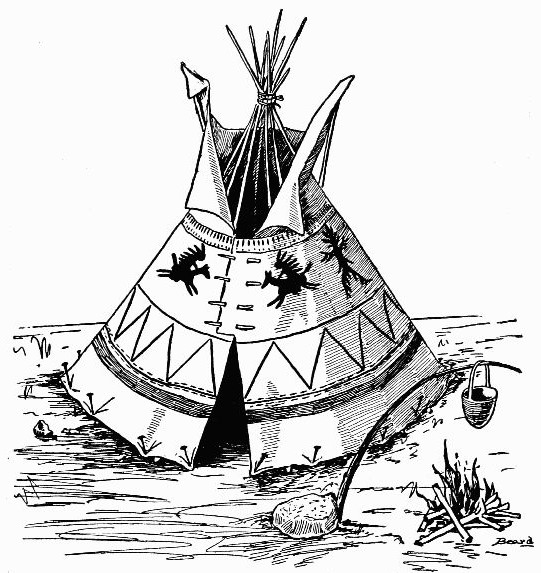
Fig. 171.—Wigwam with make-believe camp-fire.
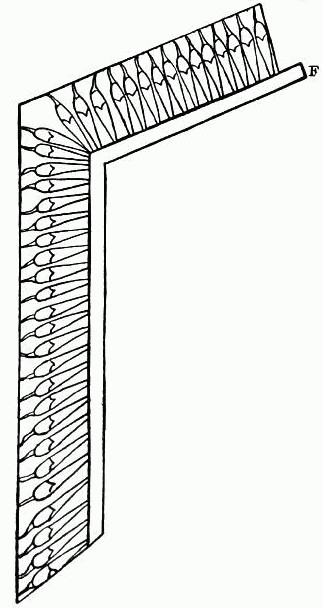
Fig. 172.—Pattern for war bonnet.
Real chiefs like Turning Eagle, Swift Dog, Crazy Bull, and others, wore gorgeous feather headdresses, and gloried in the strange war bonnets, not because they were gay and startling, but for the reason that each separate feather in the head-band meant that the owner had performed a brave deed of which the tribe was proud, and the greater the number of brave deeds the greater the number of feathers; consequently the longer the bonnet-trail. This explains the real meaning of the common expression, "A feather in your cap."
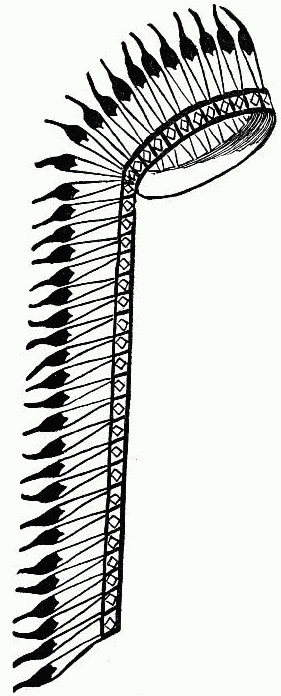
Fig. 173.—Indian war bonnet.
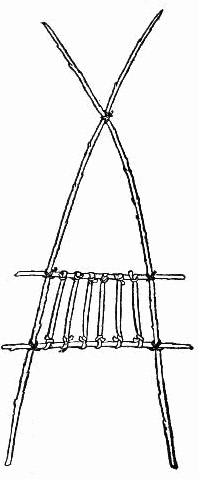
Fig. 174.—Tie the four poles together and tie thongs across centre for your travois.
Your Indian must be a mighty chief and will need a very long-trailing
War Bonnet.
Cut the head-dress like Fig. 172 of white paper. Paint all the paper horse-hair tips on the paper eagle feathers red, the tops of the feathers black, and the band in which they are fastened yellow, red, and green, leaving white spaces between the colors (Fig. 173). Cut out, then turn the end of the band F (Fig. 172) until the loop fits the Indian's head, and glue the end of the loop on the strip (Fig. 173). Paste fringed yellow paper around each of the chieftain's feet, fringed edge uppermost, to serve as moccasins. Part the Indian's hair at the back, bring the two divisions in front, one on each side of the head, and wind each with scarlet worsted as the real Indian wears his hair, then wrap around your red man a soft, dull-colored cloth extending from the waist to the knees. Pin the drapery in place and the chief will be ready to take charge of his bronco pony, which may be any toy horse you happen to possess. The horse in the illustration is an ordinary cloth toy.
Red men are not fond of remaining long in one place, and naturally your Indian will soon want to break camp and carry his belongings elsewhere. Help him prepare by making
A Travois.
You will need four slender poles, two fifteen and one-half inches long, one five and one-half and another six and one-half inches long. Bind the six-and-a-half-inch pole across the two long poles four inches from their heavy ends; fasten the five-and-a-half-inch pole across the long poles two and one-half inches above the first cross-piece. Instead of thongs of buffalo hide, such as the real red man would use, take narrow strips of light-brown cloth to form the rude net-work over the space bounded by the four poles. Tie the top ends of the long poles together (Fig. 174), then tie the travois to the horse, as in Fig. 175. In most of these conveyances the thongs are tied across one way only, from short pole to short pole, forming a ladder-like arrangement.
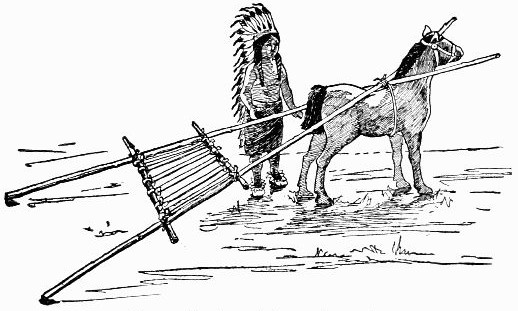
Fig. 175.—Travois ready for camping outfit.
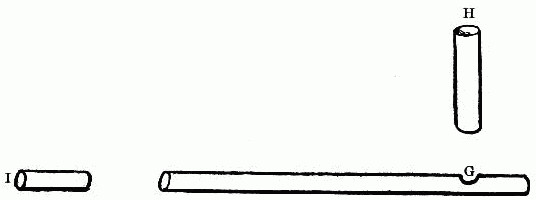
Fig. 176.—Different parts of straw calumet.
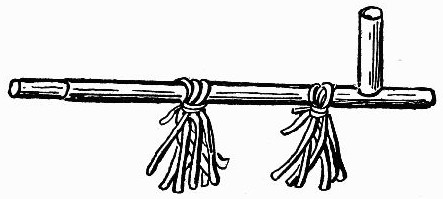
Fig. 177.—Calumet finished.
A chief must always have his
Calumet,
or "pipe of peace," to smoke and pass around the council circle, when all the leaders of the different tribes meet to talk over important matters concerning the welfare of their people. Real calumets are generally large and of goodly length, some of them being four feet long. They are made of dull-red stone, which, when first cut from the large mass, is soft enough to be carved out with a knife; later the pipe becomes hard and capable of receiving a polish. But as the red stone is not within our reach, we must use dull red-colored straw for the calumet. Soak the straw in hot water to render it less brittle. Then cut a three-inch length piece; make a hole in it a short distance from one end (Fig. 176, G) and insert a three-quarter inch length of straw for the pipe bowl (Fig. 176, H). For the mouthpiece take a half-inch length of white straw (Fig. 176, I), and slide it in the other end of the pipe. Glue both bowl and mouthpiece in place and decorate the calumet with red, green, and white silk floss tied on the pipe stem (Fig. 177).
The Tomahawk
must not be forgotten. Soak a stick two and one-half inches long in hot water; when it is pliable, split an end down one inch, no more (Fig. 178, J), and in true Indian fashion bind a stone hatchet (Fig. 178, K) between the split sides of the stick handle with thongs of hide. Whittle the little hatchet from a piece of wood, cover it with glue, then with sand. When dry it will be difficult for others to believe that the implement is not of real stone. Instead of thongs use thread (Fig. 179).
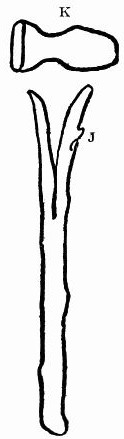
Fig. 178.—Handle and hatchet for tomahawk.
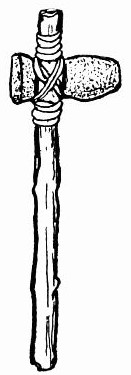
Fig. 179.—Tomahawk ready for use.
The Chieftain's Shield
is of hide taken from the neck of the bull bison; the piece must be twice the required size for a finished shield to allow for the necessary shrinkage. Over a fire built in a hole in the ground the skin is stretched and pegged down. When heated, it is covered with a strong glue made from the hoofs and joints of the bison, which causes the hide to contract and thicken. As this process goes on the pegs are loosened and again adjusted until the skin ceases to contract and absorb the glue. Then the hide is much smaller and thicker than at first. When it has slowly cooled, the skin is cut into a circle and decorated. Though pliable, the shield is strong enough to ward off blows from arrows or spears.
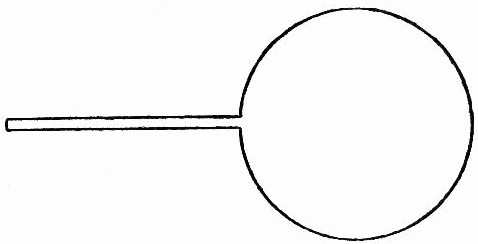
Fig. 180.—Diagram for shield.
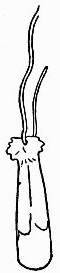
Fig. 181. Eagle feather of paper.
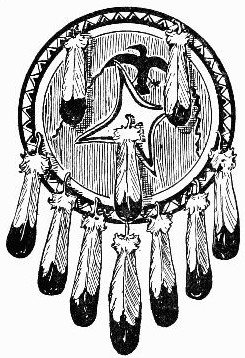
Fig. 182.—Decorated Indian shield.
Bison hide is something you cannot obtain, so take writing paper for the shield. Cut it into a circle an inch and a half in diameter, with an extension for the handle (Fig. 180). Glue the free end of the handle on the opposite side of the back of the shield. Make ten paper eagle feathers (Fig. 181), hang seven on the bottom of the shield with red thread, after first decorating the centre of the shield with given designs and the edge with colored bands, using any or all of the following colors, but no others: positive red, blue for the sky, green for the grass, yellow for the sun, white for the clouds and snow, and black. To the Indian color is a part of religion. Purple, pinks, and some other colors, the red man, loyal to his beliefs, can never bring himself to use. Attach two of the remaining feathers at the top and another on the centre of the shield, as shown in Fig. 182.
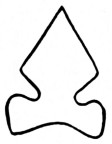
Fig. 183.—Paper flint arrow-head.
The Indian makes his
Arrow-heads
of triangular flakes of flint chipped from a stone held between his knees and struck with a rude stone hammer. The pieces knocked off are carefully examined, and only those without flaws are kept. Stones for arrow-heads must be very hard. When found, the red men bury them in wet ground and build fires over them, causing the stones to show all cracks and checks. This enables the arrow-maker to discard those unfitted for his work.
Though you cannot make a real flint arrow-head, you can manufacture a toy one. Take a piece of stiff pasteboard and cut it like Fig. 183. Let the length be a trifle over half an inch. Cover the arrow-head all over with a light coat of glue, then dip it in sand, and the arrow-head will come out as if made of stone. Were it actually hard stone and large size you would be obliged, as the Indians do, to trim and shape more perfectly the point and edges of the arrow-head. You would hold a pad of buckskin in your left hand to protect it from the sharp flint, and on your right hand would be a piece of dressed hide to guard it from the straight piece of bone, pointed on the end, which you would use to strike off little bits of stone along both edges, working cautiously as you neared the point in order not to break it. But such work will not be needed on your arrow-head.
For
The Shaft
hunt up a piece of wood strong and straight. Cut it three inches in length, remove the bark and scrape the wood until it is about the thickness of an ordinary match. Notch one end and split the other end down one-quarter of an inch, insert the arrow-head (Fig. 184), then bind the shaft and head together with thread (Fig. 185), in place of the wet sinew an Indian would use for a real arrow, after he had first fastened the head in the shaft with glue from buffalo hoofs.
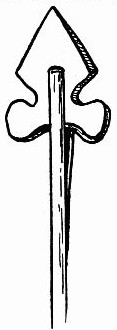
Fig. 184.—Insert arrow-head in shaft.
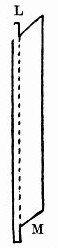
Fig. 185.—Arrow-head and shaft bound together.

Fig. 186.—Paper feather for arrow.
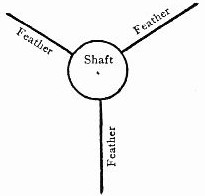
Fig. 187.
Cut three paper feather strips (Fig. 186), each an inch in length, paint black bands on them, bend at dotted line and glue the feathers on the shaft one-quarter of an inch from the notch, allowing them to stand out at angles equally distant from each other (Fig. 187). Bind the extensions L and M (Fig. 186) to the shaft, and tie tufts of white and red worsted on immediately above the feathers to help in finding the arrow (Fig. 188). Paint the shaft in brilliant colors.
Almost any kind of wood that has a spring will make
A Good Bow
for your little Indian. Cut the piece of wood four inches long and an eighth of an inch wide. Scrape it flat on one side and slightly rounded on the other, notch the stick at each end, wind the centre with red worsted and paint the bow in bright hues (Fig. 189). Tie a strong thread in one notch and bring it across to the other notch; tighten until it bends the bow centre half an inch from the straight thread; tie the thread around the notch (Fig. 190). Now try the wee weapon; hold it vertically and shoot the little arrow into the air. It will fly very swiftly away, landing many yards from where you stand.
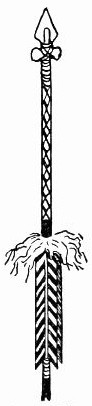
Fig. 188.—Finished arrow.

Fig. 189.—Bow ready for string.

Fig. 190. Bow string.
Make the bow case (Fig. 192) of ordinary wrapping paper cut like Fig. 191, three and a half inches long and two and a half inches wide. Fold the paper lengthwise through the centre and glue the sides together along the dotted lines; then fringe the edge up to the dotted line and decorate with gay paint.
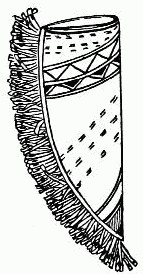
Fig. 191.—Cut bow case like this
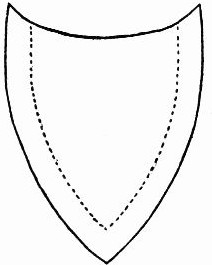
Fig. 192.—Bow case finished.
Dress the jointed doll squaw in a fringed
Chamois-Skin Gown;
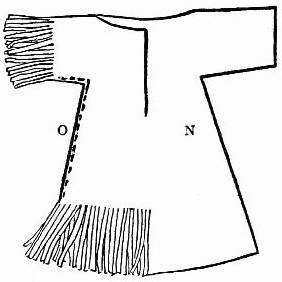
Fig. 193.—Squaw's chamois dress.
fold the skin and let one half form the front, the other half the back. Cut the garment like the half N, in Fig. 193, stitch the sides together, stitch the under part of the sleeves together and fringe both sleeves and bottom of the dress (O, Fig. 193). Belt the gown in with scarlet worsted and load the squaw down with strands of colored beads; then seat her on the grass (Fig. 194) while you make the primitive loom for her to use in weaving one of the famous
Navajo Blankets.
Paint a two by four inch piece of white cotton cloth with a blanket design in red and black, with white between the markings, and pin it securely on a board (Fig. 195). Tie stones to a pole six inches in length (Fig. 196); with long stitches fasten the stone-weighted pole to the bottom edge of the painted cloth blanket (Fig. 197).
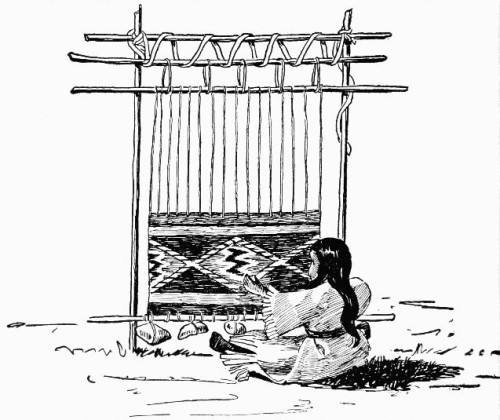
Fig. 194.—Squaw doll make-believe weaving Navajo blanket on primitive loom.
Two inches above the blanket attach a six-inch pole to the board with pins and use a coarse needle and heavy thread to make the warp. Run the thread through the wrong side of the blanket and up around the pole. Cross it on the under side of the long thread (P, Fig. 197) which extends from blanket to pole.
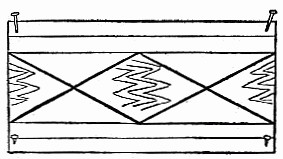
Fig. 195.—Indian blanket pinned on board.

Fig. 196.—Stones tied to pole for bottom of loom.
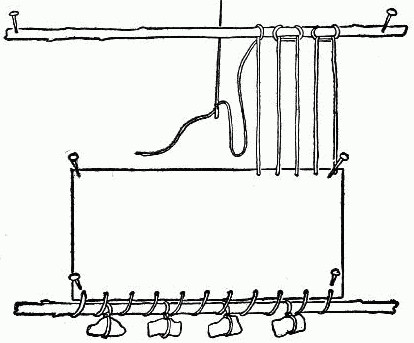
Fig. 197.—Building primitive loom.
Carry the thread along the pole a short distance, loop it over (Q, Fig. 197) and bring the thread down through the right side of the blanket. Take a long stitch and again carry the thread up over the pole. Continue until the warp is entirely across the blanket. Pin another pole six and a half inches long, three-quarters of an inch above the top pole, and fasten the two poles together by tying loops of string across from one to the other (Fig. 198).
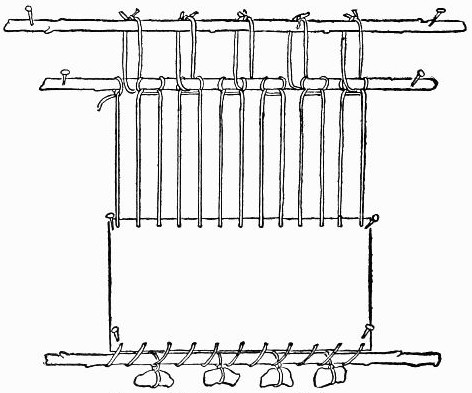
Fig. 198.—Primitive loom ready for frame.
Make the loom frame of two seven-inch poles four and a half inches apart and crossed at the top by another seven-inch pole, the three firmly tied together and made to stand erect on the grass by planting the two upright poles in holes bored through the cloth grass into the board ground. Hang the loom on this frame by winding a narrow strip of cloth loosely around the top of the frame and top of loom (Fig. 194).
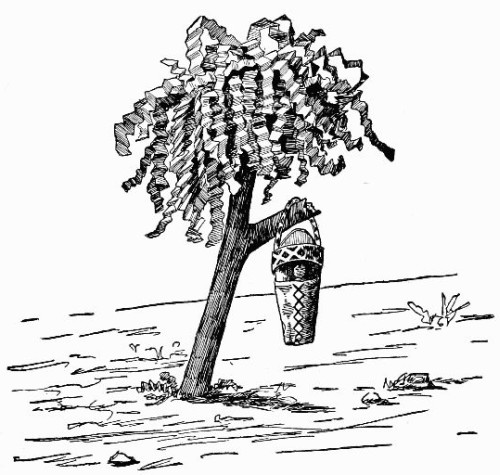
Fig. 199.—Natural twig and tissue-paper tree.
Find a stout, short-branched twig for
The Tree
(Fig. 199). Sharpen the bottom and drive it into a hole in the ground. For the foliage cut a fringe of soft green and olive-brown tissue-paper folded lengthwise in strips. Crimp the strips with a blade of the scissors, then open out the fringe; gather each one through the centre, give the paper a twist, and the two ends will form bunches of foliage. Work the twisted centre of one piece down into a crack at the top of the tree. Over across this at right angles in another opening, fit in the second twist of paper foliage and crown all with a bunch standing upright as shown at Fig. 199.
A solemn
Little Papoose
bound in its stiff cradle is one of the drollest things imaginable. Paint a small doll copper color, make its hair black, and bind the baby in a cradle cut from brown pasteboard (Fig. 200). Cut along heavy line and bend forward the tongue R along the dotted line, bring the strap S across and glue the end on the under side of the cradle; then line the cradle with white tissue-paper and place the Indian child on it; spread a piece of vivid red tissue-paper over the infant, bringing the sides of the cover on the under side of the cradle, where you must glue them. Fold over the lower end of the paper and glue that also on the back of the cradle. Paint the cradle and portions of the cover white, green, black, and yellow (Fig. 200); then hang the cradle and baby on the limb of the tree (Fig. 199), where the little papoose will be safe while his squaw-mother works at her weaving.
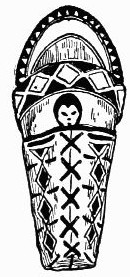
Fig. 200.—The little papoose you can make.

Cradle for papoose.

Fig. 201. Wampum, Indian money.
The red men use queer money which they call
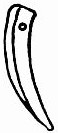
Fig. 202. Buffalo claw cut from wood.
Wampum.
It is made of shells found usually along the borders of rivers and lakes. The Indians cut the thick part of the shell into cylinders about an inch long, bore holes lengthwise through the centres and string them like beads on fine, strong sinews (Fig. 201), but this money is not as pretty as glass beads, for it resembles pieces of common clay pipe stems. A certain number of hand-breadths of wampum will buy a gun, a skin, a robe, or a horse, and when presented by one chief to another the wampum means good-will and peace. Of course, you will want to supply your Indians with their own kind of money. You can string the wampum into a necklace and decorate the strand with eagle claws, bright beads, and tufts of gay worsted.
Find some beads much smaller, but as near as possible in color and form to real wampum, and string them with tiny eagle claws made of wood cut like Fig. 202, only smaller. Paint the claws very dark gray, almost black, and bore a hole through the heavy end with a hat-pin heated red hot. The claws will then string easily and give quite a savage appearance to the necklace (Fig. 203).
Let the colored worsted tufts, which must take the place of hair, be bright-red, and the strands of round beads on each side of the necklace of various colors (Fig. 203).
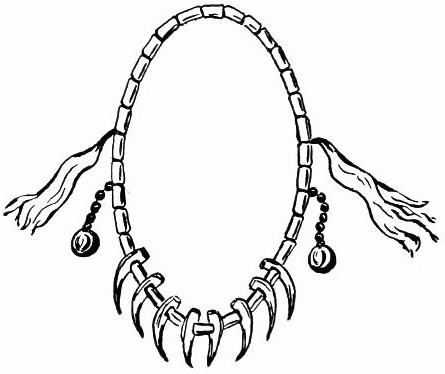
Fig. 203.—Indian necklace of wampum, eagle claws, tufts of hair, and bone beads.
Indians when they cannot obtain beads use gayly colored porcupine quills for their embroidery. You need not try the embroidery, but be sure to make the entire Indian encampment with everything pertaining to it.
CHAPTER XIII
A TOY COLONIAL KITCHEN WITH FAC-SIMILE COLONIAL FURNISHINGS.
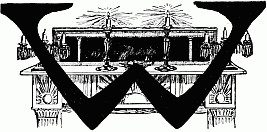
WOULD it not be fun to see a yoke of real live oxen come slowly walking into the kitchen dragging a load of logs? That is what many of the colonial boys and girls saw every day, and frequently the boys helped their fathers cut the logs which were for the big kitchen fireplace. And such a fireplace! Large enough for the huge, roaring fire and the chimney-seats also. These were placed close against the sides of the opening, making fine places for the boys and girls to sit and listen to thrilling tales of adventure or delightful fairy stories.
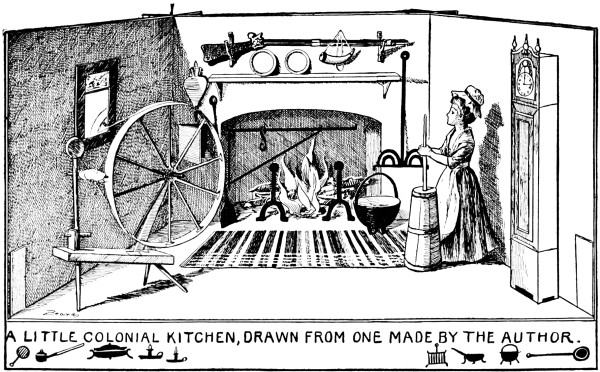
Fig. 204.
The kitchen in those days was the chief apartment and the most interesting room in the house. Who would want to go into the stiff, prim "best room" when they could be so much more comfortable in the spacious kitchen where everyone was busy and happy, and where apples could be hung by a string in front of the fire to roast and made to spin cheerily when the string was twisted, that all sides might be equally heated? Any girl or boy to-day would be[134] [135] only too glad of a chance to sit on a log in front of such a fire and watch red apples turn and sputter as the heat broke the apple skin, setting free the luscious juice to trickle down the sides.
As the Indian's first thought was for shelter, and he put up his wigwam, so the early settler's first thought was for shelter, and he built, not a wigwam, but a log-house with a kitchen large enough to serve as a general utility room. It was filled with various things, and all articles in it were used constantly. Everything not brought from the mother country the settlers made by hand. The colonial kitchen you can build may be of gray or white cardboard. Old boxes, if large enough, will answer the purpose.
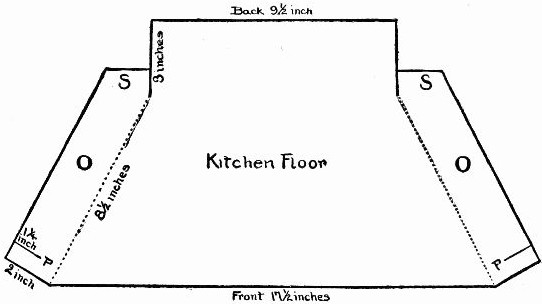
Fig. 205.—Kitchen floor.
I will tell you exactly how I built the colonial kitchen seen in Fig. 204. I made the floor (Fig. 205), the two side walls both alike (Fig. 206), the back wall (Fig. 207), and the interior of the fireplace (Fig. 208) of light-gray cardboard. I cut all the heavy lines, scored and then bent all the dotted lines.
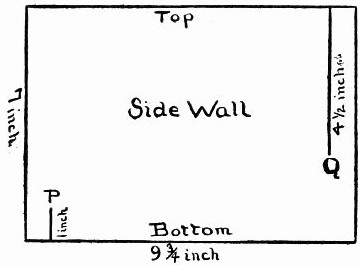
Fig. 206.—Side wall.
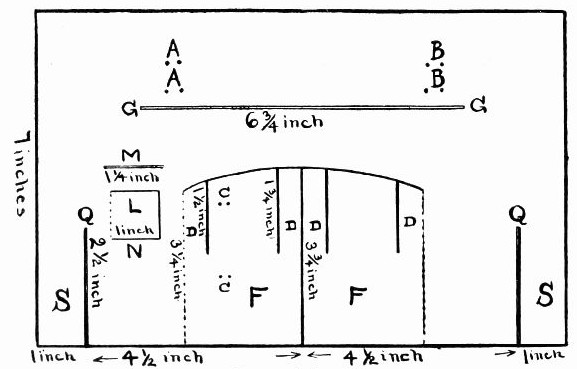
Fig. 207.—Back wall.
Now you do the same thing. Get your measurements correct and be careful to make the lines perfectly straight. Before putting the kitchen together, fasten the rustic brackets, cut from a branching twig (Fig. 209), on the wall above the mantel-piece to support the flintlock gun. Take two stitches through the wall around each twig, as shown in Fig. 210, at the dots A and A and B and B (Fig. 207).
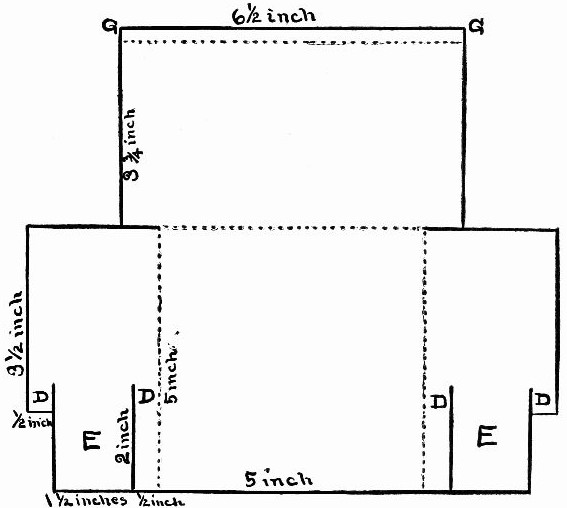
Fig. 208.—Interior of fireplace.
Every colonial fireplace boasted of
A Strong Crane
upon which to hang the pots and kettles over the fire. One end of the crane was bent down and attached to the side chimney wall by iron rings. These rings allowed the crane to turn so that the extending iron rod could be swung forward to receive the hanging cooking utensils and then pushed back, carrying the pot and kettles over the fire for the contents to cook. The crane was black and of iron. A hair-pin (Fig. 211) makes a fine crane. Bend yours, as shown in Fig. 212, then with two socket-rings made with stitches of black darning-cotton fasten the crane to the side of the chimney at the dots C and C (Fig. 207), and tie a piece of the darning-cotton on the little crane immediately below the lower socket-ring; bring the thread diagonally across to the top arm of the crane an inch and a quarter from the free end and again tie it securely (Fig. 213).
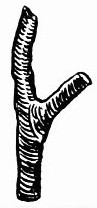
Fig. 209.—A forked twig for the bracket.
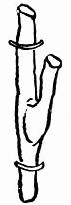
Fig. 210.—Put the brackets up in this way.
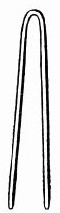
Fig. 211.—The crane is made of a hair-pin.
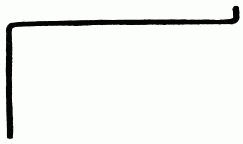
Fig. 212.—The crane.
Bend the two sides of
The Fireplace
F and F (Fig. 207) as in Fig. 213. Bend forward the interior of the fireplace (Fig. 208) at dotted lines, and fit Fig. 208 on the back of Fig. 207 to form the inside of the fireplace and the mantel-piece. Slide the slashed top strips of the sides of the fireplace D,D,D,D (Fig. 207), back of the slashed strips D,D,D,D (Fig. 208), which will bring the two centres E and E of the sides in Fig. 208 behind F and F in Fig. 207, and will thus form two layers on the sides of the chimney. Push the edge G and G of Fig. 208 through the slit G and G in Fig. 207 to form the mantel-piece, then bend down the edge of mantel-piece along dotted line.
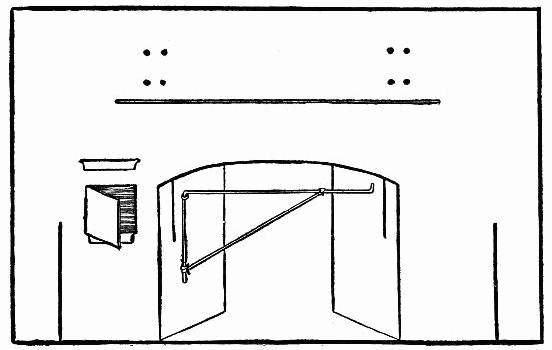
Fig. 213.—Back wall, showing crane hung and oven door open.
You must have
An Oven
at one side of the great fireplace for baking the wholesome "rye and Indian" bread, and the delicious home-made apple, pumpkin, rice and cranberry pies. In colonial days thirty large loaves of bread or forty pies would often be baked at one time, so spacious were the ovens. These side-ovens used to be heated by roaring wood fires built inside of them and kept burning for hours. When the oven was thoroughly hot the cinders and ashes were brushed out and in went the pies with a lot of little ones called "patties," for the children. When these were cooked to a golden brown each child was given his own piping hot "patty."
Make your box-like oven according to Fig. 214, cut the heavy lines, score and bend the dotted lines. Bring the side H to the side I; lap I over H so that the two slits, J and J, will exactly fit one over the other; then bend the back down and run the flap J on the back through the two slits J on the side, and the flap K through the slit K.
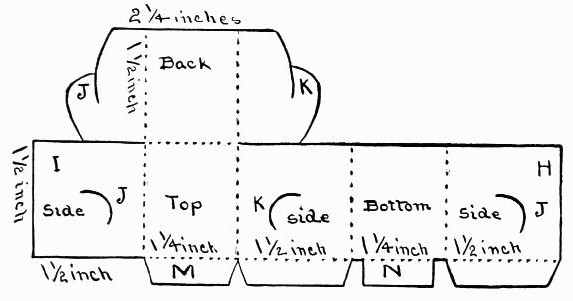
Fig. 214.—The oven.
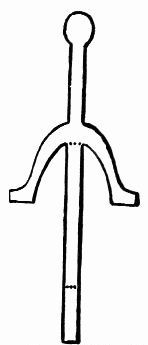
Fig. 215.—Pattern for andiron.
Adjust the oven back of the oven door L (Fig. 207), and fasten it tight on the wall by sliding the flap M of the oven (Fig. 214) through the slit M (Fig. 207) above the oven door; bend it down flat against the wall. Bring the bottom oven-flap N in through and over the lower edge of the oven door-way N (Fig. 207) and bend that also flat against the wall (Fig. 213). The two side oven flaps will rest against the back of the wall on each side of the oven door-way.
Now that is finished firm and strong, and you can
Put the Kitchen Together
in a few moments. Lay the floor (Fig. 205) down flat on a table; bend up the two diagonal sides O and O, and slide the slit P in the side wall (Fig. 206) down into the slit P of the floor (Fig. 205), bringing the wall (Fig. 206) in front of the upturned floor-piece O (Fig. 205). In the same way fasten the other side wall on the floor. Slip the two slits Q and Q of the back wall (Fig. 207) down across the top slits (Q, Fig. 206) of the side walls. While bringing the back wall (Fig. 207) down to the floor, slide its outside strips S and S over and outside of the upturned pieces of the floor, S and S (Fig. 205), to hold them in place.
As soon as the Indian's wigwam was up, he had a brisk fire to cook by, for after shelter came food. The white man did likewise after his house was built. Though he had andirons to help with his fire, even then to
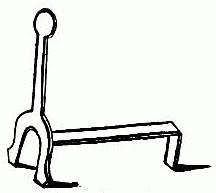
Fig. 216.—The andiron.
Lay the Fire
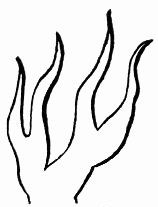
Fig. 217.—The flames.
in the immense fireplace required some skill. Cut two andirons of cardboard (Fig. 215), bend at dotted lines, paint black, and the andirons will stand alone and look like real ones (Fig. 216).
Cut from red, orange, yellow, and black tissue-paper flames like Fig. 217; bend at dotted line and paste the mingled flames one at a time and turned in varying directions on a piece of cardboard made to fit the bottom of the fireplace. Adjust the little black andirons to the fire and glue them in place; select a large log for the "back-log," and a more slender one to lay across the front of the andirons. Place smaller wood in between with the flames, and scatter a few bits of black paper on the hearth underneath to appear like fallen charred wood. When finished the fire should look as if it were actually sparkling, roaring, and blazing (Fig. 218).
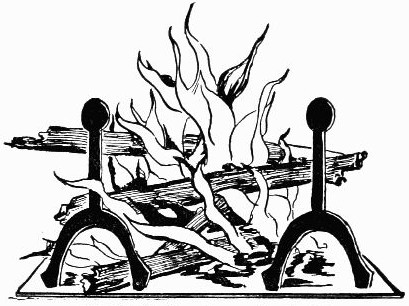
Fig. 218.—The flames leap up the chimney.
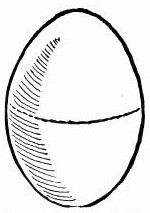
Fig. 219.—Cut the shell in half.
Your fire is ready, so you must hurry and get the
Great Iron Pot
to hang over the flames. Break an egg in halves as indicated by dotted lines in Fig. 219; even off the edge of the larger half shell with a pair of scissors, paste a strip of tissue-paper over the edge and glue on a stiff paper handle (Fig. 220). Cut three pieces of heavy, stiff paper like Fig. 221, bend at dotted line and pinch the two lower corners on part T together to form the pot legs (Fig. 222). Turn the egg-shell upside down and fasten the legs on by gluing the flap U (Fig. 221) on the bottom of the shell; the legs should enable the pot to stand upright. Turn the egg-shell into iron by painting the handle and outside of the pot jet black (Fig. 223). Swing the crane forward, hang on the pot, pretend you have something to cook in it, then move the crane back over the fire.
Fig. 220.—A strip of paper for the handle.
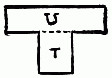
Fig. 221.—Cut the pot leg like this.
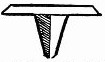
Fig. 222.—Bend the pot leg like this.
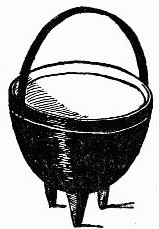
Fig. 223.—Paint the pot black.
Remember all the time you are playing, that this is the way your colonial ancestors cooked.
In days of long ago, they had many other
Odd Utensils
One of the easiest for you to make is the long-handled iron shovel called a "peel" (Fig. 224), used to place bread and pie in the great oven. Cut the peel from stiff cardboard, paint it black and stand it up by the side of the chimney (Fig. 204). Trace the toaster (Fig. 225) on cardboard, paint it black, bend up the four semicircular rings and bend down the two feet, one on each side (Fig. 226).
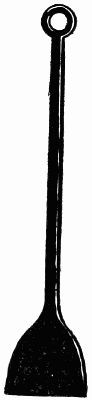
Fig. 224.—A queer shovel called the "peel."

Fig. 225.—Make the toaster by this pattern.
Chicken and other eatables were placed between the front and back rings on the toaster and broiled before the fire, which was so hot that it was necessary to have long handles on all cooking utensils.
Fig. 227.—Make a pot-hook like this.
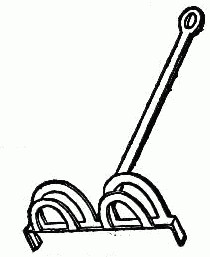
Fig. 226.—The toaster.
Several pieces of iron of varying lengths, generally made into the shape of the letter S, were called "pot-hooks"; they hung on the crane. Make two or three pot-hooks of cardboard and paint them black (Fig. 227). When you are not using the little toaster, bend up the handle and hang it on a pin stuck in the wall (Fig. 204).
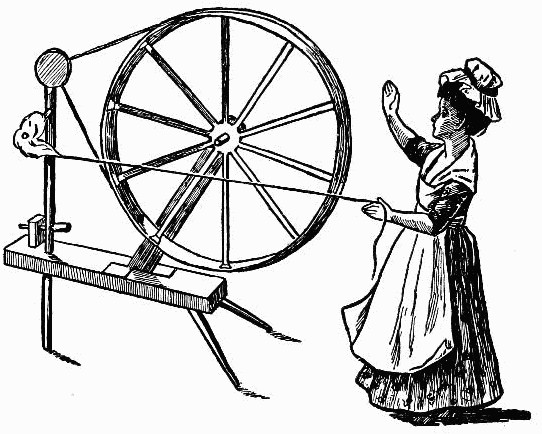
Fig. 228.—The spinning-wheel and jointed doll spinning.

Fig. 229.—Spokes.
Just look at your little colonial friend, Thankful Parker! (Fig. 228). The tiny maid seems almost to be stepping lightly forward and backward as she spins out long threads of the soft, warm yarn, singing softly all the while a little old-fashioned song. How busily she works, and listen! you can all but hear the wheel's cheery hum, hum, hum! That's the way the real colonial dames used to spin. Such a
Spinning-Wheel
belonged to every family, for all had to do their own spinning or go without the yarn, as they could obtain no assistance from others.

Fig. 231.—Small wheel.
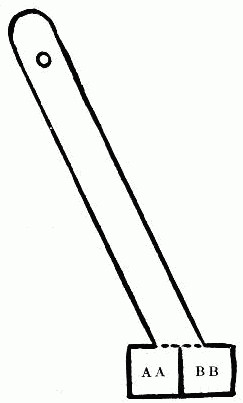
Fig. 233.—Wheel brace.
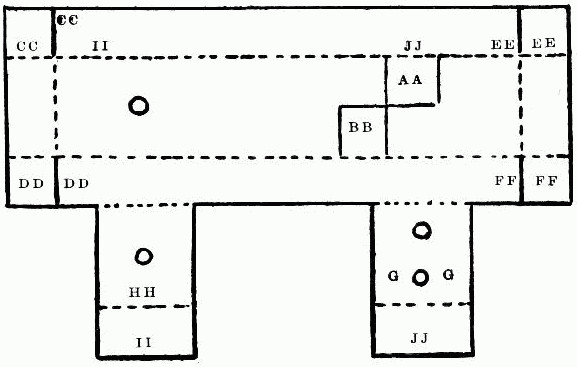
Fig. 232.—Stand.
Fig. 230.—Tire of wheel.
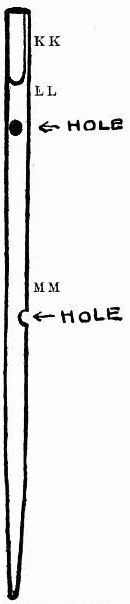
Fig. 234.—Upright.
Cut from cardboard the spokes (Fig. 229) for your miniature colonial spinning-wheel, the tire (Fig. 230), and the two small wheels (Fig. 231). Bend forward the fan-shaped ends of each spoke (Fig. 229) and glue the tire (Fig. 230) around on them; let one edge of tire lie flush on the edges of the bent ends of the spokes.
With the exception of the square spaces AA and BB on the stand (Fig. 232) cut the heavy lines and the little holes; score, then bend the dotted lines. Bend down the long sides and the ends fitting the corners against and on the inside of the same letters on the sides, glue these in place and you have a long, narrow box with two extensions on one side (HH and GG). Bend these extensions, also their ends II and JJ, and glue the ends on the inside of the opposite side of the box against the places marked II and JJ.
Turn the box over, bringing the level smooth side uppermost. Cut out the wheel brace (Fig. 233), turn it over on the other side, then bend AA backward and BB forward, and glue the brace on the box-like stand (Fig. 232) on the squares AA and BB. See Fig. 228.
Make the upright (Fig. 234) of wood; shave both sides of the end, KK, until it is flat and thin, then glue a small wheel (Fig. 231) on each side, raising the wheels above the wood that the flat end of the upright may reach only to their centres. Glue the wheels together to within a short distance of their edges.
With the red-hot end of a hat-pin bore the hole LL through the front of the upright, and below bore another hole, MM, through the side. Make the screw (Fig. 238) and the block (Fig. 239) of wood. Run the screw through the side hole MM in the upright (Fig. 234), and push the screw on through the hole in the top of the block (Fig. 239). Break off more than half of a wooden toothpick for the spindle (Fig. 236) and pass it through the hole LL (Fig. 234).
Fig. 235.—Hub.
Make the hub (Fig. 235) of wood and thread it in through the wheel and brace (Fig. 233), to hold the wheel in place. Use two wooden toothpicks, with the ends broken off (Fig. 237), for legs; insert these slantingly into the holes, GG (Fig. 232), on the under part of the stand, allowing the top ends to reach up and rest against the under side of the top of the stand. Spread out the bottom ends of the legs.
Run the upright (Fig. 234) through the single hole near one end of the stand (Fig. 232) and pass it down through the under hole on HH. The lower part of the upright forms the third leg. See that all three legs set evenly when the wheel stands, and that the box part is raised slightly higher at the upright end, slanting downward toward the other end (Fig. 228). Glue the three legs firmly in place.
Connect the two small wheels (Fig. 231) and the large wheel together by passing a string between the small wheels and over around the outside of the tire of the large wheel, fastening it on here and there with a little glue (Fig. 228). Twist a piece of raw cotton on the spindle and tie a length of white darning-cotton to the end of the cotton (Fig. 228).
Fig. 236.—Spindle.
Fig. 237.—Leg.
Fig. 238.—Screw.

Fig. 239.—Block.
Fig. 241.—Hair-pin.
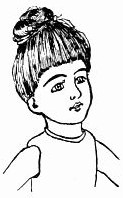
Fig. 240.—Do her hair up in this fashion.
Stretch the thread across to the hand of your colonial-dressed doll, glue it in place, and the next time your mother attends a meeting of the Society of Colonial Dames tell her to show your little maid Thankful Parker and her spinning-wheel. When you
Dress the Doll
coil her hair up on top of her head (Fig. 240) and fasten it in place with common pins (Fig. 241). Make the straight bang look as nearly as possible as though the hair were drawn up into a Pompadour such as was worn in Colonial times.
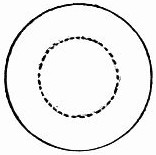
Fig. 242.—Pattern of cap.
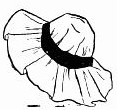
Fig. 243.—The cap.
Fig. 244.—Cap band.
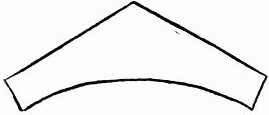
Fig. 245.—Pattern of kerchief.
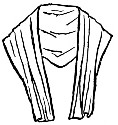
Fig. 246.—Fold the kerchief like this.
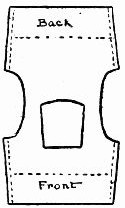
Fig. 247.—Pattern of waist.
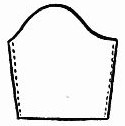
Fig. 248.—Pattern of sleeve.
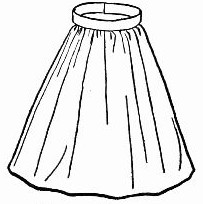
Fig. 249.—The apron.
Make the cap (Fig. 243) of thin white material cut like Fig. 242, and the band (Fig. 244) of the same color as the dress. Cut the thin white kerchief like Fig. 245, and fold it as in Fig. 246. Fig. 247 gives the design for the dress waist, and Fig. 248 the sleeve. The skirt is a straight piece gathered into a waistband. The apron (Fig. 249) is white. When the doll is dressed it should resemble little Thankful Parker (Fig. 228). An
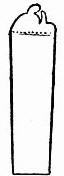
Fig. 250.—Lock and band of tinfoil.
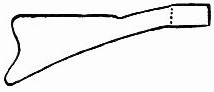
Fig. 251.—Make this part of pasteboard.
Old-Fashioned Flintlock Rifle
with its long, slender barrel was used almost daily by our forefathers for securing game as food.
The gun was kept hanging in plain sight over the kitchen mantel-piece, ready for defence at a moment's notice, for in those early days wolves and other wild animals were numerous and dangerous, and enemies were also likely to appear at any time.
You should have one of those queer old guns to adorn your kitchen wall. Get some heavy tinfoil off the top of a bottle, or take a collapsible tube and from it cut a wide strip like Fig. 250, one narrow, straight strip and two medium-wide straight strips, four in all. Cut the butt end of the gun (Fig. 251) of stiff cardboard. Break a piece measuring four and one-half inches from a common coarse steel knitting-needle for your gun-barrel and use a slender, round stick, or the small holder of a draughtsman's pen, cutting it a trifle more than three and one-half inches in length for the ramrod groove.
Fig. 252.—A pin for a ramrod.
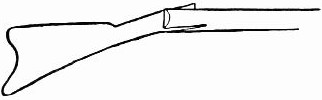
Fig. 253.—Slide the paper end in the wood like this.
In the centre of one end of the stick bore a deep hole with the red-hot point of a hat-pin and insert the pointed end of an ordinary pin for a ramrod (Fig. 252). Split the other end of the stick up through the centre not quite half an inch and work the butt end of the gun in the opening (Fig. 253).

Fig. 254.—Ready for the tinfoil bands.
Lay the gun-barrel above the wooden part (Fig. 254) and fasten the two together with the four bands of tinfoil (Fig. 255), allowing the top part of Fig. 250 to stand up free to represent the flintlock. We must be content without a trigger unless you can manage to make one by bending down and cutting a part of Fig. 250. Paint the butt and wooden portion of the gun brown before binding on the barrel, and you will find that you have made a very real-looking little rifle to hang upon the rustic brackets over the mantel-piece.

Fig. 255.—Colonial flintlock made of knitting-needle and small pen-holder.
When the fire in your big kitchen fireplace needs brightening, use the
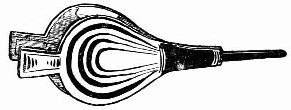
Fig. 257.—The finished bellows.
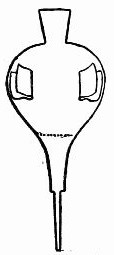
Fig. 256.—Cut the bellows by this pattern.
Little Bellows
to send fresh air circulating through the smouldering embers. The bellows are easy to make. Cut two pieces of pasteboard like Fig. 256, and cut two short strips of thin paper. Paste one edge of each strip to each side of one piece of cardboard bellows, fold the strips across the centre (Fig. 256), and attach the free ends of the folded strips to the other piece of pasteboard bellows, forming a hinge-like connection on each side between the two pasteboard sides. Paste the points of the two sides together up as far as the dotted line (Fig. 256). When thoroughly dry you can work the bellows by bringing the handles together and opening them as you would real bellows (Fig. 257).
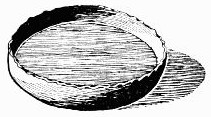
Fig. 258.—Colonial pewter dish made of tinfoil.
Heavy tinfoil must furnish material for your
Pewter Ware;
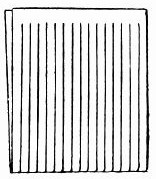
Fig. 259.—The warp.
much of it has the same dull, leaden color and the peculiar look of old pewter. Should the pieces of tinfoil you find be twisted and uneven, lay them on a table and smooth out the creases with scissors or the dull edge of a knife-blade; then cut out round, flat pieces and holding one at a time in the palm of your left hand, round up the edges by rolling the ball of a hat-pin around and around the plate; press rather hard and soon the edges will begin to crinkle and turn upward (Fig. 258). You may mould some deeper than others and have a row of different-sized pewter plates on the kitchen mantel-piece, and you can make a wee pie in the deepest plate, open the oven-door and shove the pastry into the oven with the little iron peel. Try it.
The colonial kitchen would be incomplete without a bright,
Home-like Rag Rug
to place over the bare board floor, and it will be fun for you to weave it. Take a piece of smooth brown wrapping-paper the size you want your mat, fold it crosswise through the centre and cut across the fold (Fig. 259), making a fringe of double pieces which we will call the warp. Unfold the paper and weave various colored tissue-strips in and out through the brown foundations (Fig. 260), until the paper warp is all filled in with pretty, bright colors. You can weave the rug "hit or miss" or in stripes wide or narrow as you choose, only make the rugs as pretty as possible.
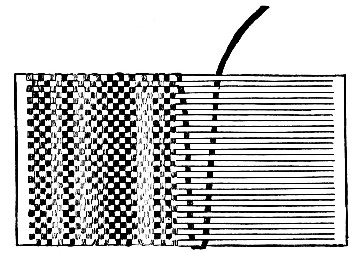
Fig. 260.—Weave the rug in this way.
Now we must manufacture a fine
Old Colonial Clock
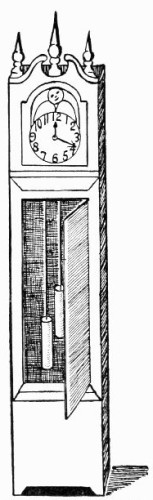
Fig. 261.—Colonial clock with movable weights.
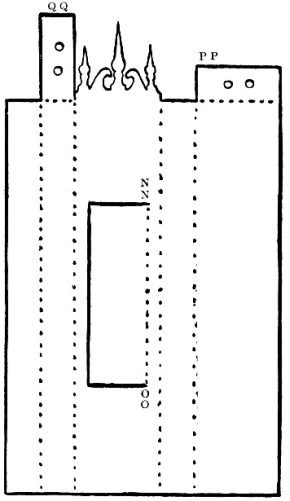
Fig. 262.—The clock is cut in one piece.
Fig. 263.—Draw the circle.
(Fig. 261). It would never do to forget the clock, for poor little Thankful would not know how long her many loaves of bread were baking in the big oven, and the bread might burn. Cut Fig. 262 of cardboard and score all dotted lines, except NN-OO, which forms the hinge of the door. Mark this with a pinhole at top and bottom, turn the cardboard over and draw a line from pinhole to pinhole; then score it on this line that the door may open properly outward. Try to draw the face of the clock correctly. Make it in pencil first so that any mistake may be erased and corrected. When you have the face drawn as it should be, go over the pencil lines with pen and ink. Begin the face with a circle (Fig. 263). Make it as you made the circle for the wigwam, only, of course, very much smaller. Above the circle, at the distance of half the diameter of the circle, draw a curve with your home-made compass (Fig. 264). Lengthen the compass a little and make another curve a trifle above the first (Fig. 265). Connect the lower curve with the circle by two straight lines (Fig. 266), draw a small circle above the large one (Fig. 267), connect the two circles by two scallops (Fig. 268), and bring the upper curve down into a square (Fig. 269). The small top circle stands for the moon; draw a simple face on it like Fig. 270, then make the numbers on the large circle (Fig. 271) and also the hands (Fig. 272). Both numbers and hands must be on the same circle on the clock. They are on two different circles in the diagrams that you may see exactly how to draw them.
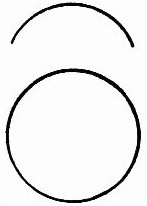
Fig. 264.—Then a curve above the circle.
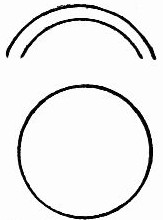
Fig. 265.—Another curve above the first one.
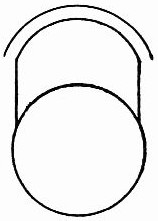
Fig. 266.—Connect the lower curve with the circle by two lines.
Leave Fig. 269 white, but paint the other portions of the clock a light reddish brown with black lines above and below the door, and a black band almost entirely across the bottom edge of the front of the clock that the clock may appear to be standing on feet. Gild the three points on the top to make them look as if made of brass.
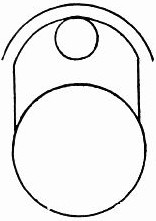
Fig. 267.—Draw a small circle above the large one.
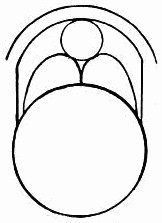
Fig. 268.—Connect the two circles by two scallops.
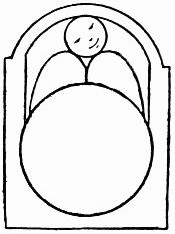
Fig. 269.—Extend line of upper circle down to form a square.
Be sure that the four holes in the top (Fig. 262) are fully large enough to allow a coarse darning-needle to be passed readily through them; then bend the clock into shape, fitting the extension PP over the extension QQ; the two holes in PP must lie exactly over those in QQ. Glue the clock together, using the blunt end of a lead-pencil, or any kind of a stick, to assist in holding the sides and tops together until the glue is perfectly dry.

Fig. 270.—Make this face in the small circle.
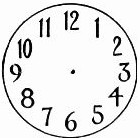
Fig. 271.—Put the numbers on the clock face in this way.
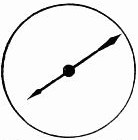
Fig. 272.—Make the hands of the clock like these.
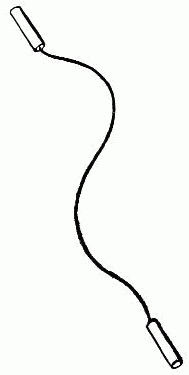
Fig. 273.—Weights for winding the clock.
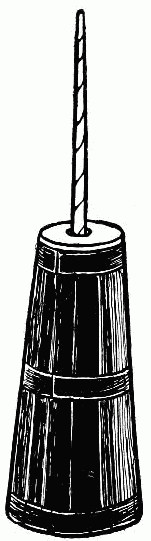
Fig. 275.—The churn.
Thread a piece of heavy black darning-cotton in the largest-sized long darning-needle you can find; on one end of the thread mould a cylinder-shaped piece of beeswax, cover it with thin tinfoil, then open the clock-door and hold the clock with its head bent outward and downward from you. Look through the open door and see the holes on the inside of the top; run your needle through one of these holes and across the top on the outside, bringing it down through the other hole into the clock. Slip the needle off the thread and mould another piece of beeswax on the free end of the thread, make it the same size and shape as the first weight, cover this also with tinfoil and you will have clock-weights (Fig. 273) for winding up the old-fashioned timepiece. Gently pull down one weight and the other will go up, just as your colonial forefathers wound their clocks. When the weight is pulled down in the real clock it winds up the machinery, and the clock continues its tick, tack, tick, like the ancient timepiece Longfellow tells us of, stationed in the hall of the old-fashioned country-seat.
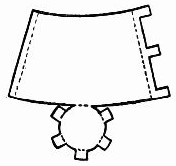
Fig. 274.—Pattern of the churn.
Fig. 277.—Handle of the dasher.
Do you like real country buttermilk, and have you ever helped churn? If you live in the city or for some other reason are not able to make the butter, you can still enjoy manufacturing a little
Colonial Churn
that will look capable of producing the best sweet country butter (Fig. 275).
Fig. 276—Cork lid to the churn.

Fig. 278.—Dasher.
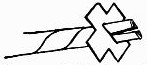
Fig. 279.—Push the end of the handle through the dasher.

Fig. 280.—Cut end of handle pasted on the dasher.
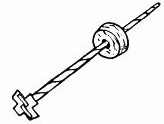
Fig. 281.—Put the handle of the dasher through the lid.
Cut Fig. 274 of heavy paper or light-weight cardboard; mark three bands on it (Fig. 275). Make your churn much larger than pattern, have it deep enough to stand as high as Fig. 275. Glue the sides together along the dotted lines, turn up the circular bottom and glue the extensions up around the bottom of the churn. Fit a cork in the top for the churn-lid and make a hole through the centre of the cork for the handle of the dasher (Fig. 276). Make the handle by rolling up a strip of paper as you would roll a paper lighter. Glue the loose top end of the handle on its roll; then cut the large end of the handle up a short distance through its centre (Fig. 277). Cut the dasher (Fig. 278) from cardboard, slide it over the divided end of handle (Fig. 279), bend the two halves of the handle-end in opposite directions, and glue them on the dasher as shown in Fig. 280. Slip the handle of dasher through the cork lid (Fig. 281), and fit the lid in the churn (Fig. 275). Paint the churn and handle of dasher a light-yellow-brown wood color, the bands black, and when dry you can work the dasher up and down the same as if the churn were a real one. Stand the churn in your kitchen not far from the fire so that little Thankful may attend to the cooking while she is churning.
CHAPTER XIV
LITTLE PAPER HOUSES OF JAPAN
FRAGILE, quaint and full of sunshine and color are the typical houses of Japan. They are so simple in construction a child might almost build them, generally only one story in height and always without a cellar, chimneys, fireplaces, windows, and even without a door. Yet the dainty abodes are flooded with light and fresh air. How is it managed? Simply by sliding the entire front of the house to one side, leaving the building wide open. Often the back walls, too, are opened, and in some houses the sides also. These cottages are usually part wood and part paper. It seems strange to think of people actually living in paper dwellings, but the Japanese understand how to manufacture strong, durable paper. They delight in making all sorts of paper, from the tough, well-nigh indestructible kind to the delicate, filmy variety, and it is adapted to innumerable uses. In Japan people not only build paper walls, but the very poor wear paper clothing.
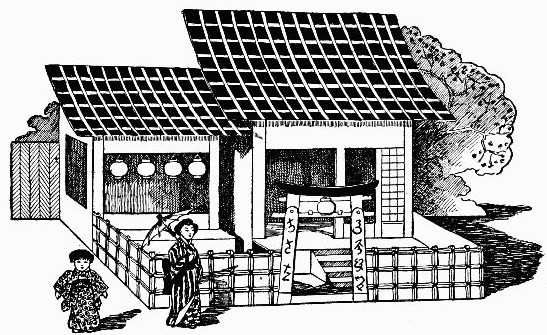
Fig. 282.—The little paper house.
We will make our
Japanese House
entirely of paper (Fig. 282). Take medium-weight water-color paper, or any kind that is stiff enough and not too brittle, cut a piece sixteen inches long and seventeen inches wide and on it mark the plan of the large room (Fig. 283). This should measure sixteen inches across the back from A to A, seventeen inches along the side from A to B, and thirteen inches across the front from B to C. The back division forms the foliage and the back of the room, the centre division the roof, and the front division the front and sides of the room.
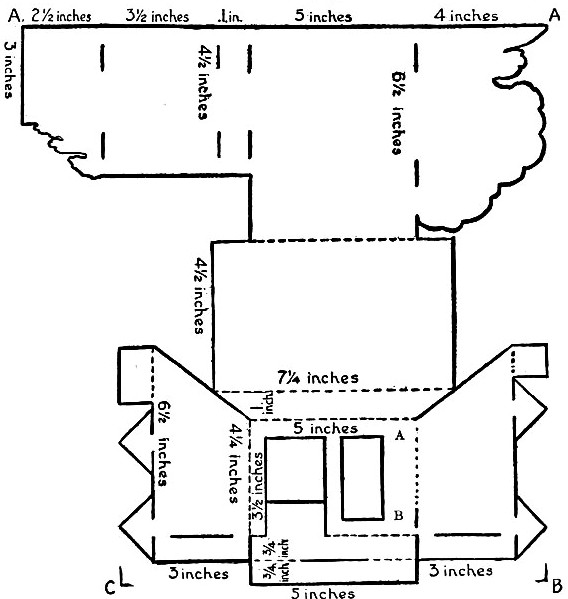
Fig. 283.—Plan of large room.
No paste is used in making the building; the design is merely cut out, bent into shape, and fastened together with projecting tongues run through slits. Cut all the heavy lines, lightly score, then bend all the dotted lines, except the two immediately across the front of the room at top and bottom. This front is five inches wide and four and a half inches high, with two openings in it and a portion extending down in front to form the little porch. Make a pinhole at each end of the two lines forming top and bottom of the front of the room A and B, then turn the paper over and draw a top line and a bottom line across on the wrong side of the paper from pin-point to pin-point. Score these on the wrong side of the paper, for they must bend from that side in order to extend inward from the right side to form the projection of the roof and the top landing of the veranda. Fasten the room together, then cut out the floor (Fig. 284), slide it in place and also the steps (Fig. 285), marking straight lines across the diagram to indicate steps.
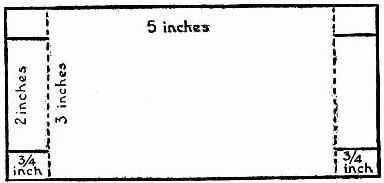
Fig. 284.—Floor of large room.
Build the small room (Fig. 286) in the same way that you made the large one. Cut it from a piece of paper nine and one-half inches wide and thirteen and one-half inches long. This room has no floor. When finished run the tongues extending out on the back of the room through the remaining four slits at the side of the foliage on the back of the large room (Fig. 283). Work carefully and you will be fully repaid.
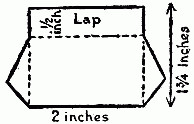
Fig. 285.—The steps.
Paint the roof of each room in little black squares with white markings between to represent black tiling. Paint the outside of the house yellow, the back wall of the large room pale blue, the floor light brown. Paint the back of the small room mottled green and pink. Make a band of light blue edged with black across the outside top of the front opening and a red band across the bottom. Let the projecting veranda be yellow, with vines across the lower part. Edge the openings of the large room with two narrow bands, one purple the other black, and mark black lines from side to side crossed with lines running from top to bottom to form a lattice-like work on the side of the smaller opening (Fig. 282).
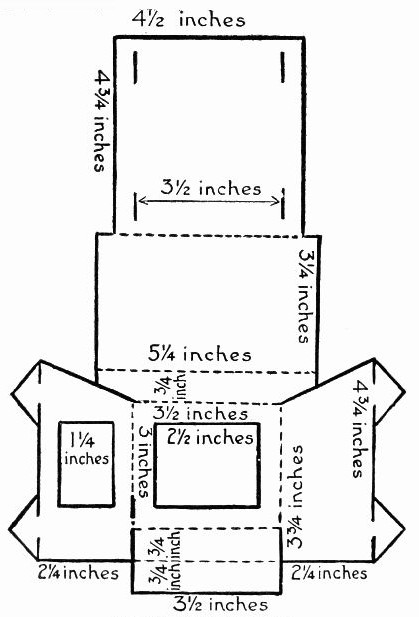
Fig. 286.—Plan of small room.
The sides of the house are supposed to be formed of paper-covered screens which slide in grooves and may be removed entirely when desired. The interior of a real Japanese house is divided into rooms merely by the use of sliding paper screens, and the entire floor may readily be thrown into one large apartment, there being no solid partitions as in our houses. Cut out flat round paper lanterns, paint them with the gayest of colors and make the small top and bottom bands black; then with needle and thread fasten the lanterns along the top front of the large opening of the small room (Fig. 282).
You need not be concerned in the least about furnishing the little house: it does not need any furniture, for the Japanese have no stoves, chairs, tables, knives or forks, carpets, bedsteads, washstands, bookcases, desks, framed pictures, nor any comforts like ours.
The Floors
are covered with clean, thick, soft matting rugs and are just the place for girls and boys to play, and have a good time running about in their stocking feet, for in Japan people always take off their shoes before entering a house and everyone goes either stocking-footed or barefooted when indoors, so the floor-mats are kept free from dust.
Of course, men, women, and children all sit on the floor; and when
Breakfast is Ready
the floor is set instead of a table, and each person receives his own little lacquer tray placed on the floor, or on a low wooden stool, with the individual portion of rice in a delicate china bowl, pale tea in dainty teacups and shredded or diced raw fish in china a queen might envy. On the tray are also a pair of ivory chopsticks, which even a little child can manage skilfully, in place of the spoon, knife, or fork that our girls or boys would use. The Japanese do not have bread, butter, milk, or coffee, and never any meat, but they cultivate a mammoth radish which is cut up, pickled and eaten with relish. For dinner they take pale tea, rice, and fish, and for supper fish, pale tea, and rice. Often the fish is cooked, sweetmeats are served and pickled radish also, but frequently the breakfast consists of merely a bowl of cold rice. These unique people do not seem to think or care much about their food; many times they deny themselves a meal that they may spend the money on a feast of flowers in some garden where they can enjoy gazing upon masses of exquisite cherry blossoms, chrysanthemums, or other flowers. No nation in the world loves flowers more than the Japanese, and none can rival them in the beautiful arrangement of their blossoms.
When night comes the natives
Never Go to Bed,
for there are no beds. Soft silk or cotton comforts are brought to each person, and the people roll themselves up in the comforts and sleep any place they wish on the floor, using little wooden or lacquer benches for pillows; usually these have a roll of soft paper on the top, making them a little more comfortable. Take a comfort and try sleeping on the floor with some books under your head and you will know how it feels to sleep in Japanese style.
Every Japanese house should have its
Fenced-in Garden.
Make your fence of paper cut according to Fig. 287, and mark the pattern (Fig. 288) on it with two tones of yellow paint. Paint the convex top of the gate-way a bright red with narrow black border, and mark the white gate-posts with black Japanese lettering like Fig. 289. Paint the remaining portions of the gate-way yellow, the edges black. Fig. 282 will help you to grasp the idea of the fence and gate-way. The names of the streets are not on the corners as in our cities, so a panel of white wood is nailed to the gate-posts with both the name of the street and householder on it, and often a charm sign is added.
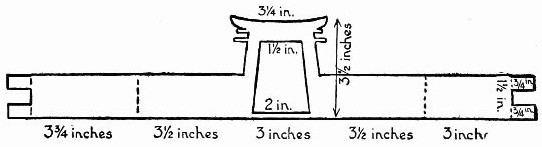
Fig. 287.—Fence and gate-way.
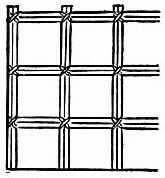
Fig. 288.—Draw this pattern on the fence.
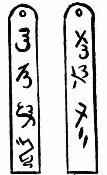
Fig. 289.—Signs for gate-posts.
Put up the fence by slipping the upper tongues on each end through the slit on the outside front edge of each room, then sliding the lower tongues of the fence through the lower outside edges of rooms and porches (Fig. 282).
Both boys and girls have fine times in Japan, and they are as happy as the day is long. On the fifth day of the fifth month the boys reign supreme, and their relatives and friends vie with each other in their endeavors to render the day a happy one for the little fellows. All Japan is alive and anxious to celebrate the occasion. Quaint flags in the shape of enormous fish swim in the air and float over the towns, forming bright masses of color. Every home that is blessed with one or more boys displays a fish banner for each son, the younger the child the larger the fish, and the proudest house is the one that can boast of the greatest number of fish flying from its bamboo pole. Every Japanese boy's birthday is celebrated on this day with great rejoicing, no matter at what time of the year he was born.
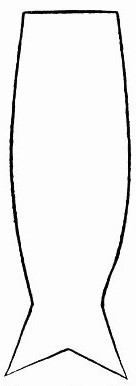
Fig. 290.—Upper half of koi.
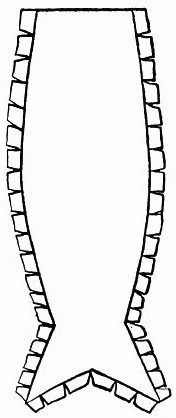
Fig. 291.—Under half of koi.
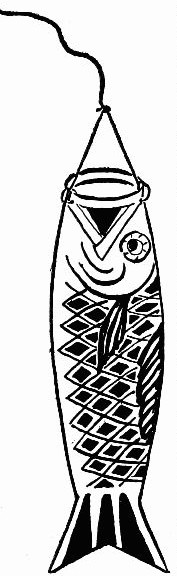
Fig. 292.—The koi—emblem of undaunted determination.
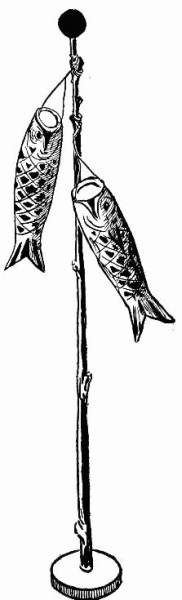
Fig. 293.—Boy's birthday pole.
Make
Several Fish
for the pole to be placed in front of the little paper house; they look very comical, bobbing and swinging high in air with their wide-open mouths. Cut Fig. 290 of white tissue-paper, also Fig. 291, which is a trifle larger than the first and is slashed along three edges. Lay Fig. 290 on top of Fig. 291; bend the flaps over and paste them on Fig. 290. Form a little hoop of a strip of stiff paper with the ends pasted together; blow the fish open, then paste the hoop on the inside of the open edge of the head to form its immense mouth. When dry mark the fish with red paint like Fig. 292. Tie a thread on the two opposite sides of the mouth and with another thread attach the loop to a slender stick on the end of which you have fastened a gold disk made of two pieces of gilt paper. This is intended to represent the rice ball with which the real fish are fed. The fish banners are hollow so that the wind may fill them, causing the fish to rise and fall as the breeze comes and goes. Push the end of your fish-pole through the centre of a small box-lid or button mould (Fig. 293) and stand the decoration outside the gate-way of the little house. The fish used on this eventful day are the famous carp, which the natives call koi, the unconquerable. The Japanese carp stands for good cheer, indomitable will, perseverance and fortitude, and it is used to impress these virtues upon the boys, but all the good qualities named are fully as necessary for girls even though the Japanese do not mention the fact, but girls are not forgotten. The nation gives them the third day of the third month for their festival. It is called the
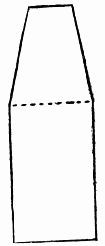
Fig. 294. Pattern of kago.
"Feast of Dolls,"
and is a gala day for little girls. Dolls and gorgeously dressed images, representing the Mikado, nobles, and ladies, are brought out and placed on exhibition, along with beautiful jars containing queer little trees and rare vases filled with flowers. The day is made a joyous one and a day long to be remembered by the little girls.
There are no sidewalks in Japan, the pavements being laid lengthwise through the centre of the streets, and on this path people stroll or hurry along. Mingled with the others are the Japanese laboring men, called coolies, carrying between them
The Kago,
which swings from a pole the ends of which rest on the men's shoulders. The kago is a sort of canopied hammock chair. You can easily fashion a tiny one from paper and straw. Cut Fig. 294 of stiff paper, make it three inches long and at the broadest part an inch and a quarter wide. Paint the kago yellow, and to form the framework sew on each end a piece of heavy broom straw, jointed grass, or straw which has been limbered by soaking, and cut a piece six and three-quarter inches long for each side. Bring the side straws together beyond each end and bind them (Fig. 295). Then hunt up a slender round stick six inches long and sew the kago on it by means of thread loops at each end (Fig. 296). Make the canopy of a piece of stiff paper three and one-half inches long and two and one-quarter inches wide, paint it yellow, and with stitches only at each end sew it firmly on the pole over the seat of the kago (Fig. 297).

Fig. 295.—Bind the edges of the kago with grass or straw like this to make the frame.
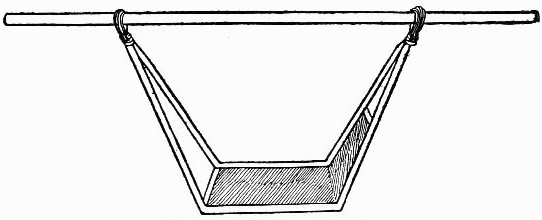
Fig. 296.—Tie the kago to the pole.
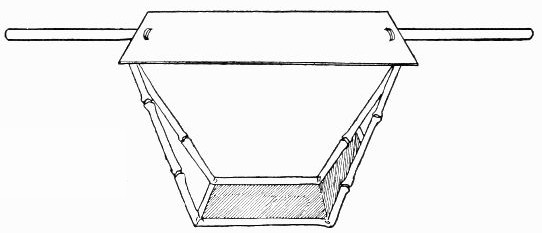
Fig. 297.—Sew the top on over the pole.
Either buy a little
Japanese Umbrella
or make one of a disk of green tissue-paper folded and crimped from centre to edge. Use a heavy broom straw for the handle and lighter ones for the ribs; stick them in, gluing them only to the centre, which is now the top of the umbrella; wind the top of the umbrella, the ribs, and the handle firmly together with black thread. The umbrella will not open but looks well closed. Place a tied bundle of red tissue-paper and the green umbrella on top of the yellow kago and fasten them securely in place with black thread (Fig. 298). Fold a piece of soft, lavender-colored material on the seat of the kago as a comfort for the doll to sit on; then fit in a little Japanese doll or any kind of doll dressed and painted to resemble a little Jap. The doll's head should reach up, or almost up, to the canopy. Pull part of the comfort over the doll and fasten her snugly up in a sitting position. Make a gay paper fan and attach it to one of the doll's hands, and the little lady will be ready to go on her journey.
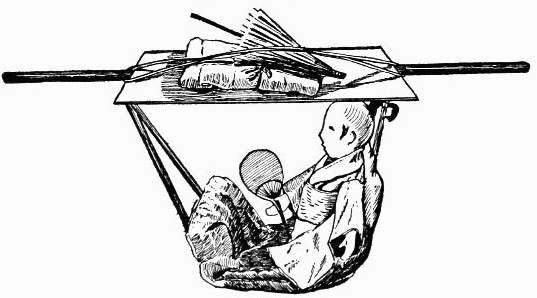
Fig. 298.—The little lady rides in her kago.
CHAPTER XV
SOME ODD THINGS IN RUSSIA
IN his own country the Czar is almost worshipped by the people, and when his coronation takes place, crowds of loyal Russians flock to Moscow, the former in hopes of obtaining a glimpse of their beloved ruler, or at least of seeing portions of the grand procession, the beautiful decorations and the gay festivities which always form part of the jubilant occasion.
For centuries the great white Czars have been crowned in the
Cathedral of the Assumption,
which, though not large, is magnificent, and is the most important building in all Russia. The structure stands, surrounded by many other sacred edifices, in an enclosure known as the Kremlin, situated in the centre of the city of Moscow. Its white walls support a vaulted roof of soft, dull green crowned with golden cupolas, each cupola surmounted by a shining golden cross. The interior is resplendent almost beyond description with its rich coloring, its jewel-framed paintings, its sculptures, its gold, silver, and precious stones, its priceless robes and holy relics.
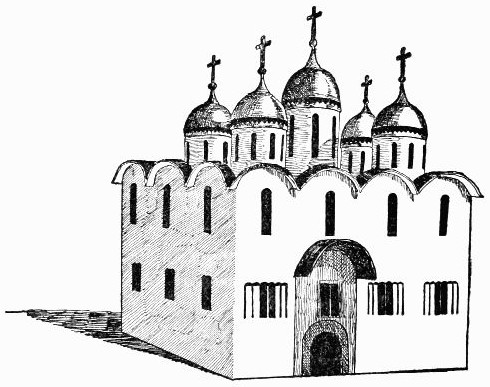
Fig. 299.—Miniature Cathedral of the Assumption.
To give a true conception of the wonderful interior of the sacred cathedral to one who has never seen it, is impossible, but we can gain an idea of the general appearance of the exterior by making a miniature Cathedral of the Assumption (Fig. 299). Find, or make, a firm white pasteboard box seven inches long, five and one-quarter inches wide, and four and one-half inches high; this is for the body of the building. Fold a strip of paper seven inches in length, crosswise, through the centre, and bring the ends together, making another fold crosswise through the centre of the doubled strip, which will give four layers of paper of equal length. Cut this into a scallop three-quarters of an inch deep, open out the strip and you will have four scallops, each one and three-quarters inch wide, at its base. Lay the strip in turn along each of the top edges of the sides of the box, and mark the box around the edges of the scallops, drawing four scallops on the two long sides of the box, and three on each of the short sides. Cut out the scallops on top of the box; then take the cover of the box, which must form the roof of the structure, and remove the bent-down sides; trim off with scissors the extreme edge of one long side and one short side, until the cover forms a tight fit in the top of the box, but may, with gentle pressure, be made to slide down one inch. Fasten the roof in place at each corner by running a strong pin from the outside wall through into the roof, until the pin is embedded its full length in the roof.
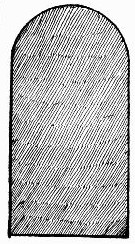
Fig. 300.—The Door-way.
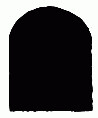
Fig. 301. The door.
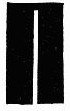
Fig. 302.—Door window.
Fig. 303.—Upper window.
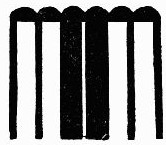
Fig. 304.—Lower front windows.
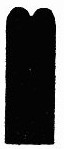
Fig. 305.—Lower side windows
Now cut the
Door-way
(Fig. 300) of light reddish-brown paper; make it three inches high and one and one-half inch wide. Let the door proper (Fig. 301) be of inked paper an inch and a half high by an inch and a quarter wide, the door-window (Fig. 302) one inch and a quarter high by three-quarters of an inch wide. Cut the upper row of windows like Fig. 303 and the lower front windows according to Fig. 304. Make the lower side windows double (Fig. 305). The door-arch (Fig. 306) must be a trifle over two and one-quarter inches long. Curve the arch by drawing it across a blade of the scissors, paint it green on both sides, bend down the slashed portion, and paste the arch over the door-way, as in Fig. 299.
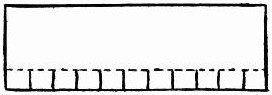
Fig. 306.—The door-arch.
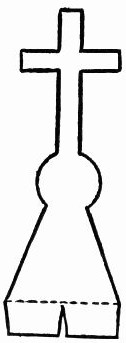
Fig. 307.—The paper cross.
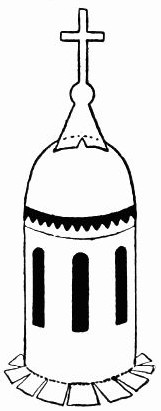
Fig. 308.—A cross on the top of each cupola.
Make five
Cupolas
of white writing-paper. For each cupola, cut a piece of paper five inches long. Let the first be three inches wide and the remaining four two and one-quarter inches wide; slash up the bottom edge of each cupola one-quarter of an inch; then half an inch below the top edge of each cupola paste a row of narrow, three-quarter-inch high windows cut from inked paper (Fig. 303). When the windows are on, paste the two ends of each cupola together, lapping them one-quarter of an inch. Bend out the lower slashed edge and glue the highest cupola on top of the centre of the roof; fasten the other four on the roof near the corners and at equal distances from the centre (Fig. 299). Have ready five half egg-shells and glue one on the top of each cupola. Then cut five paper crosses (Fig. 307), each measuring about two inches in height, including the lower slashed portion. Fasten a cross on top of each egg-shell (Fig. 308). Gild all the crosses and shells, bringing the gilt down into a narrow band on the paper below the shells. On the edge of each shell paste a narrow black-painted paper strip (Fig. 309), adjusting it so that the gilt on the white paper will show below the points.
Fig. 309.—A narrow black strip.
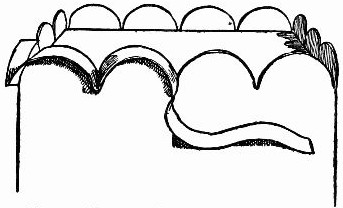
Fig. 310.—Fasten a strip of paper along the edge.
To Make the Roof
fasten a five-eighths-inch wide strip of paper along and over the scalloped top edge of the four sides of the building, using strong paste or glue for the purpose (Fig. 310); be sure that the strip is on even and firm; then let it dry. Paint the entire flat roof and flat top surface of the scallops green, using the same paint selected for the door-arch. Oil paint is best. Be careful not to spatter green on the white and gold cupolas.
When finished, place your little cathedral up high on a level with your eyes, turn it until you have the view which is given in Fig. 299, and you can very easily imagine just how the real Cathedral of the Assumption appears.
Thousands of girls, boys, and grown-up men and women in freezing, snowy Russia,
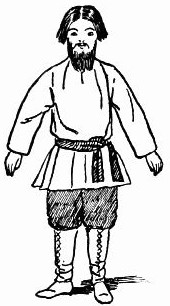
Fig. 311.—Dress a doll like a Russian.
Sleep On Their Stoves
every night during the long winter months. How strange it would seem to be away up on top of a great warm stove, built of brick and nearly as high as the ceiling! The Russians do not bother about making the bed, or rather the stove, for they have no sheets, blankets, or bedspreads. When it is time to retire, the inmates climb up on top of the great whitewashed stove and sleep just as they are, in the clothing they wear during the day.
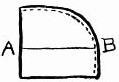
Fig. 312.—Half of cap.
If you would know how the average Russian looks,
Dress a Doll Like a Russian
(Fig. 311). Cut two halves of a muslin cap (Fig. 312) and sew them together (Fig. 313). Sew in strands of tan-colored darning cotton on a line around the cap, midway from top and bottom (A-B, Fig. 312), and also sew a line of tan-colored strands on each side of the middle stitching of the white cap, until the lower fringe is reached. Fig. 314 shows the fringe of hair partially sewed on the cap. Glue this cap on the doll's head, smooth down the hair and cut it off straight around, making the hair a trifle shorter at the back than the front.
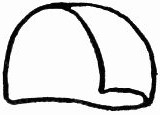
Fig. 313.—The cap.
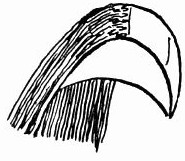
Fig. 314.—The fringe of hair partially sewed on.
Cut another piece of cloth (Fig. 315), and sew in a fringe of the tan-colored cotton (Fig. 316); glue this on the doll to form the beard, and trim off the edges. Paint the moustache on the face, making it the color of the hair. Russians, as a rule, are blonds, having either red or lighter-colored hair.
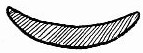
Fig. 315.—Another piece of cloth.
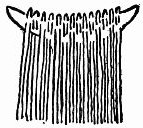
Fig. 316.—The beard.
Make the trousers loose and bind them to the doll below the knees. The Russian leather boots which the natives wear always reach up over the trousers, and you can make such boots by painting the doll's feet black and sewing straight pieces of black material on the doll for boot-legs, allowing the cloth to be long enough to wrinkle around the ankle.
Try to make the boots appear as if laced up the front, for many wear them so in Russia. The blouse should be loose and belted in at the waist, hanging straight and square around the bottom. In case your doll has real hair, omit the wig and cut the real hair in Russian style.
These people never use their immense stove for heating a teakettle, though they drink tea upon all occasions. To make tea they resort to a samovar, which is a curious brass or copper vessel, shaped something like an urn. When the tea is ready, it is poured into tall glasses, a slice of lemon is put in each glass, and the tea drunk scalding hot. The beverage is called chai, and the Russians enjoy it so much that they often take twenty glasses in succession. When one desires sugar, it is not put in the tea, but held in one hand, and a portion bitten off from time to time between the swallows of tea.
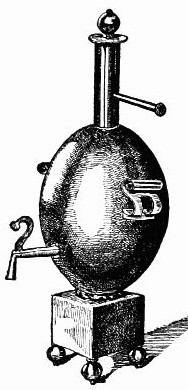
Fig. 317.—A little Russian samovar.
If you will empty an egg-shell of its contents and get a sheet of white writing-paper, a small square box, a piece of yellow sealing-wax, some liquid gilt, and five gilt beads, four about the size of large peas, and the fifth a trifle larger, we can manufacture
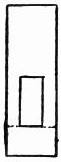
Fig. 318. The handle.
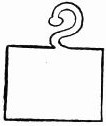
Fig. 319.—The faucet.
A Little Russian Samovar
like Fig. 317. Should you have no box, make one of pasteboard one inch square and half an inch high; if you cannot get the beads, use small, round buttons. The four beads or buttons are feet for the samovar. Fasten one on each corner of the bottom of the box with sealing-wax, then glue the broken centre of the large end of the egg-shell on the middle of the top of the box. Cut the handles from paper according to Fig. 318, making each handle one inch and a half long and half an inch wide. Run the half of one handle over the edge of a blade of the scissors; this will cause the paper to curl. Turn the handle over and curl the other half in the opposite direction; bend the handle at the dotted line, one-quarter of an inch from the lower edge, and paste it on one side of the samovar, midway between top and bottom. Make the other handle in the same way, and fasten it on the opposite side.
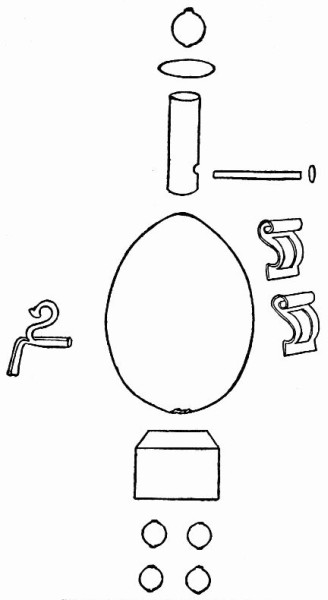
Fig. 320.—The different parts of the samovar.
Cut the faucet (Fig. 319) of paper one inch wide; roll the paper up from the bottom, bringing the handle on top;[183] [184] bend the handle straight up, and bend the spout down in front of the handle. Glue the other end of the faucet to the front of the samovar with sealing-wax, placing it near the bottom, half-way between the two handles.
Make the top chimney of a roll of paper a generous inch in width. Paste the loose edge of the paper down on the roll, and pierce a hole in the roll one-quarter inch from the bottom, making it large enough to admit the end of a match. Glue a burned match in this hole, allowing the main part to extend out one-quarter of an inch from the chimney. Fasten a small, round, flat button on the end, and attach a round paper disk three-quarters of an inch in diameter to the top of the chimney, crowning the disk with the large bead.
Fig. 320 gives all the different parts of the samovar and shows as nearly as possible how they should be put together. When the samovar is finished, gild it all over, and you will have a unique little creation that would delight the heart of a Russian.
CHAPTER XVI
POTTERY WITHOUT A POTTER'S WHEEL
ALMOST every girl at one time in her life has loved dearly to make mud-pies, and it is not strange, for her mother, grandmother, and many, many times great-great-grandmother before her delighted in making mud-pies. The last, the primitive women of our race, made them to some purpose, for they were the inventors of pottery. The home-making, house-keeping instinct was strong even in these women, who had no houses to keep, and they did their best with the material at hand.
First they wove rude baskets for holding and carrying food; then they learned that cooked food was better than uncooked and could be preserved much longer, so they made baskets of a closer weave and cooked in them by means of water heated by hot stones; finally, they tried cooking over the fire in shallow baskets lined with clay. The clay came out of the basket baked and hard, and behold, they had a new kind of vessel—fire-proof and water-proof.
We may imagine with what joy they welcomed this addition to their meagre store of home-making utensils and with what patient industry they strove to improve upon this discovery.
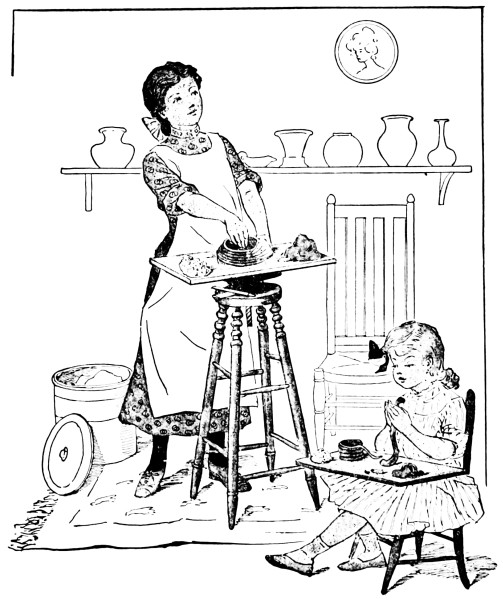
Making coiled pottery
They used their baskets as moulds to hold the soft clay, and they fashioned the clay without moulds into shapes suggested by natural objects. The sea-shells furnished inspiration and many vessels were made in their beautiful forms.
The first potter was a woman, even as the first basket-maker was a woman, and, coming down to our own times, the important discovery of the production of exquisite colors and blending of colors in the Rookwood pottery was made by a woman.
Discovered, developed, and still, in many cases, carried on by women, surely pottery is a woman's art, and as a girl inheriting the old instincts, you may find it the simplest and most natural means of expressing your individuality and love of the beautiful. Beginning as these gentle savages began, using their primitive method, you may be inspired to study deeper into the art, and perhaps become the discoverer of some new process that will give to the world a still more beautiful pottery.
Even the smallest girls may do something in
Coiled Pottery,
for it is very simple and easy at first, growing more difficult only as one grows ambitious to attempt more intricate forms.
The Clay
ready for use you will find at any pottery. If it is dry break into small pieces, put it in a large stone jar, and cover with cold water; let it stand until thoroughly soaked through and then stir with a stick until well mixed, and work with your hands—squeezing and kneading until free from lumps and perfectly smooth. When it is dry enough not to be muddy, and is of the consistency of dough, it is in good working condition.
Keep the clay always in the jar and closely covered that it may not again become too dry.
Besides the clay you will need a table to work on, a pastry-board, a thin block of wood about twelve inches square, a wet sponge for cleaning and moistening your fingers, and several simple tools.
The Table.
If you stand at your work, a tall office stool with rotating seat will be just the thing you want, for by turning the seat this way and that you may look at your work from all sides without disturbing its position. Any kind of ordinary table will answer the purpose, however. On top of the table or stool place your pastry-board, and at the right-hand side the sponge, which must be kept quite damp.
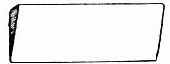
Fig. 321.—A short, flat stick.
Fig. 322.—The tools. Piece of round stick sharpened at each end.
You will want but
Few Tools
as most of the work is done by the fingers alone. A short, flat stick, sharpened on one side like the blade of a knife (Fig. 321), an old penknife, a piece of round stick sharpened at each end like Fig. 322, and some emery-paper are all you will need at first.
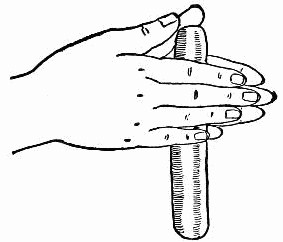
Fig. 323.—Turn it lightly between your hands.
On the pastry-board place a large lump of clay, then take a handful of the clay and begin to make
The Roll
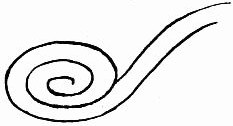
Fig. 324.—Begin to coil the clay.
by turning it lightly between your hands (Fig. 323). When the clay lengthens out lay it on the board, and roll under your hands, as perhaps you have done when making dough snakes. Keep your clay snake of an even size its entire length, be careful not to flatten any part, and continue to roll it with a light touch until it is about the thickness of your little finger. Place your square block on the stand before you, and in the centre begin
To Coil the Clay
(Fig. 324). When you have made a disk about two and one-half inches in diameter, lift the roll and build up the sides, coiling slowly round and round, pinching it slightly as you go, with the last row always resting on the one just beneath (Fig. 325).
Unless you have made a very long roll, which is not easy to handle at first, you will soon have to stop coiling for lack of material. Do not use all of the first roll, but allow the end to rest on the table, where it can be joined to the new roll you are to make. Pinch the end of the new roll to that of the old and round the joint between your hands.
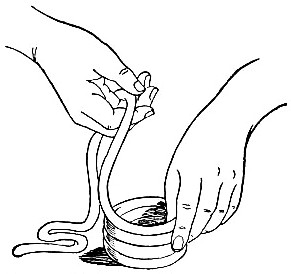
Fig. 325.—Lift the roll and build up the sides.
Continue coiling until you have made a cup-shaped vessel three inches high, then break off the roll and flatten the end to meet the surface of the brim. Moisten your fingers on the sponge, and smooth the inside of the cup, holding the walls in place with your left hand curved around the outside (Fig. 326). Do not press too hard with either hand, but slide your fingers gently round and round over the inner surface. When the coils on the inside have become well flattened mix a little clay and water into a paste, and spread it on, filling any cracks that may still be left between the coils, constantly smoothing all the time.
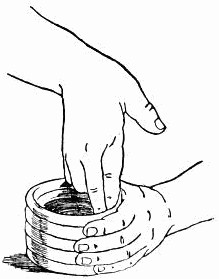
Fig. 326.—Smooth the inside of the cup.
You will find that this process has, at first, the effect of broadening the base and lowering the sides of the cup, and until you have quite mastered the method you must allow for the broadening and flattening of your work. Your cup, with a base of two and one-half inches and sides three inches in height, will now probably be a saucer measuring about four inches across the bottom, and not more than one inch and a half in height. It matters little, though, at this stage what shapes you turn out. Do your best with each piece, and if the work flattens turn it into a pretty dish by pinching the edge to form a little lip, and adding a handle like Fig. 327.
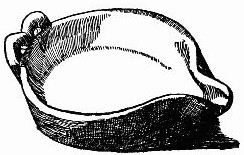
Fig. 327.—Turn it into a pretty dish.
As you are working without a wheel the symmetry of your pottery must depend entirely upon your eye and hand, therefore keep turning the block upon which it stands that no irregularity may be overlooked.
When you add ornaments or handles see that the roll of clay from which you make them adheres closely to the vessel. Add soft clay to the joints and smooth until the whole seems to be of one piece.
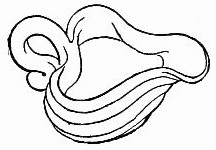
Fig. 328.—The outside corrugated by the coil.
In your first attempts leave the outside of the pottery corrugated by the coils (Fig. 328); later work you may smooth, making a surface equal to that turned on a wheel. Do not try to finish a piece in one day; it is much better to allow it to harden a little and become set, then make it as smooth as you can with your tools, levelling the edges and taking away extra thicknesses. If this cannot be done at one time, set the work away once more covered with a damp cloth and it will keep in good working condition for any length of time, but remember, the cloth must be kept damp, otherwise the clay will harden.
When you have perfected your piece of pottery to your satisfaction put it away to dry, not in the sun. Several days later, after it has become quite hard, go over the surface again with knife and emery-paper, scraping and rubbing down until it is entirely smooth and free from flaws. The work will then be ready to take to the potter for firing.
The color of clay changes in firing, and your little piece of pottery will probably come back to you almost the color of old ivory. One cannot be very positive about the color, however, for clays vary, and perhaps yours may be of a kind that will fire another color. The potter will glaze your work for you if you wish, or leave it in the bisque. Nothing has been said about what
Shapes to Make the Pottery,
for that will depend much upon your own taste and ability. Rather low, flat, dish shapes are most easily handled and variations in the cup or flower-pot shape. After these may come the jars and vases. Set a well-shaped piece of pottery before you as a model to copy, until you have ideas of your own to carry out, and learn to handle your clay before attempting too ambitious a subject.
CHAPTER XVII
BABY ALLIGATORS AND OTHER THINGS OF CLAY
THE first chance you have go to Florida; you will be charmed with all you see. Go where the sky is bluest, where winter is changed to summer, where the wild mocking-bird, the Kentucky cardinal, the scarlet tanager, the blue jay and a host of other birds are on most friendly terms with girls and boys. Go where the wild squirrels live unmolested in the beautiful great live-oaks, whose branches are hung with long, soft gray moss which swings and sways with the slightest breeze. There you will find the home of many baby alligators, queer little things whose eyes are provided with three eyelids; one is transparent and slides across sidewise like a window-glass to keep the water out of the eyes when the little fellows want to see what is going on beneath the surface. A number of baby alligators in a dry, sunny spot, will delight in piling upon each other four and five deep. The young owner of twenty of these pets declares that on such occasions all the alligators sleep except one who, wide-awake, acts as sentinel. At the approach of anyone he will swing his long tail over all his companions to awaken them and warn them of the danger that may be near. Fig. 329 was modelled from a baby alligator who conducted himself in a most dignified and exemplary manner when placed flat down on a shingle lying on a table; but first he had to be held in position for a moment in order to recover from the excitement caused by being taken from his out-of-door home and brought into strange quarters.

Fig. 329.—Alligator modelled from life.
It is not difficult to model a
Baby Alligator of Clay.
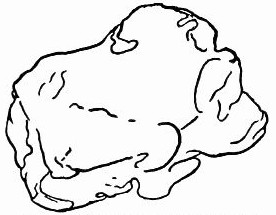
Fig. 330.—Clay for modelling alligator.
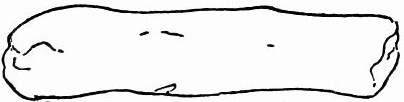
Fig. 331.—Clay rolled between the hands.
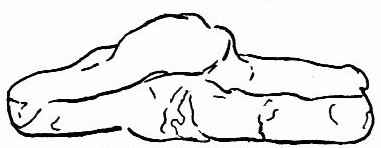
Fig. 332.—Beginning the head.
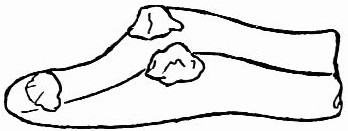
Fig. 333.—Extra pieces on for eyes and nose.
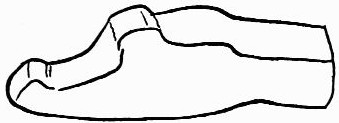
Fig. 334.—Head almost in shape.
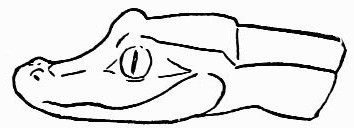
Fig. 335.—Head finished.
All you need for the work is a lump of soft clay, a hat-pin, your fingers, and determination to succeed. Take a piece of clay (Fig. 330) and roll it between your hands until it resembles Fig. 331. Push the two ends together, causing the roll to hump up slightly near the centre, lay it down on a board or any hard, flat surface, and with the fingers carefully pat, squeeze, and push it into the form of Fig. 332. Gently smooth out all roughness; then nip off little pieces of clay from the big lump for the nose and two eyes; stick them on as in Fig. 333. Again smooth the rough edges until the clay looks like Fig. 334. With a little careful modelling you can make the head exactly like Fig. 335. Mark the eyes, mouth, and nose with the flat point of the pin. If portions of the head become too thick, take off some of the clay, and if at any time the head is worked down too thin fill in the hollow spots with clay. In modelling one can always pinch off pieces here and there when necessary; or add little bits, smooth it all down, and the places altered will never show the marks of the change.
When the head is finished cover it with a wet cloth to keep the clay moist, and begin to make
The Body.
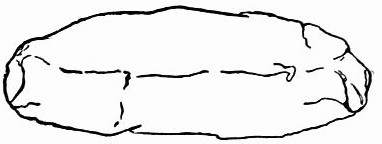
Fig. 336.—Clay for body of alligator.
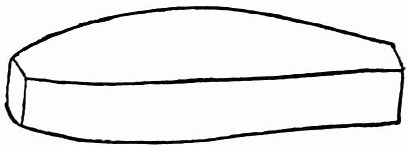
Fig. 337.—Body of alligator.
Mould another piece of clay like Fig. 336. Run the ball of your thumb along the sides, making the body the form of Fig. 337, broader and thicker through the centre than at the two ends. For the tail pull from the large lump a smaller amount of clay, roll it and model it like Fig. 338, larger at one end than at the other. The last portion (Fig. 339), like the others, is flat on the bottom, and with the exception of a small triangle at the heavy end of the tail the two sides meet at the top, forming a sharp ridge which decreases in height as it tapers down to a point at the extreme end. As each part is finished keep it moist with a wet cloth, and when the four sections are made place them in a row (Fig. 340), then join them together, rounding all the edges slightly. Fig. 341 shows how to mark the back of the alligator.
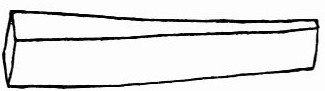
Fig. 338.—Section of tail.